Finding images for a research poster and ensuring they'll look their best when printed can be a tricky process. It's often hard to tell how an image will look when printed by looking at it on a screen. For example, you might find an image through Google Images, or a colleague might give you an image to use in a poster, and those images may look fine on a screen. Once added to a poster and printed, however, the images look blurry or pixelated. What happened? Why did the pictures come out looking so bad when they looked so good on a screen?
Understanding image resolution
The reason that images you find online might not look great in a printed poster has to do with an image's resolution. Resolution refers to the amount of spots of color per linear inch of surface, and the abbreviations dpi (dots per inch, for printing) or ppi (pixels per inch, for screens) are typically used to refer to an image's resolution. A digital image is made up of a set amount of pixels, and those pixels are translated to dots of of color when printed. The image's resolution controls how many of those dots of color are printed per linear inch of paper. The higher an image’s resolution, the more dots of color will be printed in a linear inch of paper – and the more dots of color per linear inch, the harder it will be for our eyes to pick out those individual spots of color, resulting in better looking images.
Images created for print have a high resolution, typically between 150 and 300 dpi, if not higher – for an image with a 300 dpi resolution, that means 300 dots of color are printed on a linear inch of paper. Images for the web, however, are typically created and saved at a lower resolution since the majority of screens have a resolution of between 72 and 96 ppi. This results in a smaller file size, which means the images load faster. However, a lower resolution also results in a lower quality image, as there are fewer spots of color printed in a linear inch of paper.
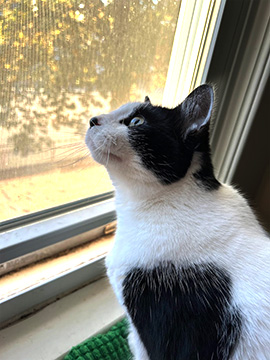
If you download an image from the web and include it in a poster without checking its resolution first, there's a good chance the image will be too small and need to be enlarged to be properly seen on a poster. Let's take a look at an example of a typical image we might find somewhere on the web, a medium-sized photo of a cat.

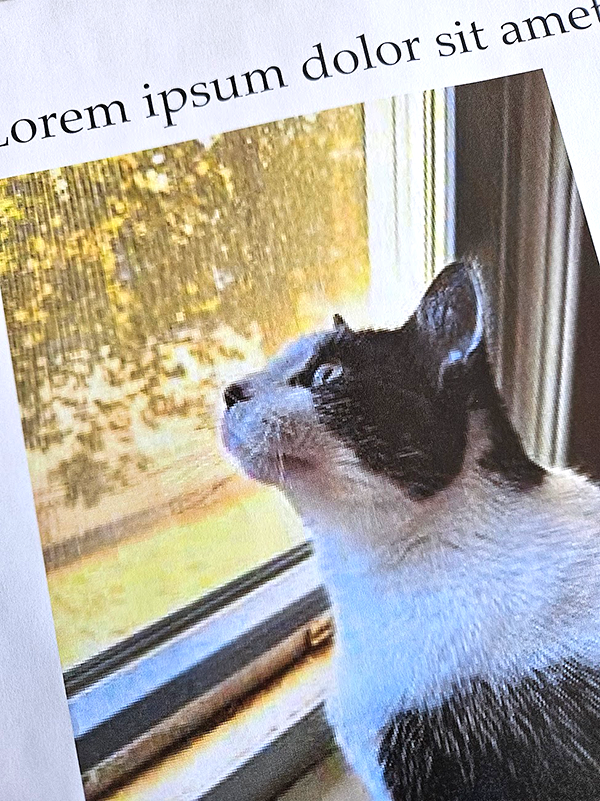
On screen, the image looks crisp and clear — however, the image is only 360 pixels high by 270 pixels wide, and has a resolution of 72 dpi. Let's say you incorporated this photo into a poster, and since it's small, you enlarged it in the page layout program you're using to make it easier to see. After printing out a section of the poster, the image doesn't look as clear as it does on screen:

As you can see in the previous image, while the text above the image is crisp, the cat photo looks pixelated and a little blurry in some spots. How can you avoid including images in a research poster that won't look good when printed, like the cat photo shown previously?
Ensuring your images look their best
In oeder for images to look their best in a poster, you'll need to ensure they are the size and resolution you need before you put them in a poster. Enlarging images once they're in a poster will result in images that look like the previous example. You can find images that will look good in a poster by making sure you check the following things when collecting images: an image's size and it's resolution.
- Image size: Aim for images of at least 1500 pixels in size, either for the width or the height. Images smaller than 1500 pixels likely won't print well.
- Image resolution: The resolution for an image should be at least 150 dpi — lower resolutions will result in poor print quality.
If you find images that are large enough in size (larger than 1500 pixels) and have a low resolution, you can change the resolution so they can be used in a poster and print at a good quality. Let's first take a look at how to find images that will be large enough to allow you to adjust the resolution before including them in a poster.
Finding appropriately-sized images on Google Image Search
When searching for images using Google Image Search, you can change your search settings to only return results that include images over a specific size. This can help ensure your images will either have a high resolution or can easily have their resolution raised. Searching for images larger than 1000 pixels should return images that will be of a sufficient size for printing, or will allow for adjustment of the resolution later.
The following steps will walk you through how to set Google Image Search to display only large images in its search results.
Google Image Search will now display images where the image is at least 1000 pixels wide or tall. (Keep in mind that these search settings will be reset once you navigate away from the Google Image Search page.)
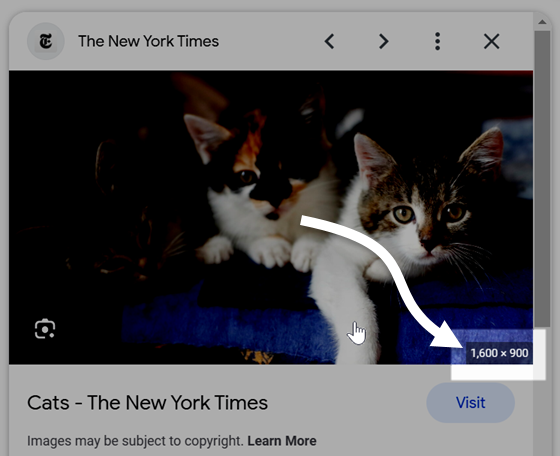
Google Image Search allows us to view the image's size in pixels by clicking on an image to display the preview, then hovering our cursor over the image preview in the preview panel, as shown in the following example:

As highlighted in the previous image, the image’s dimensions will display in the bottom right corner of the image preview. This can be helpful as you work to find images that are an appropriate size for your poster. As long as you have large enough images, you'll be able to adjust the resolution if necessary.
Working with images from a scanner or digital camera
When scanning images, the scanner's output can be set to a specific resolution as part of the scanning process. If scanning an image from a print source, make sure to set the resolution to at least 150 dpi before scanning the image — this will ensure that you won't need to adjust the resolution at a later time.
If you're taking photos with your phone's camera or another digital camera, chances are those images are already large enough that you can change the resolution without making the images too small. Most digital cameras take pictures at anywhere between 12-16 megapixels (over 4000 pixels wide or tall). This results in an image with a very large print size, but often with a low resolution, typically between 72-96 dpi. A large image with a low resolution can be edited to a more reasonable print size by making the resolution higher.
Changing an image's resolution
Image size and resolution go hand in hand — how large an image appears when printed is based on the resolution of the image. For example, an image that's 4000 pixels wide by 2000 pixels high with a resolution of 72 dpi will have a print size of approximately 56 inches by 28 inches, and will look grainy because only 72 dots of color are printed per linear inch of paper. However, changing that image's resolution to 600 dpi results in a print size of approximately 7 inches by 3 inches, which will give you a much higher quality image at a more reasonable print size.
You can adjust the resolution of an image, within reason — this involves indicating you want to have more dots of color printed in a linear inch of paper. However, as demonstrated in the previous example, printing more dots of color in a linear inch means the image will print at a smaller size. Before you start the process of changing the resolution, you'll want to make sure your image's pixel dimensions are large enough to make the resolution larger without making the image's print size too small. You can use Photoshop to check the size and adjust the resolution of an image by using the Image Size dialog box.
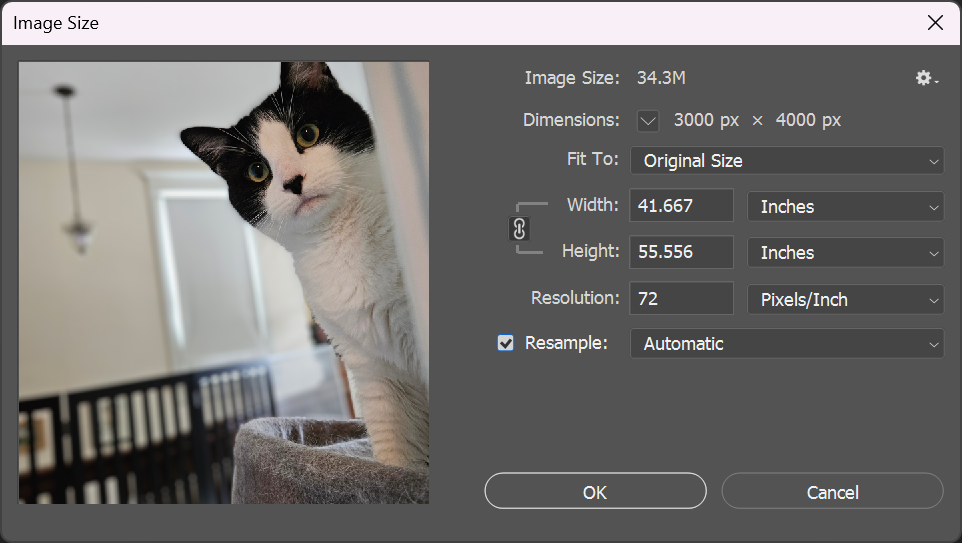
The Image Size dialog box will appear:

Take a look at the values listed for the dimensions, as well as the width and height – the image we're viewing the details for is very large, with a size of 3000 by 4000 pixels, and a print size of roughly 42 by 56 inches at 72 pixels per inch. As mentioned earlier, this will result in an excessively large image with a low print quality. However, we can raise the resolution and make the print size smaller, resulting in a reasonably-sized image that will print at a high quality.
The first step to take is to make sure the Resample checkbox is unchecked. Resampling an image involves changing the pixel dimensions of the image, either by adding or removing pixels, which can degrade the quality of an image. Unchecking the Resample checkbox makes it so that when an image's resolution is changed, Photoshop won't change the pixel dimensions of an image — instead, Photoshop will change the print size without removing or adding pixels to the image to make it a specific size.
Using images found online
When using images from the web, it's important to make sure that you have permission to use the images you've chosen for your poster. The best way to go about finding images that can be used in posters without potentially violating copyrights is to choose images that have been shared under a Creative Commons license. Google Image Search allows you to search for images that are able to be freely reused. The following accordion fold includes instructions for setting Google Image Search to only return results that are available for reuse through Creative Commons.
Learn more about Creative Commons licensing at the Creative Commons homepage.
NOTE: Faculty, staff, and students at Indiana University also have access to Adobe Stock, which contains a wide range of high-quality images you can use in posters. To learn more, read the IU Knowledge Base article About Adobe Stock at IU.
Additional tips for working with images
Here are a couple of additional tips to help you when working with images for a research poster:
- Keep backups of the original image files. If you're significantly editing an image, or if you're unhappy with the final results of editing an image, keeping a copy of the original will be helpful if you want to start the editing process over again.
- Save your image files in a print ready format. The TIFF (.tif) file format is ideal, but if you're using PowerPoint to create a poster, you'll need to save your image as a high quality JPG file. You can easily save images in a new format when you're done editing them.
If you need additional help with editing images for a poster, check out the course Photoshop: The Basics for guidance with working with Photoshop to edit images.


