If you are working in Microsoft Word, you have the option to caption the images used in the document and then create a list of figures.
NOTE: Google Docs does not currently have a list of figures option.
If you are working in Microsoft Word, you have the option to caption the images used in the document and then create a list of figures.
NOTE: Google Docs does not currently have a list of figures option.
If you are beginning this course at this point, you will need to access the practice document.
If working in Microsoft Word, you will download and extract the document.
For detailed instructions on downloading and extracting files in Google Chrome or Firefox, visit Getting Started with Exercise Files.
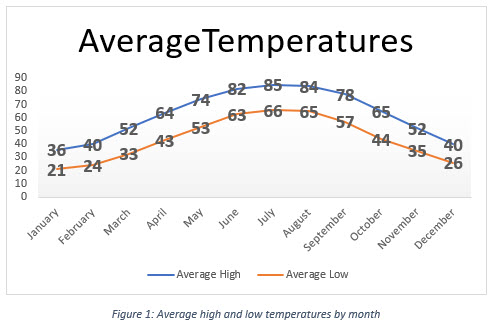
Our document has two images, the line chart of average temperatures and the photo of the Black-eyed Susans. We will add captions to each image and then create a list of captions. We will begin with the line chart.
Right-click a blank area of the line chart, Click Insert Caption...
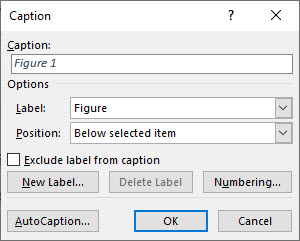
The Caption dialog box opens:

This dialog box gives us an area to enter the caption. There are options for which label we would like to use and where we would like the caption to appear. We can also modify the numbering applied to the captions.
Click after the label, "Figure 1"
: Average high and low temperatures by month
Click ![]()
The caption appears below the line chart.

Let's add a caption to the photo of the Black-eyed Susans.
Right-click the photo of the Black-eyed Susans, Click Insert Caption...
Click in the caption field, type: :Black-eyed Susans, Click ![]()
Now that the images are captioned, we can add a list of figures to the document.
The list of figures should be placed between the table of contents and author's note. We'll insert a new blank page after the table of contents and insert the list of figures there.
Click before the A in "Author's note"
Control key + Enter key
A blank page is now between the table of contents and the author's note. This new page should be numbered with the Roman numeral i. And the author's note page should be numbered ii.
Click at the top of the second page
List of figures
Click 
Click ![]()
The Table of Figures dialog box opens. This dialog box gives several options for customizing the list of figures. We're going to accept the defaults.
Click ![]()
The list of figures now appears on the second page of the document.
Let's update the table of contents to include the list of figures.
Click in the table of contents
Click ![]()
Click the Update entire table radio button, Click ![]()
The List of figures is now at the top of the table of contents.