A style is a predefined combination of text and paragraph formatting. This could include basics such as font size and line spacing, as well as advanced settings such as indents, alignment, borders, and shading. Using a style can speed up and simplify the job of formatting text and assures that a document has a consistent look. Styles can also be used to quickly and easily create your table of contents.
Acquiring the practice document
If you are beginning this course at this point, you will need to access the practice document.
Downloading the practice document for Microsoft Word
If working in Microsoft Word, you will download and extract the document.
- To begin downloading the practice document, click the following button:
For detailed instructions on downloading and extracting files in Google Chrome or Firefox, visit Getting Started with Exercise Files.
Copying the practice document in Google Docs
In Google Docs, you will copy the practice document to your Google Drive.
- To begin copying the practice document in a new browser window,
Right-click Copy practice document, Click Open link in new window
The file begins to open in a new window of the web browser. Before the document will open and can be edited, we need to make a copy of it.
Move to the new browser window.
- To copy the document file, in the browser window,
Click ![]()
A copy of the file is now open and, by default, is saved in your Google Drive. The filename now has the words "Copy of" at the beginning.
Considering inclusive design
Beyond making your documents more consistent and attractive, the use of styles is necessary to make a document accessible to everyone. Styles add structure to a document, which is helpful to users who are utilizing a screen reader. Styles also give readers visual cues of section breaks.
Applying a style
At this point, our document has five sections: Author's note, Wildflowers by season, Wildflower names, Wildflowers in planned landscaping, and Works Cited. The author of the document used the Normal (or Normal text) style for all of the text. To give a visual distinction to the sections, the section headings were changed to bold font while the subheadings are underlined.
NOTE: The currently applied style can be determined by looking at the Home tab in Microsoft Word ( ) or the toolbar in Google Docs (
![]() ).
).
We'll use styles to format these headings. To begin, we'll apply the Heading 1 style to the section headings.
Styles are applied to the entire paragraph. Therefore, it isn't necessary to select the text we want to format. Simply click in the text to be changed.
- To place your cursor in the first heading,
Click anywhere in the text "Author's note"
- To apply the Heading 1 style,
In Microsoft Word, on the Home tab, in the Styles group, Click

In Google Docs, on the toolbar, Click , Click Heading 1
The heading text is now larger and visually distinct. In Microsoft Word, the text is now larger and blue. In Google Docs, the text is larger and bold.
Let's apply the Heading 1 style to the other section headings. We will follow the same steps to make these changes.
- To select the second heading,
Click in the text "Wildflowers by season"
- To select the other section headings,
In Microsoft Word, on the Home tab, in the Editing group, Click
 , Click Select All Text with Similar Formatting
In Microsoft Word for Mac, on the Home tab, Click , Click
In Google Sheets, Right-click the text "Wildflowers by season," Click Select all matching text
- To apply the Heading 1 style,
In Microsoft Word, on the Home tab, in the Styles group, Click

In Google Docs, on the toolbar, Click , Click Heading 1
 - To deselect the headings,
Click in a blank area of the document
The section headings have now all been formatted as Heading 1s.
Modifying a style
Styles can be modified to reflect your personal style or the audience of your document. Are you sending your document to a professor or supervisor? You may want to use subdued, professional fonts and colors. Are you sharing the report with stakeholders of a fun event? If so, bright and bold may be acceptable. Keep in mind that often "less is more." Take care to not visually overwhelm your audience.
We will change the font color, size, and style of our section headings. Because these formatting choices are applied to the character, not the paragraph, we will need to select the text. Let's see how to do this now.
- To select the section heading,
Triple-click the text, "Wildflower names"
- To make the selected heading italicized,
In Microsoft Word, on the Home tab, in the Font group, Click

In Google Docs, on the toolbar, Click
- If using Google Docs, to remove the bold formatting, on the toolbar
Click

- To change the color of the selected heading,
In Microsoft Word, on the Home tab, in the Font group, Click
 , Click a dark red
In Google Docs, on the toolbar, Click , Click a dark red
 - To change the font size of the selected heading,
In Microsoft Word, on the Home tab, in the Font group, Click
 , Click 20
In Google Docs, on the toolbar, Click , type: 20 Enter key
Now that we have modified a section heading, let's apply these changes to the other headings formatted with the Heading 1 style.
- To modify the Heading 1 style to match the formatted text,
In Microsoft Word, in the Styles group, Right-click
 , Click Update Heading 1 to Match Selection
In Google Docs, in the document, Right-click the formatted heading, Click Update 'Heading 1' to match - To deselect the text,
Click in a blank area of the document
The default formatting of the Heading 1 style has been changed and the text that had the Heading 1 style applied has been updated.
The subheadings were previously formatted to be underlined. Let's modify these to reflect the new color and style of the section headings. To begin, we'll select all of the subheadings.
- To select the first subheading,
Click in the text "Spring wildflowers"
- To select the other subheadings,
In Microsoft Word, on the Home tab, in the Editing group, Click
 , Click Select All Text with Similar Formatting
In Microsoft Word for Mac, on the Home tab, Click , Click
In Google Sheets, Right-click "Spring wildflowers," Click Select all matching text
- To change the font size of the subheadings,
In Microsoft Word, on the Home tab, in the Font group, Click
 , Click 14
In Google Docs, on the toolbar, Click , type: 14 Enter key
 - To italicize the subheadings,
In Microsoft Word, in the Font group, Click

In Google Docs, on the toolbar, Click
- To recolor the subheadings,
In Microsoft Word, in the Font group, Click
 , Click a dark red
In Google Docs, on the toolbar, Click , Click a dark red
 - To remove the underline formatting from the subheadings,
In Microsoft Word, in the Font group, Click

In Google Docs, on the toolbar, Click
- To modify the Heading 2 style to match the formatted subheadings,
In Microsoft Word, in the Styles group, Right-click
 , Click Update Heading 2 to Match Selection
In Google Docs, on the toolbar, Click , Point to Heading 2, Click Update 'Heading 2' to match
 - To deselect the subheadings,
Click in a blank area of the document
The subheadings have been formatted and the Heading 2 style has been updated to reflect the changes.
Saving the modified styles for later use
Now that the styles have been modified to better fit our needs, we might want to save them. This will ensure that we won't have to recreate these styles the next time we want to use them.
Saving a style set in Microsoft Word
When working in Microsoft Word, you will want to save the modified styles as part of a new style set. A style set is a collection of styles. There are several built-in style sets in Word. By default, new documents use the Normal style.
It is possible to have several modified style sets. Maybe you have one for your academic work, one for a more casual volunteer position, or one for a group of papers that are required to be formatted a specific way. These can be created, saved, and applied as needed.
Let's save our modified headings as part of a new style set called "Wildflowers."
- To open the Style Set gallery, on the Design tab, in the Document Formatting group,
In Microsoft Word, Click

In Microsoft Word for Mac, Point to the bottom of the Style Set gallery, Click
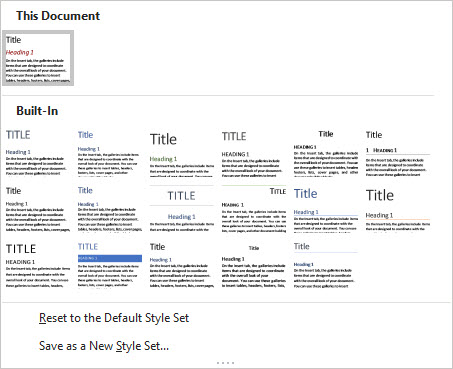
In Microsoft Word, the Style Set Gallery opens:

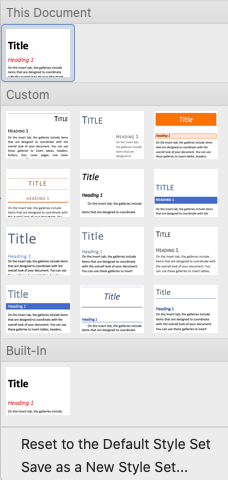
In Microsoft Word for Mac, the Style Set Gallery opens:

In the upper left corner is the style set used in this document. This is the style set we want to save.
- To open the Save as a New Style Set window, in the Style Set Gallery,
Click Save as a New Style Set...
- To name the new style set,
Click in the File name area, type: Wildflowers
- To save this style set,
Click

The Wildflowers style set is saved and is now visible in the Custom area of the Style Set Gallery (Microsoft Word) or the Built-In area of the Style Set Gallery (Microsoft Word for Mac). This custom style set will be available in future Microsoft Word documents.
Saving the modified styles in Google Docs
Saving styles in Google Docs is a simple process. However, there is no option to save a single style. All of the modified styles will be changed.
- To save the modified headings as the default styles, on the toolbar,
Click
 , Point Options, Click Save as my default styles
NOTE: Depending on the currently selected text, the Styles button may not say Normal.
The modified styles have been saved and will be used in upcoming documents.
NOTE: If you want to return to Google's default styles, on the toolbar, Click the Styles button (this button will show the currently applied style), Point Options, Click Reset styles. Your modified styles are still saved, but will not be applied to the current document.

