Worksheets may contain sensitive information that we don't want to accidentally delete, or we may want to prevent other users from deleting or altering data. To protect such information, we can lock selected cells or hide formulas from view. Excel allows us to protect entire workbooks, individual cells in a worksheet, charts, etc., from access or modification by others. There is also flexibility in allowing specific editing actions on protected sheets.
Let's move to another worksheet to explore this.
Step1. To switch to the Protection worksheet,
Click the Protection worksheet tab
Unlocking Individual Cells
By default, Excel locks all cells and charts, but the protection is disabled. If the protection were enabled, then nothing on the worksheet could be changed. However, we would most likely not want every cell locked when protecting a worksheet. If we want to change any data, we must unlock those cells first before applying protection to the worksheet. When protection is applied, only the unlocked cells may be edited or deleted; users cannot change the locked cells. For example, we might want to protect formulas in a worksheet but leave the rest of the worksheet unlocked for data entry or modification.
In the Protection worksheet, we will keep track of the hours worked for each hourly staff person and will leave cells B4 through D26 open for entering or editing data. The EmployeeID, HourlyPay, and TotalPay columns will be locked since we don't want any of those values changed.
Step1. To begin to select the cells that are to be unlocked,
Click cell B4
Step2. To select the rest of the cells to be unlocked, press:
Shift key and Click cell D26
Step3. To switch to the Home tab,
Click the Home tab
Step4. To view the Protection options, in the Cells group,
Click
Step5. To unlock the cells,
Click Lock Cell
Step6. Deselect the cells.
NOTE: You may also unlock the cells by going to the Protection tab in the Format Cells dialog box.
Protecting the Worksheet
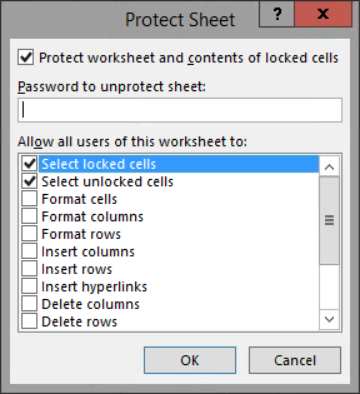
Once cells are unlocked, we are ready to protect the worksheet so that any locked data cannot be changed. Once we protect the worksheet, users will not be able to enter or edit the data in the first column or the last two columns, since those columns will be locked.
Step1. To open the Protect Sheet dialog box, on the Ribbon,
Click , Click Protect Sheet...

Step2. To set a password, in the "Password to unprotect sheet:" field, type:
HoursWorked Click
Step3. To confirm the password, in the "Reenter password to proceed" field, type:
HoursWorked Click
NOTE: If you email this worksheet to an individual, then he/she must enter the password before being allowed to modify any of the locked cells. Be aware that in previous versions, some levels of worksheet protection may be lost when emailing or copying protected worksheets.
Testing the Protected Worksheet
Now we are ready to test the new worksheet protection. When the worksheet is protected, and the "Select unlocked cells" option is enabled, pressing Tab key moves to the next unlocked cell, making data entry much easier.
Let's see how this works.
Step1. To enter the hours worked for the first employee,
Click cell D4, type: 20 Tab key
Step2. To try to change a cell with the hourly pay rate,
Click cell E4, type: 9
Step3. To close the message,
Click
Step4. Save the workbook.
NOTE for MacOS Users: Skip foward to the heading, "Protecting an Entire Workbook on MacOS".
Protecting an Entire Workbook on Windows
You can also set a password to grant users permissions to open and/or to modify an entire workbook. We will now review some other options for protecting a workbook.
Step1. To review other options for protecting a workbook,
Click the File tab, Click Info
Step2. To access the workbook protection choices,
Click
Step3. To return to the worksheet,
Click
Protecting an Entire Workbook on MacOS
You can also set a password to grant users permissions to open and/or to modify an entire workbook. We will now review some other options for protecting a workbook.
Step1. To review other options for protecting a workbook, on the Menu bar,
Click Tools, Point Protection,
Click Protect Workbook...
Step2. To return to the worksheet,
Click

