After creating your Google Slides presentation, you will most likely want to present it. Google makes this easy. You can simply advance through the slides as you speak, or you can utilize some of Google's built-in presentation tools.
Copying the practice presentation
If you are beginning this course at this point, you will need to copy the presentation to your Google Drive.
NOTE: If you have been working through the course, your file should be up to date and you will not need to copy the practice presentation. You can move ahead to Moving through a presentation.
- To begin copying the practice presentation in a new browser window,
Right-click Copy practice presentation, Click Open link in new window
The file begins to open in a new window of the web browser. Before the presentation will open and can be edited, we need to make a copy of it.
Move to the new browser window.
- To copy the presentation file, in the browser window,
Click ![]()
A copy of the file is now open and, by default, is saved in your Google Drive. The filename now has the words "Copy of" at the beginning.
Moving through a presentation
Let's switch to Slideshow view now and practice moving through a presentation.
NOTE: If you are working on a single monitor with Google Slides and these materials both open, be prepared for the Slideshow to take over the entire monitor. To exit the full screen view and continue working through the materials, use the keyboard shortcut Control key + Shift key + F. The slideshow will continue to run but won't take up the screen.
- To open Slideshow from the beginning, in the upper right corner,
Click
 , Click Start from beginning
- To exit the full screen view, on the keyboard, press:
Control key + Shift key + F
The slideshow opens.

Moving through a presentation
It is easy to move from slide to slide in a Slideshow view. You can use your keyboard (left arrow, right arrow, Page Up, Page Down, Space bar, Backspace), mouse, or the floating toolbar.
- To move forward in the slideshow, on the keyboard, press:
Right Arrow key, Enter key, or Page Down key
- To move backward in the slideshow, on the keyboard, press:
Left Arrow key, Backspace key, or Page Up key
There is a floating toolbar that is hidden by default. We can activate this toolbar by moving the mouse. Let's do this and use some of the toolbar features.
- To activate the toolbar,
move your mouse toward the lower left side of your screen
The toolbar reappears. The number shows which slide is currently being viewed. The arrows can be used to move through the slideshow:
![]()
- To move forward in the slideshow,
Click

- To move backward in the slideshow,
Click

- To see a list of slides in the slideshow,
Click

- To jump to the slide titled Resizing an Image,
Click Slide 5: Resizing an Image
Using slideshow tools
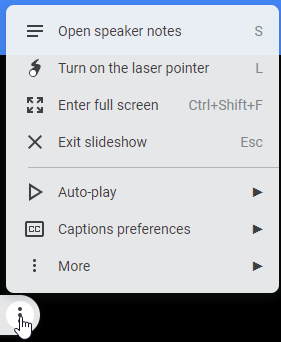
The toolbar has several hidden options, including speaker notes, a pointer, and automatic captions. These tools are in the options menu. Let's see how to access them.
- To view the options menu, on the slideshow toolbar,
Click

The Options menu opens:

Using the laser pointer tool
The slideshow laser pointer tool works like a laser pointer and allows a speaker to emphasize text or images on the screen during the presentation. Let's see how this works.
- To activate the laser pointer tool, in the options menu,
Click Turn on the laser pointer
The cursor changes and now looks like a red dot. Using the mouse, we can move this dot around to point out words or objects on our slides.
- To move the laser pointer,
move the mouse over the slide
- To open the slideshow options menu,
Click

- To turn off the laser pointer,
Click Turn off the laser pointer
Using the caption tool
Google Slides also includes a caption tool. This tool will automatically display the speaker's words at the bottom of the screen. If the presentation is being projected for an audience, audience members will be able to see what the presenter is saying in real-time.
The caption tool only works if a microphone is set up and turned on.
- Confirm that your microphone is set up and turned on.
- To open the slideshow options menu,
Click

- To turn on the captions tool, in the options menu,
Click Captions preferences, Click Toggle captions
- To add captions to your presentation,
speak into the microphone
The words you say into the microphone appear at the bottom of the presentation screen.
These captions are not saved with your presentation.
- To open the slideshow options menu,
Click

- To turn on the captions tool, in the options menu,
Click Captions preferences, Click Toggle captions

