Animations are a good way to grab your audience’s attention or keep them focused on one item at a time. As useful as animations are though, it is important not to overuse them or else you risk your presentation appearing a bit too chaotic.
Copying the practice presentation
If you are beginning this course at this point, you will need to copy the presentation to your Google Drive.
NOTE: If you have been working through the course, your file should be up to date and you will not need to copy the practice presentation. You can move ahead to Adding animation to an image.
- To begin copying the practice presentation in a new browser window,
Right-click Copy practice presentation, Click Open link in new window
The file begins to open in a new window of the web browser. Before the presentation will open and can be edited, we need to make a copy of it.
Move to the new browser window.
- To copy the presentation file, in the browser window,
Click ![]()
A copy of the file is now open and, by default, is saved in your Google Drive. The filename now has the words "Copy of" at the beginning.
Adding animation to an image
Let's begin by adding an animation to the dog image we worked with earlier. This image is on the slide titled, Formatting Images.
- To move to the slide titled Formatting Images,
Click the slide titled Formatting Images
- To select the image of the dog,
Click the image of the dog
- To open the Animation options, on the menu bar,
Click Insert, Click Animation
The Motion panel opens. Animations are part of this panel. There is a small image of the dog with the wording "Fade in (On click)" next to it. This indicates that the dog image now has the Fade in animation applied. This can be changed.
- To expand the animation options, if necessary, in the Motion panel,
Click

The animation options expand. We can now choose the type of animation, when the animation occurs, and the speed of the animation. As you are making these choices, keep in mind that too much action or speed may not be a pleasant experience for some of your audience. Think about who will be watching and the tone you want to set for your presentation.
- To change the animation,
Click
 , Click Fly in from right
- To select the bird image,
Click the bird image
- To apply animation, in the Motion panel,
Click
 , Click
  , Click Fly in from right
Now that the dog and bird images have animation, let's follow those same steps to apply animation to the cat image.
- To select the cat image,
Click the cat image
- To apply animation, in the Motion panel,
Click
 , Click
  , Click Fly in from right
The Fly in from right animation has been applied to all of the images. Each has been set to animation "On click." This means the presenter will need to click to animate each image individually. This can easily be changed. Let's add some animation to another element of the slide and modify when that animation occurs.
Adding animation to text
Let's animate the title of this slide. It is not necessary to select all of the text. We simply have to select the textbox.
- To select the title textbox,
Click Formatting Images
- To add animation to the title text, in the Motion panel,
Click

The Fade in animation has been applied to the title text. We'll leave this as is.
Before we make any other adjustments, let's see how this looks and works.
- To play the animation, in the Motion panel,
Click

- To move through the animation,
Click several times
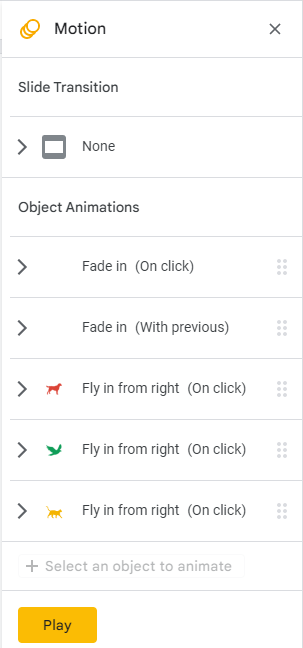
The three images appear one at a time as we click the mouse. The title of the slide is the fourth element to appear. And the information under the title is on the slide the entire time. Let's change this so that the title and text appear at the same time, and before the images.
- To select the informational text,
Click the informational text
- To animate the selected text, in the Motion panel,
Click

The Fade in animation is applied. Notice that by default, it is set to take place "On click." Let's modify this so that the informational text appears with the title text.
- To adjust the timing of the animation for the informational text,
Click
 , Click With previous
- To play the animation, in the Motion panel,
Click

- To move through the animation,
Click several times
The title and the text appear at the same time. That works well. But it would make more sense for the images to appear after the title and text. Let's rearrange the order of these animated elements. This can easily be done in the Transitions panel.
- To move the dog animation, in the Motion panel,
Press & Drag the dog animation below the text animation
- To move the bird animation, in the Motion panel,
Press & Drag the bird animation below the dog animation
- To move the cat animation, in the Motion panel,
Press & Drag the cat animation below the bird animation
The Motion panel should now look like this:

Take a moment to play this slide and see the final animations.
- To play the animation, in the Transitions panel,
Click

- To move through the animation,
Click several times

