Welcome to the appendix for InDesign: The Basics! The appendix contains supplemental information that's referenced in the training materials so interested learners can get more information about features or tasks not fully explored in the contents of InDesign: The Basics.
Page contents
This page contains the following information:
Changing the default unit of measurement in InDesign
If desired, you can change the default unit of measurement used in InDesign so that all new documents created use your preferred unit of measurement. This process should be completed without a document open in InDesign – in other words, before you open a document or create a new file.
The following accordion folds include instructions for accomplishing this on both Windows and MacOS computers:
- Ensure that no documents are currently open in InDesign.
- To open the Units and Increments preferences, on the Menu bar,
Click Edit, Point Preferences, Click Units & Increments…
- To change the unit of measurement for the horizontal ruler, in the Horizontal drop-down menu,
Click
 , Click your desired unit of measurement
 - Repeat step B with the Vertical ruler unit drop-down.
- To accept the changes, in the bottom right corner of the dialog box,
Click

- Ensure that no documents are currently open in InDesign.
- To open the Units and Increments preferences, on the Menu bar,
Click InDesign, Point Preferences, Click Units & Increments…
- To change the unit of measurement for the horizontal ruler, in the Horizontal drop-down menu,
Click
 , Click your desired unit of measurement
 - Repeat step B with the Vertical ruler unit drop-down.
- To accept the changes, in the bottom right corner of the dialog box,
Click

Removing formatting from a document before placing it into a layout
If you're importing a Word document or other text file that has formatting and want to remove the formatting before it's placed into the document, you can do this using the Import Options dialog box. The instructions in the following accordion walk you through this process.
- To start placing a document, in the Menu bar,
Click File, Click Place…
- To select the file to place, in the Place dialog box,
Click the file
- To have InDesign display the Show Import Options dialog box before placing the file, above the file name field at the bottom of the Place dialog box,
Click the checkbox next to Show Import Options, Click

- To remove the formatting from the text, in the Import Options dialog box,
Click the radio button for Remove Styles and Formatting from Text and Tables
- To finish importing the text, in the upper right corner of the Import Options dialog box,
Click

Exporting an InDesign document as a PDF
There may be times when you want to create a PDF version of a publication for digital distribution. PDFs can be read by a number of different programs, including (but not limited to) Adobe Acrobat Reader DC and most popular web browsers.
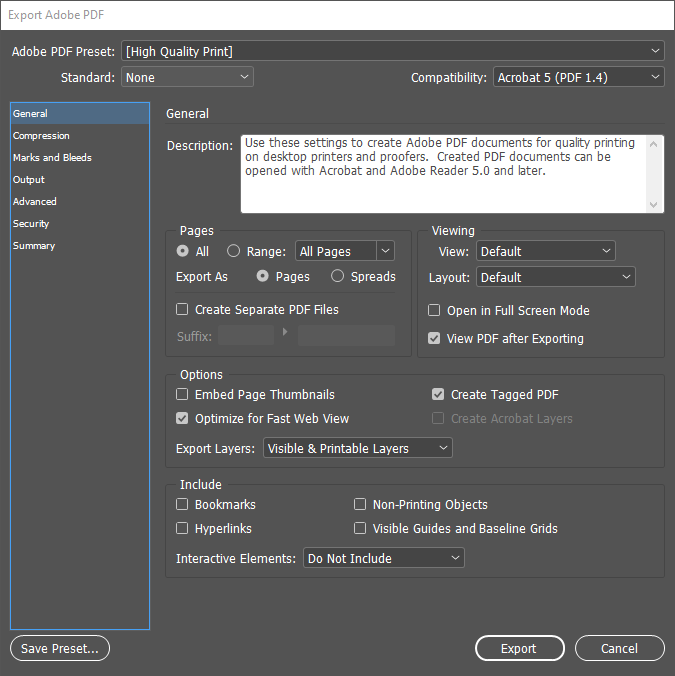
When creating a PDF, there are many different options we can set regarding the document's quality, distribution method, and file size – these are all located in the Export Adobe PDF dialog box:

In the Adobe PDF Preset drop-down menu, we have a number of presets we can choose from:
- High Quality Print: Creates PDFs for quality printing on desktop printers and proofing devices. These PDFs can be opened with Acrobat and Adobe Reader 5.0 and later.
- PDF/X standards (various): Several ISO standards whose purpose is to facilitate graphics exchange. They enforce a series of printing-related requirements such as embedding and color specifications.
- Press Quality: Creates PDF documents for high-quality print production destined for digital printing or for separations to a commercial printer or print service. This produces the highest quality printable PDF, and can be opened in Acrobat and Adobe Reader 5.0 and later.
- Smallest File Size: Creates PDFs for on-screen display, sending via email, and sharing via the internet. This preset uses compression, downsampling, and a relatively low image resolution to keep the file size low, and can be opened with Acrobat and Adobe Reader 6.0 and later. For best results, avoid using this preset if you intend to print the file.
There are also other settings we can change, such as exporting specific pages of the document, including hyperlinks and bookmarks in the exported document, and more.
The following accordion includes instructions for exporting an InDesign document as a PDF.
- To start the process of exporting a document as a PDF, on the Menu bar,
Click File, Click Export…
- Navigate to the folder you want to save the file in.
- To change the file type to PDF, if necessary, in the Save as type field,
Click
 , Click Adobe PDF (Interactive) or Adobe PDF (Print)
 - To continue exporting the file as a PDF, in the lower right corner of the Export dialog box,
Click

- To choose a preset, if necessary, in the Adobe PDF Preset drop-down,
Click
 , Click on the desired preset
 - To automatically open the PDF once it's finished exporting, if necessary, in the Viewing section of the Export Adobe PDF dialog box,
Click the checkbox next to View PDF After Exporting
- To finish creating the PDF, in the bottom right corner of the dialog box,
Click


