

The last part of the project that needs to be created is the introduction for the video. To avoid worrying about altering the timing of our current sequence, we'll create a new sequence for this part of the video. Once the introduction is finished, both sequences can be combined and then published as a video file.
Let's move back to the Editing workspace, so we can get started with making the introduction.
Step 1. Switch back to the Editing workspace.
Next, we'll make the sequence for the introduction inside the Sequences bin. We'll be using a different process to make this sequence — instead of using a clip to help us make a sequence, we'll use the New Item button in the Project panel to make this one.
Step 2. To indicate the folder where we'd like our new sequence to be made, in the Project panel,
Click Sequences
Step 3. To create a new sequence, in the bottom right corner of the Panel dock,
Click ![]() , Click Sequence...
, Click Sequence...
The New Sequence dialog box appears:
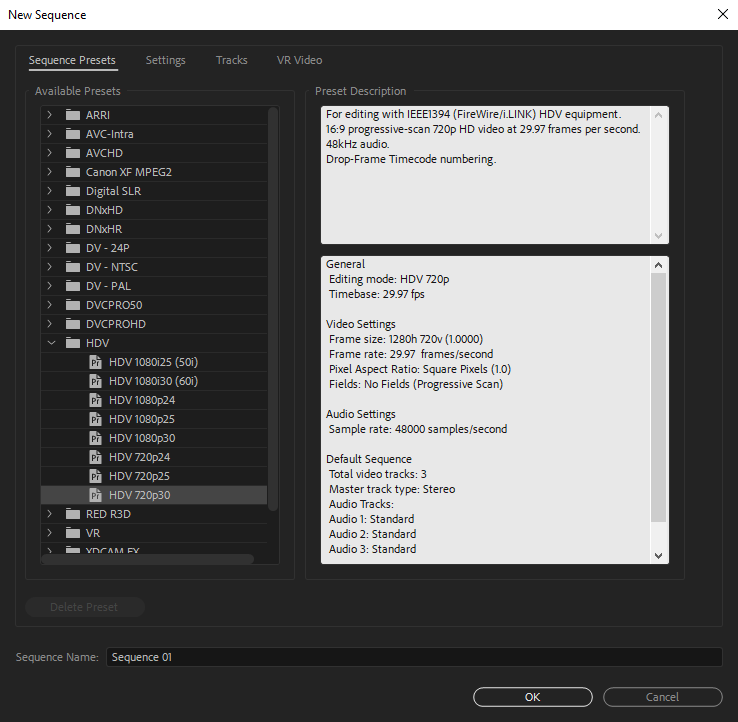
Click  , Click HDV 1080p 30
Click ![]()
Creating a Title
Adobe Premiere Pro gives you many options when it comes to creating a title for a video. You can create a title from scratch in Premiere, import a title graphic created in Photoshop or Illustrator, or import a composition created in After Effects. You can also add animation, special effects, and audio to your title. The first thing we'll add is an image that'll be used for the very beginning of the introduction.
Adding an Image
Since Michael wants to use the same title screen that he has used on other dance videos he has created in the past, we will use an image that he has already created. This image is in the Images bin.
Step 1. Expand the Images bin in the Project panel, if necessary.
Step 2. To add title.jpg to the Timeline, in the Project panel,
Press and Drag title.jpg to the very beginning of the Video 1 track of the Timeline
Step 3. Zoom in until title.jpg appears larger on the Timeline.
Step 4. Move the playhead to the 10 second mark on the Timeline.
Step 5. Adjust the length of title.jpg so it is now 10 seconds long.
Step 6. To reposition the playhead at the beginning of the clip, press:
Home
Step 7. Save the project.
Using a Template to Add Text to the Title
Next, we'll want to add a text overlay with the title of the video. We can do this with the Essential Graphics panel, much like we did when we added credits to the video. Let's switch to the Captions and Graphics workspace and find a good template to use for the title.
Step 1. Switch to the Captions and Graphics workspace.
Step 2. To find templates that can be used for titles, in the search bar of the Essential Graphics panel, type:
Title Enter key
We're presented with a collection of templates that could be used for titles. The one we'll be using today is the Film Title template.
Step 3. To find the Film Title template, in the gallery section of the Essential Graphics panel,
scroll down until you see 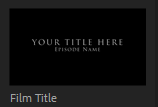
Step 4. To add the template to our sequence,
Press & Drag to the very beginning of the Video 2 track on the Timeline
The title template is now on the timeline — let's edit it so it matches the feel of our video a little better. Before we start editing the clip, let's move to a frame where we can see the text clearly.
Step 5. Move the playhead to the 7 second mark on the Time Ruler.
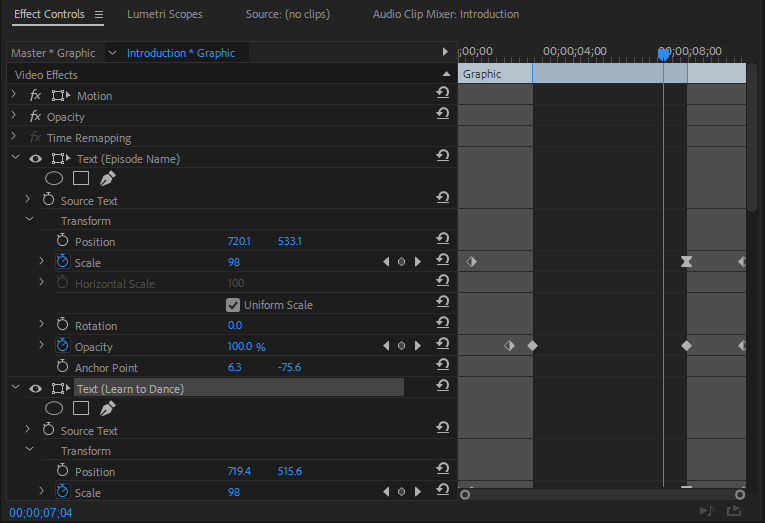
Now we'll change the appearance of the text. We'll start with editing the title line.
Step 6. To select the line of text we want to edit, in the Program Monitor,
Double-Click the line of text that reads "Your Title Here"
Step 7. To change the font for the title, in the Text section of the Essential Graphics Edit tab,
Click ![]() , type: Script MT Bold
, type: Script MT Bold
Step 8. Reselect the title line, if necessary.
Step 9. To change the title's text, on the keyboard, type:
Learn to Dance
Next, we'll edit the second line of text.
Step 10. Repeat steps 6 through 9 for the second line of text, using the following values:
- Font face: Candara Italic
- Text: With Michael Fatyanov and Friends
Working With Effects
Click 
Step 6. Preview the title.
Adding Background Music to the Introduction
Background music can be added to a title in exactly the same way that we added voice-overs earlier. Let's switch back to the Editing workspace, then add the file Always_GeorgeOlsen.mp3 to the Timeline. This file is located in the Audio bin, with the rest of our audio files.
Step 1. Expand the Audio bin, if necessary.
Step 2. To add background music to the sequence,
Press & Drag Always_GeorgeOlsen.mp3 to the beginning of the Audio 1 track on the Timeline
Step 3. Play the sequence from the beginning.
Adding More Images
While it is perfectly acceptable to use video in every sequence of a movie, it is also possible to add still images. There are many different ways that you can use photographs and scanned images to make a movie interesting.
We'll be adding some photographs of people dancing to the introduction for our video. These are all located in the Images bin.
Step 1. If necessary, scroll through the Project panel until you see the Images bin.
Step 2. To select all the images that we will add to the Introduction sequence, in the Project panel,
Click 1_club.jpg, press: Shift key, Click 6_performance.jpg
Step 3. To add the images to the Timeline,
Press & Drag the images to the Video 1 track of the Timeline, immediately following title.jpg
Step 5. To activate the Track Select Tool, in the Tools panel,
Click![]()
Step 6. To select all of the still images to the right of 1_club.jpg, on the Timeline,
hold Shift key, Click 1_club.jpg
Step 7. To begin to change the duration of the still images selected,
Right-Click 1_club.jpg
Step 8. To change the duration of the still images, in the menu that appears,
Click Speed/Duration...
Step 9. To activate Ripple Edit, at the bottom of the dialog box,
Click the "Ripple Edit, Shifting Trailing Clips" checkbox
Step 10. To change the duration of the still images,
Click the timecode, type: 00;00;07;00 Enter key
Step 11. To add the voice-over for the introduction, in the Audio bin on the Project panel,
Press & Drag intro.mp3 to the Audio 2 track of the Timeline
Step 12. To move the voice-over into the correct position, on the Timeline,
Press & Drag intro.mp3 until its left edge aligns with the left edge of 1_club.jpg
Trimming the Background Music
Currently, our background music is longer than the still images that make up our introduction. Let's trim this audio clip now.
Step 1. Zoom out until you can see all clips in the sequence.
Step 2. To activate the selection tool, in the Tools panel,
Click![]()
Step 3. Trim the audio on the track Audio 1 so it ends at the same time the clip 6_performance.jpg does.
Adding Default Transitions to the Introduction Sequence
We're almost done with the introduction — there are two more things we need to do, however. One of those things is adding transitions to the sequence. Let's do that now.
Step 1. To select all the clips on the Timeline,
Click on a blank area in the Timeline, press: Control key+A
Step 2. To add default transitions to the sequence, on the Menu bar,
Click Sequence, Click Apply Default Transitions to Selection
Step 3. Use any method you prefer to preview the sequence.
The last thing we need to do is adjust the background music so we can hear the narration better.
On Your Own: Adjusting the Volume of the Second Sequence
Once again, we'll use the Audio Track Mixer to adjust the volume of the background audio. We'll follow the same process we did earlier.
Step 1. Switch to the Audio workspace.
Step 2. Move the playhead to the beginning of the sequence.
Step 3. Start playing the sequence, and adjust the volume of the clips as necessary. Remember, the Audio 1 controls adjust the background music, while the Audio 2 controls adjust the voiceover.
Step 4. Save the project.
We've finished creating the introduction. Next, we'll combine the sequences in preparation for exporting the finished video.