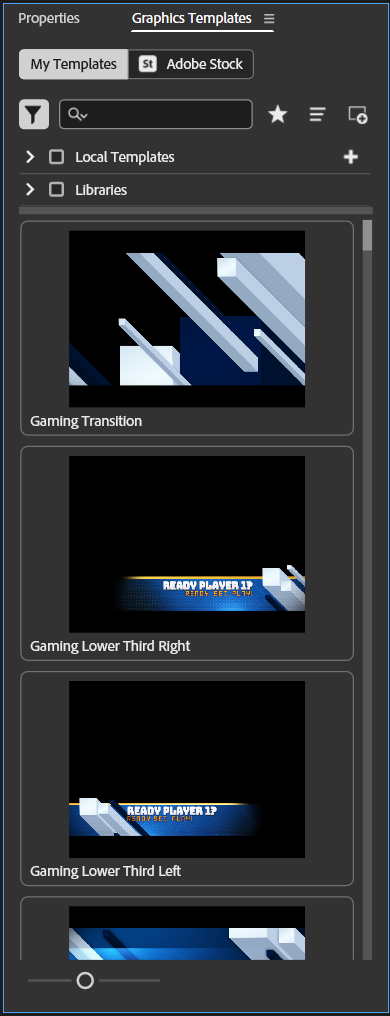
The Graphics Templates panel contains many different templates that make use of text, graphics, and special effects that can be used for credits, video titles, topic transitions, and more. Following is an image of the Graphics Templates panel:
NOTE: Depending on your screen resolution, the Graphics Templates panel may look slightly different than the image above.
The top part of the panel allows us to switch between viewing templates that come pre-installed with Premiere Pro and ones we can download from Adobe Stock. We can also search for a specific template, or any template that matches the specific terms we enter into the search field.
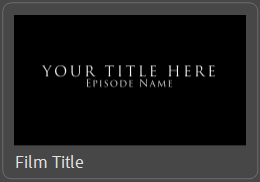
We'll use one of the templates in the Graphics Templates panel, Film Title, to create the opening title for the dance video. Let’s search for the Film Title template, then add it to the Intro sequence. To do this, we'll need to switch to the Captions & Graphics workspace, then we'll need to show the Graphics Templates panel.
To switch to the Captions and Graphics workspace, in the upper right corner of the Premiere Pro window,
Click, Click Captions and Graphics
To display the Graphics Templates panel, in the panel dock on the right side of the screen,
Click
To search for the Classic Credits template, in the Search field near the top of the Graphics Templates panel,
Click, type: Film Title Enter key
The Film Title thumbnail should appear in the Graphics Templates panel:
NOTE: You may need to scroll down in order to see the thumbnail for the Film Title template.
To add the Film Title template to the sequence,
Press & Drag from the Graphics Templates panel to the beginning of the V2 track on the timeline
The template is now on the timeline. We'd like the opening title text to remain on screen for the same amount of time that title.jpg is visible, so we'll adjust the duration of the Film Title clip to 10 seconds.
To activate the Selection tool, if necessary, in the Tools panel,
Click
To change the duration of the Film Title clip, on the timeline,
Press & Drag the right edge of the clip to the right until it's the same length as the title.jpg clip on track V1
Editing a template
Now that we’ve chosen a template to use, we can edit its contents using the Properties panel. For our project, we’ll change the fonts used in the opening title to better match the feel of our project. The changes we make to the template won’t affect the original template file, so we’ll still have the original Film Title template if we need it.
Before we do anything else, we'll need to switch back to viewing the Properties panel in the right-side panel dock.
To open the Properties panel, in the panel dock on the right side of the screen,
Click
Changing the placeholder text in a template
The first element in the template we'll edit is the placeholder text "YOUR TITLE HERE" – we'll replace the text with the video's title. To get started, we'll zoom in on the Film Title clip at the beginning of the timeline, then position the playhead in the middle of the clip. Once we've done that, we'll replace the text in the title clip.
To zoom in on the clips at the beginning of the timeline, at the bottom of the Timeline panel,
Press & Drag the right handle of the zoom scroll bar to the left until the clips appear larger on the timeline
Position the playhead roughly in the middle of the Film Title clip to ensure all the lines of text are visible.
To select the Film Title clip, on the V2 track in the Timeline panel,
Click the clip on the V2 track
To reposition the playhead so the title’s text is visible on screen, in the Timeline panel,
Press & Drag the playhead to the left on the timeline until both lines of text are visible in the Program Monitor
To select the first line of text, with the Selection tool active, in the Program Monitor,
Double-Click the first line of text
The active tool will switch to the Type tool, and we can now change the text of the first line.
To change the text of the first line, on the keyboard, type:
Learn to Dance
To activate the Selection tool, in the Tools panel,
Click
To select the second line of text, in the Program Monitor,
Double-Click the second line of text
The active tool will switch to the Type tool, just like we saw when editing the first line of text.
To change the text of the second line, on the keyboard, type:
With Michael Fatyanov and Friends
Changing the style applied to text in the template
Now that the text in the template has been changed, we're ready to change the formatting. We'll style the first and second lines of text differently to help the title stand out more. Once we're done changing the styling, we'll preview the opening title to see how it looks so far.
To activate the Selection tool, in the Tools panel,
Click
To select the first line of text, in the Program Monitor,
Click the line of text that says "Learn to Dance"
To change the font used for the first line of text, in the Text section of the Properties panel,
Click, type: Forte Enter key
To select the second line of text, in the Program Monitor,
Click the line of text that says "With Michael Fatyanov and Friends"
To change the font used for the second line of text, in the Text section of the Properties panel,
Click, type: Candara Italic Enter key
To change the font size, under the Font drop-down menu,
Click, type: 70 Enter key
To move the playhead to the beginning of the sequence, on the keyboard, press:
Home key
To start playback of the sequence, on the keyboard, press:
Spacebar
Watch through the opening title to see how the Film Title clip looks at this point.
To stop playback of the sequence, on the keyboard, press:
Spacebar
The opening title looks good so far, though there are some visual effects used in the Film Title template we’d like to turn off — specifically the 3D effect added to the text and the flash that appears when the text first shows on screen.
Hiding applied effects using the Graphics Templates panel
When working with a template from the Graphics Templates panel, there may be some effects used in the template that we want to turn off because they don't fit with the theme of our video. For example, in the Film Title template, there's a blue flash at the beginning of the clip and a diagonal sheen across the letters in the title that don't really fit in with the video that we're creating, and we want to disable those effects so they don't show in the final version of the video. We can hide these effects using the Properties panel.
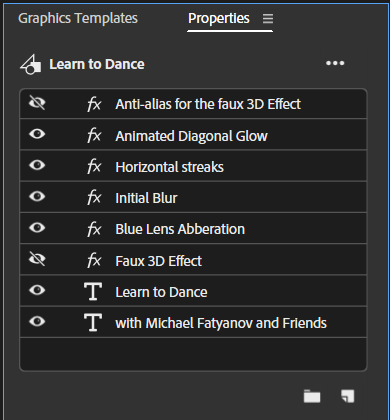
The following screenshot shows the top part of the Properties panel, where the layers in a clip are displayed:
Here, we see a number of different layers. All but the last two of these are effects that are applied to the text in the title — this is indicated by the small "fx" icon to the left of the layer's name. The last two layers are the two lines of text visible in the title clip, which is indicated by the "T" icon to the left of the layer's name. We can hide an effect here by clicking on the layer visibility icon to the far left of the layer's name — this icon looks like an eyeball.
Let's hide the effects we don’t want to use in the opening title by toggling the layer visibility to off for each of those effects. Specifically, we'll turn off the effects responsible for the diagonal sheen and blue flash at the beginning of the clip.
Ensure the title clip on the V2 track is still selected.
To hide the Animated Diagonal Glow layer, in the top part of the Properties panel,
Click to the far left of the text Animated Diagonal Glow
Repeat step b for the following layers in the Essential Graphics panel:
Horizontal Streaks
Blue Lens Abberation
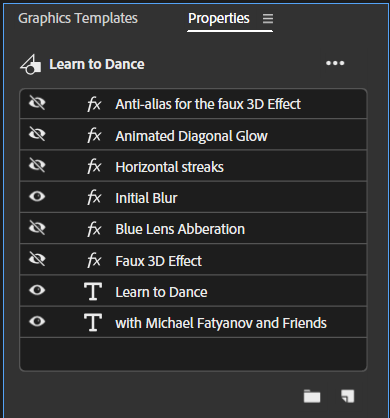
After completing step 1, the list of layers should look like the following image:
The layer visibility icon shows an eye with a slash through it for all of the effect layers we hid in step 1, indicating that these effects are hidden and won't be part of the final video. Let's see how the opening title looks now that we've made these changes.
To move the playhead to the beginning of the sequence, on the keyboard, press:
Home key
To start playback of the sequence, on the keyboard, press:
Spacebar
Watch through the opening title to see what it looks like at this point.
To stop playback of the sequence, on the keyboard, press:
Spacebar
To save the project, on the keyboard, press:
Control key + S
The horizontal sheen and blue flash are no longer visible in the opening title.