

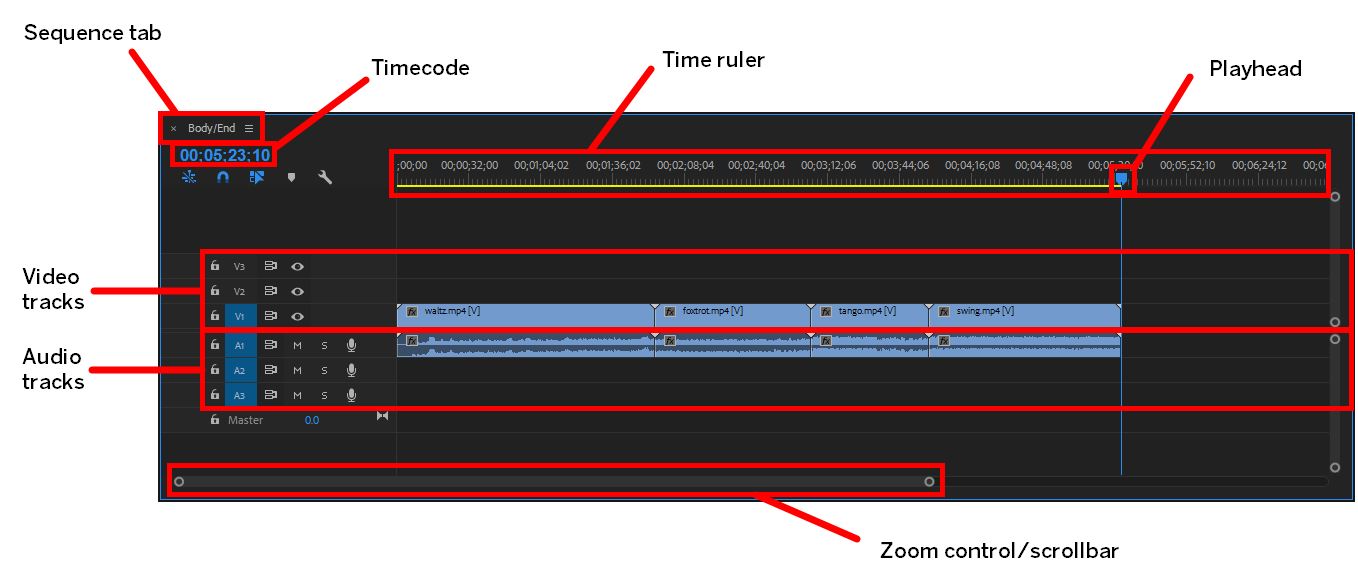
Before we go further into editing, let's take a closer look at the Timeline panel. The Timeline panel is an important piece of the Premiere Pro interface, and a lot of editing work takes place in the Timeline. The following diagram highlights the most important elements of the Timeline panel:
The table below provides information about each of these elements:
| Feature | Function |
|---|---|
| Sequence tab | Displays the title of the sequence you are currently working with. If you are working with several sequences in the same project, each sequence will show on a different tab in the Timeline panel. |
| Timecode | Shows the timecode for the current frame in the Timeline panel. |
| Playhead | Indicates the current frame displayed in the Program Monitor. |
| Time ruler | Displays time within the Timeline. |
| Video tracks | Area for placing the video clips and/or still images that you want in your movie. Multiple tracks are used to superimpose or mix clips. |
| Audio tracks | Area for placing the audio clips that you want in your movie. Multiple tracks are used to mix clips. |
| Zoom control/scrollbar | Allows for zooming in and out on the Timeline, and also allows for scrolling along the Timeline if a sequence is longer than the visible area in the Timeline. |
Let's experiment with some of the tools in this panel so we can better understand how the Timeline panel works. We will start by exploring the Zoom control, which is built into the horizontal scroll bar at the bottom of the Timeline panel.
Step 1. To zoom out, using the horizontal scrollbar at the bottom of the Timeline panel,
Press & Drag to the right
Step 2. To zoom in, using the horizontal scroll bar,
Press & Drag to the left
NOTE: You can also use a keyboard shortcut to zoom in or out on the Timeline. To zoom in, press the plus key (+) multiple times and to zoom out, press the minus key (-) multiple times. However, the plus and minus keys on the numeric keypad won't work for these shortcuts, as the numeric keypad is used for controlling the time displayed in the timecode.
00;00;00;00
Step 3. To move the playhead to a different position, at the top of the Timeline,
Press & Drag ![]() to the right
to the right
Step 4. To quickly jump to another location on the Time Ruler,
Click anywhere on the Time Ruler