Once your project is complete, you have many options for sharing and exporting the finished video. You can export it to an MP4 file saved on your computer, or you can upload it directly from Premiere Rush to a number of social media services, such as Facebook or YouTube.
To learn more about exporting videos from Premiere Rush, watch the following video.
Description of the video:
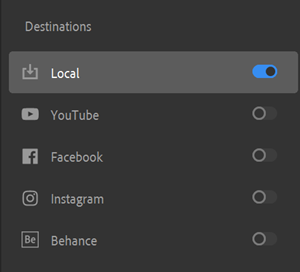
[music] Exporting a completed video in Premiere Rush is done through the Share workspace. We can access the Share workspace using the Workspace switcher tabs in the upper left corner of the Premiere Rush interface. To switch workspaces, click on the Share tab and the workspace will load. The Share workspace is divided into three different sections: the destinations list, settings, and a place to preview your completed video. Let’s see what each of these sections do, then we'll demonstrate the process of exporting a video. The Destinations list, located on the left side of the screen, gives you the ability to publish a completed video directly from Premiere Rush to a number of different sites, including Facebook and YouTube. You can also save your video to your computer from here as well with the Local destination. As a heads-up, in order for your video to successfully publish to Facebook, YouTube, and Behance, you’ll need to log into those services before exporting a video. You can log in through the Settings for a specific service. The settings are displayed immediately to the right of the Destinations list. Clicking on a service’s name will display the relevant settings for that service. We can also view and adjust advanced settings for a service by clicking on the Advanced Settings heading. The preview section on the right side of the Share workspace allows you to preview your video before you export it. To preview the video, use the playback controls beneath the video preview to start and pause playback as needed. [narration in previewed video] ... fun facts about cats. [music] Now that we’re familiar with the Share workspace, let’s walk through the process of exporting a completed video. I’ll demonstrate how to save a copy of a video to my computer, as well as publish it to YouTube. First, to save a copy to my computer, in the Destinations list on the left side of the screen, I’ll toggle the switch for Local to On. In the Settings section, I'll click in the File Name text entry field and type the name Cat Facts Final. To change the location where I'm saving the file to, in the Save to… field, I’ll click on the folder name that’s already displayed, and in the Choose Export Folder dialog box, I’ll browse to the location I want to save to. I’ll save mine to the Cat Video folder, which is on the desktop. I’ll click on the Cat Video folder to select it, then in the bottom right corner of the Choose Export Folder dialog box, I’ll click the Select Folder button. Next, to indicate I want to publish the video to YouTube, in the Destinations list on the left side of the screen, I’ll toggle the switch for YouTube to On. To sign into my YouTube account, I'll click on the Sign in button. My web browser will open, and I’ll complete the login process there. Once I’m logged in, I’ll be brought back to Premiere Rush. To give the video a title, in the Title text entry field, I’ll give it the name Cat Facts Final. To add a description, in the Description text entry field, I’ll type Final version of the Cat Facts video. I’ll also set the privacy level to Private here – I can change this later on in YouTube if I want. Now that I’ve chosen where I want to publish the video and adjusted any necessary settings, I can publish the video. To do this, in the lower right corner of the Premiere Rush interface, click the Export button. The Rendering view will load, and Premiere Rush will then render the video and publish it to whichever destinations we selected in the Destinations list, if any. Like I mentioned earlier, I’m saving my video to my computer and publishing it to YouTube. To start, Premiere Rush will save the completed version of the video to my computer. After the video is finished rendering, to publish the video to the destinations you chose, at the bottom of the window, click the Publish button. Premiere Rush will upload your video to the chosen destinations. The Publish button will only appear if you're publishing your video to destinations other than saving it to your computer. If you’re only saving your video to your computer using the Local destination, this button won’t appear – instead, you’ll see the Done button. Once the video has been published, or if you’re only saving the video to your computer, to exit the Rendering view, at the bottom of the screen, click the Done button. Premiere Rush will return you to the Share workspace. [music]
Premiere Rush makes it easy to save a local copy of your video and export it to multiple services at the same time, simply by toggling the switches in the Destinations panel:

Additionally, you have the ability to adjust advanced settings for your video, including the following:
- The resolution used for exporting the video
- The video's frame rate
- The audio channels used for the video
- The video's overall quality
This can be helpful if you need to export the video using specific settings for use on a video service that's not one of the ones you can export to using Premiere Rush (such as Kaltura at IU). You can also choose from a number of presets, which bundle options together based on a number of popular export formats.
NOTE: If you need to export your video in a file format other than MP4, or need to adjust export settings that aren't available in Premiere Rush, you can open the project in Premiere Pro and export it from there. More information on opening Rush projects in Premiere Pro can be found here.
Exporting a local copy of a video
Exporting a local copy will save the video to a location you specify on your computer. Let's practice exporting a file now by exporting a video using the Share workspace. We won't make use of the advanced settings in this lesson, but feel free to expand the Advanced Settings menu and explore the settings there.
Let's go ahead and export the Cat Facts video that was created in the lesson On your own: Putting it all together.
NOTE: If you're exporting a different Premiere Rush project than the Cat Facts one, you can change the references to Cat Facts in the following instructions to match the video you're exporting.


