The Append query allows records to be restored to or added to an existing table. Append queries allow us to add new records to the database without going through time consuming data entry. This approach can be an alternative to bringing data directly into an existing table using the import tools, especially when there are mismatches between existing fields and those imported.
Importing Data to Append
The English department at the University of the Midwest is going to start using the database we have been creating. We already added the English department to tblDepartments. The English department has been keeping the list of their courses in an excel file. We want to add these records to tblCourses. Since the structure of the spreadsheet doesn't match our table structure, the spreadsheet's data needs to be imported into the database and placed in a new table; then we can append the data from that table into our existing Employees table.
Step1. To begin importing data, on the Ribbon,
Click the External Data tab
We now see the various options available to us when dealing with external data in Access. We want to import a Microsoft Excel file into Access.
Step2. To import an Excel file, in the Import & Link group,
Click  , Point From File, Click Excel
We see the Get External Data -- Excel Spreadsheet dialog box.
We will navigate to the Access_AMD subfolder and choose the correct file to import.
Step3. To begin finding the correct file, to right of the File name text box,
Click 
Step4. Navigate to the Access_AMD subfolder within the epclass folder.
Step5. To select the spreadsheet file to import,
Double-Click EngCourses.xlsx
Step6. Verify that the "Import the source data into a new table in the current database" radio button is selected.
Step 7. To continue, if necessary,
Click 
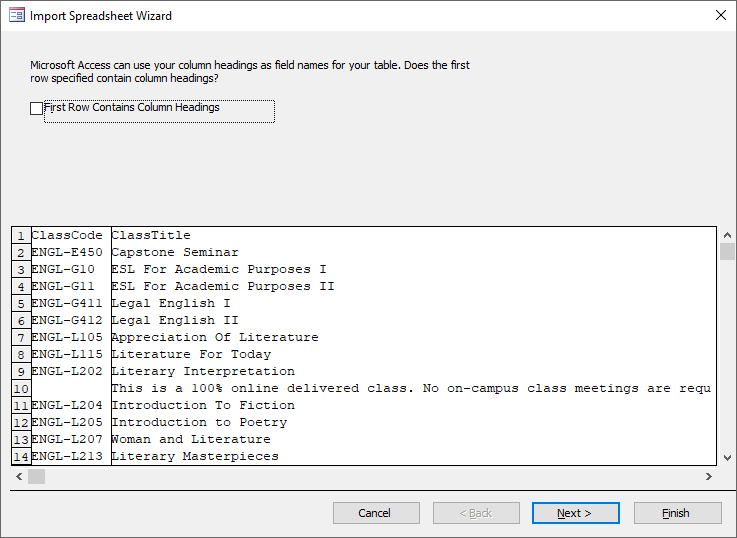
You see the Import Spreadsheet Wizard:

This screen in the wizard has a "First Row Contains Column Headings" checkbox at the top. If we look at the data showing at the bottom of the screen, we see that the first row does in fact contain headings for the columns.
We want to select this option.
Step7. To indicate that the first row of data contains column headings,
Click the "First Row Contains Column Headings" checkbox
We see the first row in the preview window change appearance. These column headings will be treated as field names from this point forward, not as data to be imported.
Since this table is only temporary and we will be deleting it once we have appended our data to the Courses table, we want to create this table as fast as possible. The option we have changed is the only option we need alter so we want to skip the rest of the steps in the wizard.
Step8. To finish the wizard,
Click 
We see a dialog box noting that the data was successfully imported. It also allows us to save the import steps, which would be useful if this were a data source from which we imported regularly. Since that is not the case here, we won't save them at this point.
Step9. To close the dialog box without saving the import steps,
Click 
Since we skipped the step where we could have named the table, notice the name of the new table is EngCourses, which is the same as the worksheet name in Excel. It doesn't conform to Access naming conventions, but remember that it is only a temporary table anyway.
Reviewing the Imported Data
Before we append the data to the Courses table, we should review what we imported to be sure the import went as expected.
Let's open the table.
Step1. To open the new table, in the Navigation pane,
Double-Click EngCourses
We see the 57 records that were imported. As we skipped the step where we could make decisions on the primary key, Access assigned an autonumber as the primary key of our table.
There is also something a little odd in our data. Notice there are some rows where the ClassCode, Description, Dept, and CreditHours fields are empty. These rows only have information in the ClassTitle column.
Let's take a better look at the ClassTitle column.
Step2. To expand the ClassTitle column,
Point between the ClassTitle and Description headings, Double-Click to expand the ClassTitle column
Looking at the data in rows 9, 18, 27, and 35, we can see that this information is really a note about the course above the columns. If we are going to keep notes on the courses, we should add a Notes field to the Courses table and store this type of information in that column. In our case, we just want to get rid of the stray information.
We could manually delete the extra rows, since there don't appear to be that many. However, we could use a Delete query to more easily remove the extra rows.
Step3. To start to close the table, at the top of the object workspace,
Right-Click EngCourses tab, Click Close
Step4. To skip saving the changes to the layout of the table,
Click 
We will now create a Delete query.
 , Point From File, Click Excel
![]()
![]()

![]()
![]()
![]()

