The Make Table query is a select query that pulls data from a database based on certain criteria, and then saves that data into a new table. The new tables that result from Make Table queries can be used for different purposes. For example, a table can be used to hold inactive records for a specific point in time and then used as the basis for historical reports about that period. The Make Table query is also useful for making some information in an existing table available to other users without exposing all fields of the table. New tables can also enhance the performance of very complex queries based on multiple tables. The table becomes the record source for forms or reports, and the query doesn't have to run each time those objects are opened.
Using a Query to Create a Table
As we pointed out earlier, the Locations table was added to the database after the Access: Structuring & Relating Data course. Let's take a look at the data currently stored in the Locations table.
Step1. To open the table,
Double-Click tblLocations
Step2. Close tblLocations.
Step3. To begin creating a new query, on the Ribbon,
Click the Create tab, Click ![]()
Step4. To select the table we need to create this query, in the Add Tables pane,
Double-Click tblLocations
Step5. Resize the tblLocations window as needed.
Step6. To add the needed fields to the grid,
Double-Click the BuildingCode, BuildingName, StreetAddress, City, State, and Zip fields
Step7. To preview the query, on the Ribbon,
Click 
Step8. To return to Design View,
Click 
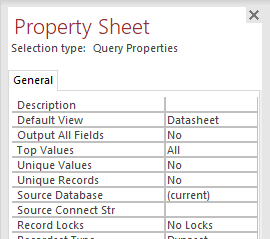
Step9. To view the query properties, in the Show/Hide group of the Query Design tab,
Click![]()

Step11. To change the Unique Values option, in the Unique Values field,
Double-Click No
Step12. To see the results of the query, on the Ribbon,
Click 
Running a Make Table Query
We need to tell Access that we want this to be a Make Table query instead of the default Select query type.
Step1. To return to Design View,
Click 
Step2. To designate the query as a Make Table query, on the Design tab of the Ribbon, in the Query Type group,
Click ![]()

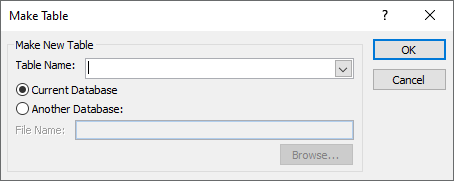
Step3. To name the table, type:
tblBuildings Enter key
Step4. To run the Make Table query, on the Ribbon,
Click ![]()

Step5. To complete the creation of the new table,
Click ![]()
Step6. To close the query without saving changes, at the top of the object workspace,
Right-Click the query tab, Click Close, Click ![]()
Adding a Primary Key to the Buildings Table
While we have created our new table called tblBuildings, it does not yet have a primary key nor is it related to any other tables. There must be a primary key assigned before we can establish relationships to other tables.
Let's assign a primary key to the Buildings table.
Step1. To open tblBuildings in Design View, in the Navigation Pane,
Right-Click tblBuildings, Click Design View
Step2. To select the BuildingCode field, if necessary,
Click the BuildingCode field
Step3. To set the BuildingCode field as the primary key, on the Ribbon, in the Tools group,
Click 
Step4. To save the changes to the table design, press:
Control key + S
Step5. Close the table.
Creating Relationship for the Buildings Table
The Buildings table needs to be related to the Locations table.
Let's relate the Locations and Buildings tables.
Step1. To access the Relationships window, on the Ribbon,
Click the Database Tools tab, Click 
Step2. If necessary, in the Add Tables pane, switch to the Tables tab.
Step3. To add the Buildings table to the Relationships window,
Double-Click tblBuildings
NOTE: If tblBuildings does not appear in the Tables tab of the Add Tables pane, switch to the All tab — tblBuildings should be displayed there.
Step4. To position tblBuildings closer to the tblLocations table,
Press & Drag the tblBuildings title bar and move it to the left of tblLocations
Step5. To expand the field list, if necessary,
Press & Drag the bottom border of the field list
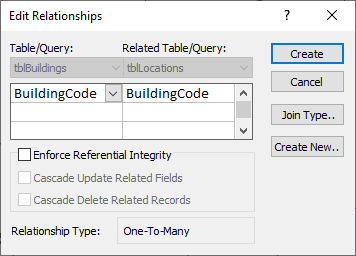
Step6. To create a one-to-many relationship, from tblBuildings to tblLocations,
Press & Drag BuildingCode in tblBuildings onto BuildingCode in tblLocations

Step 7. To enforce referential integrity,
Click the "Enforce Referential Integrity" checkbox
Step8. To cascade update related fields,
Click the "Cascade Update Related Fields" checkbox
Step9. To create the relationship,
Click ![]()
Step10. To close the Relationships window,
Right-Click the Relationships tab, Click Close
Step11. To save the layout changes,
Click ![]()
Removing Duplicate Fields
When we used the Make Table query to create the Buildings table, the data also remained in the Locations table. We would like to remove the duplicate information. It might seem that a Delete query would be used to do this but that is not the case. Delete queries allow us to delete rows of data, not fields.
Let's remove the duplicate fields,
Step1. To open the Locations table, in the Navigation pane,
Right-Click tblLocations, Click Design View
Step2. To select BuildingName,
Click the gray box to the left of BuildingName
Step3. To select the rest of the duplicate columns,
Press & Hold the Shift key, Click the gray box to the left of Zip
Step4. To start to delete the columns, press:
Delete key

Step5. To finish deleting the fields,
Click ![]()
Step6. To save the changes to the design, press:
Control key + S
Step7. Close the table.

