Today we will be working with a database that contains information for managing student enrollments at the University of the Midwest.
Our database holds accurate and timely information about the departments, faculty, courses, students, and their enrollments. This information is of little value to us unless we are able to analyze the information and answer questions about it. To examine just the information that we want and to relate it in a meaningful manner, we rely on the use of queries within Access.
We will query the University of the Midwest database to retrieve customized data sets and summarized data sets. We need to be able to see things like which classes students are taking, who is teaching the classes, and where classes are being held. Access queries will help us to sort, filter, summarize, analyze, update, append, and delete the information in our tables.
An important note about these materials
Before getting started, it's important to note that these materials were written using the Office 365 version of Access. If you are using a different version of Access to follow along with the materials, such as Access 2016 or older, your interface may look different and certain interface elements may have different names than those shown in these materials. While you'll be able to complete many of the exercises in this course using an older version of Access, some of the steps may refer to interface elements or dialog boxes that have had their names and locations changed.
Let's look at the University of the Midwest database we will use in today's workshop. We will launch Access and then open and explore the database.
Step1. Launch Access.
Step2. To begin opening an existing database, in the left pane,
Click Open
Step3. To browse to a location on the computer, under the Other Locations heading,
Click![]()
Setting the Location for Opening Your File
When the dialog box opens, it lists a default location from where the file will be opened. All of our exercise files are contained in the epclass folder, located on the desktop. We'll want to change our location to this folder.
We will start at the desktop, since our exercise file folder, epclass, is located there.
Step1. To move to the desktop,
Click
Step2. To open the epclass folder,
Double-Click![]()
Step3. To open the correct folder,
Double-Click the Access_AMD folder
Step4. To open the database file,
Double-Click UofMW.accdb
Step5. To enable the content,
Click![]()
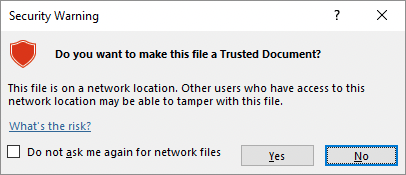
NOTE: Once a file has been opened and enabled from a specific location, Access will consider this location a trusted source and will not show this warning again. For more information regarding trusted documents, refer to the Access online Help documentation.

Step6. To make the file a trusted document, if necessary,
Click![]()
Viewing Tables
There are twelve tables in the University of the Midwest database: tblCourses, tblDepartments, tblEnrollments, tblFaculty, tblGradeScale, tblLocations, tblMeetingTimes, tblMeetingDays, tblRoles, tblSections, tblSectionsInstructors, and tblStudents. Let's take a moment to look at some of these tables so we have a clear idea of what information they contain. In particular, we will look at the tables we added between Access: Structuring & Relating Data and today's workshop.
Step1. To view the Students table, in the Navigation pane,
Double-Click tblStudents
Step2. To view a subdatasheet, next to any record,
Click![]()

NOTE: If a table is on the "one" side of multiple relationships, instead of seeing a subdatasheet, the Insert SubDataSheet dialog will open. This dialog box allows you to pick what data you want to see in the subdatasheet. To learn more about subdatasheets, visit this Microsoft support page about how to add a subdatasheet.
Step3. To open the Enrollments table,
Double-Click tblEnrollments
Step4. To open the Grade Scale table,
Double-Click tblGradeScale
Step5. To open the Locations table,
Double-Click tblLocations
Step6. To open the Meeting Days table,
Double-Click tblMeetingDays
Step7. To open the Meeting Times table,
Double-Click tblMeetingTimes
Step8. To close all the tables, at the top of the object workspace,
Right-Click any tab, Click Close All
Viewing Relationships
The structure of the University of the Midwest database includes tables that allow us to track information about the classes offered at the University of the Midwest. Because all of these table are related, we can ask Access to display in one datasheet information about what department a class is in, who is teaching the class, where the class is located and which students are enrolled in the class.
When working with a relational database, it is important to understand the relationships that exist between the tables. Let's open the Relationships window to view how the tables are related.
Step1. To see the available database tools, on the Ribbon,
Click the Database Tools tab
Step2. To view the table relationships for the database, in the Relationships group,
Click
| Table Name | Related Table | Join Fields |
|---|---|---|
| tblCourses | tblSections | CourseCode = SectionKey |
| tblDepartments | tblCourses | DeptCode = DeptCode |
| tblDepartments | tblFaculty | DeptCode = Dept Code |
| tblFaculty | tblSectionsInstructors | EmployeeID = InstructorID |
| tblGradeScale | tblEnrollments | LetterGrade = Grade |
| tblLocations | tblDepartments | LocationID = Office |
| tblLocations | tblFaculty | LocationID = Office |
| tblLocations | tblSections | LocationID = Location |
| tblMeetingTimes | tblSections | MeetingTimeID = MeetingTimeID |
| tblMeetingDays | tblSections | MeetingDayID = MeetingDayID |
| tblRoles | tblSectionsInstructors | RoleID = Role |
| tblSections | tblEnrollments | SectionKey = SectionID |
| tblSections | tblSectionsInstructors | SectionKey = SectionKey |
| tblSections | tblEnrollments | student_id = UniversityID |
Step3. To close the Relationships window, at the top of the object workspace,
Right-Click the Relationships tab, Click Close

