Before we start building a table in Access, we should take a minute and think through what information we want to track. What information will we need about each department?
One item we will definitely want to include is the DeptCode field. This field is what will allow us to connect our department information with the faculty table that we already have. It would also make sense to include a department name field that's more descriptive. For example, the BIOL department represents the Biology department. We might also want to include fields for the location on campus, the phone number, department email address, and the departmental web site. For the departmental web site, we will make use of the hyperlink data type. Hyperlinks allow you to enter a web address that can easily be opened by clicking.
Let's begin by setting up a new table.
Step1. To switch to the Create command tab, on the Ribbon,
Click the Create tab
Step2. To create a new table, in the Tables group,
Click![]()
Step3. To create the first field,
Click![]()
Step4. To choose the field type, in the drop-down menu,
Click Short Text
Step5. To enter a name for the field, in the Field1 area, type:
DeptCode Tab key
Step6. To choose the field type, in the drop-down menu,
Click![]()
Step7. To enter a name for the field, in the new column heading, type:
DeptName
Step8. To select a data type for the next column,
Right-Click![]()
Step9. To set up the field, in the drop-down menu,
Click![]() , type: Office
, type: Office
Step10. For the rest of the fields, enter the following information:
| Field Name | Data Type |
|---|---|
| Phone | Short Text |
| Short Text | |
| URL | Hyperlink |
NOTE: Like EmployeeID, the Phone field is considered a text field, even though it is made up of numbers, because we will never perform any calculations on it.
Setting the Field Size
Now that we have the basic field names and their types established, we can go back and set up some additional information for each field. The first thing we'll do is edit the field size.
The default field size for Short Text is 255 characters, but we don't expect any of our Short Text fields to need that much space. If we leave the field size at the default, Access will be reserving a lot of space for our database that will never be needed. We're going to put some limits in so that there is less unused space in our file.
Step1. To select the DeptCode field,
Click DeptCode
Step2. Click the Table Fields tab, if necessary.
![]()
NOTE: Depending on your screen resolution, the icons on the Ribbon may appear differently.
Step3. To adjust the field size, in the Field Size field on the Ribbon,
Click 255, type: 4 Enter key
Step4. To move to the next field,
Click DeptName
Step5. To adjust the field size of the DeptName field, in the Field Size field on the Ribbon,
Click 255, type: 50 Enter key
Step6. Use the following information to establish the field size for the rest of the fields:
| Field Name | Field Size |
|---|---|
| Office | 6 |
| Phone | 14 |
| 8 |
Entering Data in a Table
We'll start by entering some information into our newly created table by hand, to practice direct data entry.
Step1. To start entering the first record,
Click the first cell in the DeptCode column, type: pols, Tab key
NOTE: We will adjust the settings for this field later to display our entry in all capital letters.
Step2. To enter the department name, in the DeptName field, type:
Political Science Tab key
Step3. To enter the location, in the Office field, type:
SM211 Tab key
Step4. Use the following information to finish data entry for this record:
| Field | Value |
|---|---|
| Phone | 8128671758 |
| polisci | |
| URL | http://example.com/politicalscience |
Step5. To close our new table,
Right-Click![]() , Click Close
, Click Close
Step6. To begin saving the table,
Click![]()
Step7. To change the name of our table, in the Save As dialog box, type:
tblDepartments Enter key

Importing Records from Excel
Now that we have our tblDepartments closed, we can import the remaining records.
This section has less guidance than the previous sections. If you would like a walk-through, watch the video Importing Records from Excel.
Step1. Click the External Data tab, then in the Import & Link group, use the New Data Source button to import an Excel file.
Step2. Browse to the Departments_to_Import.xlsx file, and append the records to tblDepartments.
Step3. Open tblDepartments to confirm that 4 additional records have been added.
Enhancing Table Design
Now that we have all of the relevant records in tblDepartments, we can do a few things to improve the table. We will set a primary key, and set up an input mask for the Phone field.
Setting the Primary Key
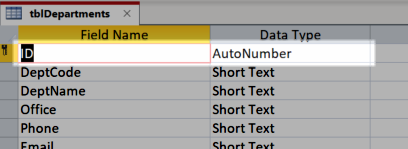
When we first created our table, Access created an Autonumber field called ID in the first column, and set it up as the primary key. This field will automatically assign a unique number to each record as it's entered. For situations when the records in a table do not have a good candidate for a primary key, this can be very helpful. However, in our table, we already have a field that is the perfect candidate for primary key, the DeptCode, since this code is unique to every department.
What we'll do now is move to design view to delete the ID field, and assign DeptCode as our new primary key.
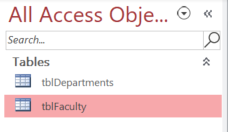
NOTE: If you did not successfully complete the challenge exercise, open MidPoint1.accdb from the MidPoint files folder in Access-The Basics, and save the database as UofMW.accdb.
Step1. Reopen tblDepartments, if necessary.
Step2. Switch to the Home command tab on the Ribbon, if necessary.
Step3. To switch to design view, in the Views group,
Click
NOTE: You can also change to design view from any tab by using the view buttons in the lower-right corner of the object workspace:
![]()

Step4. To select the entire ID field's row, in the Field Name area,
Click
Step5. To delete the field, on the keyboard, press:
Delete key

6. To confirm deletion of the field,
Click![]()
Step7. To confirm deletion of the primary key,
Click![]()
Step8. To select the DeptCode field, if necessary,
Click
Step9. To set the DeptCode field as the primary key, in the Tools group of the Design command tab on the Ribbon,
Click
Step10. Save the changes.
Using an Input Mask for the Phone Number
We could leave the Phone field as it is, but this would display phone numbers as an unbroken string of ten numbers. This can be difficult to read. Instead, we will tell Access to only accept numbers for data entry, and to display our phone numbers with parentheses and other characters that will make them easy to read and recognize.
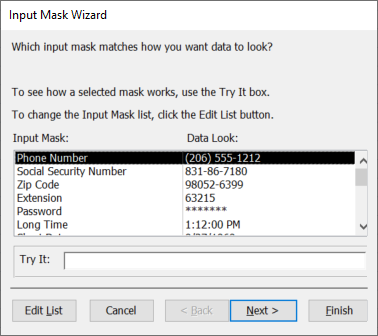
The way to accomplish this is to set up an input mask. Input masks make data entry more precise and error-free, as they restrict the type of data that can be entered. They can also make data more readable by automatically adding familiar symbols. For common types of data, Access has input masks pre-programmed. We simply have to choose the right mask.
Step1. To select the Phone field, in the Field List,
Click Phone

Step2. To position the cursor, in the Field Properties area,
Click Input Mask
Step3. To launch the Input Mask Wizard, on the far right edge of the Input Mask field,
Click

Step4. To continue,
Click
![]()
NOTE: If we wanted to make the area code required, we could replace the 9s with 0s between the parentheses.
Step5. To continue,
Click![]()
Step6. To keep the symbols stored with the phone number,
Click the "With the symbols in the mask, like this:" radio button
Step7. To continue,
Click![]()
Step8. To continue,
Click![]()
| Character | Use |
|---|---|
| ! | Causes the input mask to fill from left to right instead of from right to left. |
| 9 | Represents an optional digit. |
| 0 | Represents a required digit. (The last zero tells Access to store the symbols in the mask). |
| \ | Forces Access to display the next literal character. (This character works with only one literal character, versus double quotes, which work with multiple characters). |
| ; | Used as a separator. |
| _ | Used as the placeholder when entering data. |
Step9. To switch to datasheet view, on the Ribbon,
Click
Step10. To save our design changes,
Click![]()
Using an Input Mask for Text
Right now, the DeptCode field is not uniform. The last record is in lowercase letters, whereas the other records are all in uppercase. We'd like DeptCode in tblDepartments to look like it does in tblFaculty, where each code is shown in uppercase. We can do this with an input mask. In this case, there is nothing in the Input Mask Wizard that will help us, so we'll enter the code in manually.
Step1. To return to design view,
Click
Step2. To select the DeptCode field, in the Field List,
Click DeptCode
Step3. To select the correct area, in the Field Properties,
Click Input Mask
Step4. To open the online help documentation, on the keyboard, press:
F1 key
NOTE: The F1 key opens contextual help links, based on where your cursor is. You can also search for Help topics by clicking the Help tab in the Ribbon and then clicking the Help button, or by clicking "Tell me what you want to do..." on the Ribbon.
A browser window will open, and the page "InputMask Property, Access" from the Microsoft Docs site will load.
Step5. To choose the correct link, if necessary,
Click the "TextBox.InputMask Property (Access)" link
| Character | Use |
|---|---|
| L | User must enter a letter |
| ? | User can enter a letter |
| A | User must enter a letter or a digit |
| a | User can enter a letter or a digit |
| > | Converts all characters that follow to uppercase |
| < | Converts all characters that follow to lowercase |
NOTE: A field can also be left empty, regardless of the input mask codes, unless it is marked "required."
Step6. Close the browser window.
Step7. To set the Input Mask for DeptCode, in the Input Mask field, type:
>LLLL
Step8. Save the changes we've made to the design of our table.
Step9. To switch to datasheet view, on the Ribbon,
Click
Step10. To close the table,
Right-Click![]() , Click Close
, Click Close

