Up to this point in Access, we have been working with independent tables, which could have been easily created in another application such as Microsoft Excel. Early in the workshop, we explained some advantages of using a relational database over a flat file database. Next we will focus on one of those advantages, the ability to create a relationship between our faculty table and our new departments table.
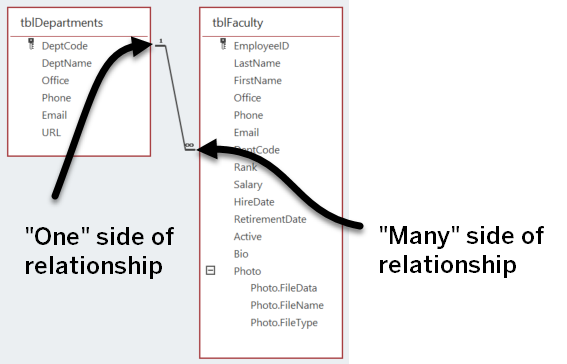
The most common type of relationship in Access is the one-to-many relationship. In this example, one department can have many faculty members, but each faculty member is assigned to only one department. The primary key is DeptCode, which is the common field that will relate or join these two tables.
The foreign key in the related table links to the primary key in the primary table. Records with a foreign key can contain duplicate values (unlike the primary key), or this field value can be left blank. When tables are related, there is less chance for error because fields do not have to be manually updated in multiple places; therefore, redundancy and inconsistencies are minimized or eliminated, and data within the database is much easier to locate and manage. For example, in this database, Access will keep track of information pertaining to each department on the DeptCode field; therefore, any information specific to any department has to be entered only once into tblDepartments.
We will learn more about the other types of relationships, one-to-one and many-to-many, in the course Access: Structuring and Relating Data.
Adding Tables to the Relationships Workspace
In order to set up the one-to-many relationship between our two tables in Access, we will need to make use of the Database Tools command tab.
Step1. To open the Database Tools tab, on the Ribbon,
Click the Database Tools command tab
Step2. To open the Relationships workspace,
Click
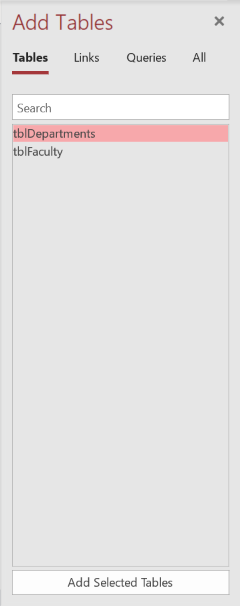
Step3. To select tblDepartments, if necessary,
Click tblDepartments
Step4. To select the second table, on the keyboard, press:
Shift key + Click tblFaculty
Step5. To add the tables, at the bottom of the Add Tables pane,
Click ![]()
Step6. To position the cursor,
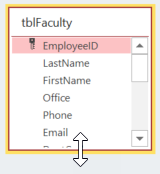
hover over the bottom border of tblFaculty

7. To increase the length of the tblFaculty window,
Press & Drag the bottom border of the window down until all of the fields are visible
Step8. Repeat steps 5 & 6 with tblDepartments, if necessary.
Step9. To close the expanded Photo field information,
Click
Defining a Relationship Between Two Tables
Remember that there is one record for the Mathematics department in tblDepartments, but there are many faculty assigned to the DeptCode MATH in tblFaculty. Access will automatically recognize the one-to-many relationship because DeptCode is the primary key in tblDepartments. Access reminds us of the primary key for each table with this symbol:![]()
The fact that DeptCode is the primary key in tblDepartments guarantees that the values in that field are unique. The same value for DeptCode, however, can appear multiple times in tblFaculty, for each faculty member in that department. Thus, this will be a one-to-many relationship by definition.
Let's create the relationship between our two tables on the DeptCode field.
Step1. To create the relationship, in the tblDepartments window,
Press & Drag DeptCode over to DeptCode in tblFaculty

Enforcing Referential Integrity
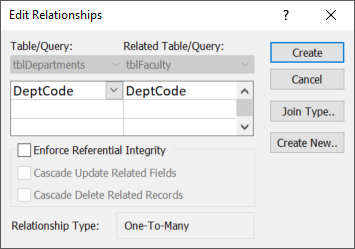
In this dialog box, we can also enforce referential integrity. Referential integrity is very important to good database design. It operates strictly on key fields, and prevents us from creating so-called "orphaned" records. Every time a key field is changed, either in the primary table or the related table, Access will check to make sure that the relationships will be kept intact and that the records in the database are not invalidated.
For example, we would not want to assign a faculty member a department code that does not exist. This might happen due to data entry error, such as typing MATS instead of MATH for a Mathematics faculty member. If you enforce referential integrity, Access will not allow you to enter that mistyped value.
Step1. To enforce referential integrity for this relationship,
Click the "Enforce Referential Integrity" checkbox
Understanding Cascade Update Related Fields and Cascade Delete Related Records
If Cascade Update Related Fields is checked, we can make changes to fields in a related record. For example, if a department were renamed and we decided to change its department code in tblDepartments, cascade update would automatically update the department code field for all faculty in tblFaculty from that department. Enabling this option then becomes a question of business rules; do we want someone doing data entry to have the ability to make that kind of change? If not, or if we adopt as a business rule that our department codes will never change, then we should not select Cascade Update Related Fields.
On the other hand, we almost never want to enable Cascade Delete Related Records. If it's enabled, when we delete a record from the main table, all of the related records get deleted as well. For example, if a department was getting renamed or moved, and we decided to delete the department instead of updating the record, then all of the faculty assigned to that department would be deleted as well.
For our database, we'll just enable Cascade Update Related Fields, in case a department code changes at some point in the future.
Step1. To enable the correct option,
Click the "Cascade Update Related Fields" checkbox
Step2. To finish creating the relationship,
Click![]()

Step3. To close the window, on the Ribbon,
Click![]()
Step4. To save the layout of the relationships workspace,
Click![]()


