We will now open a pre-existing Access database table, so that we can explore the interface and discuss key terminology. Our Access database contains a table to keep track of faculty at the fictional University of the Midwest.
An important note about these materials
Before getting started, it's important to note that these materials were written using the Office 365 version of Access. If you are using a different version of Access to follow along with the materials, such as Access 2016 or older, your interface may look different and certain interface elements may have different names than those shown in these materials. While you'll be able to complete many of the exercises in this course using an older version of Access, some of the steps may refer to interface elements or dialog boxes that have had their names and locations changed.
Opening the Database
Let's go ahead and open the database we'll be working with today.
Step1. Launch Access.
The first thing we see when we launch Access is a variety of templates. In addition to the option to create a new blank database, you can use these templates to create a new database; you can also search online for additional templates.
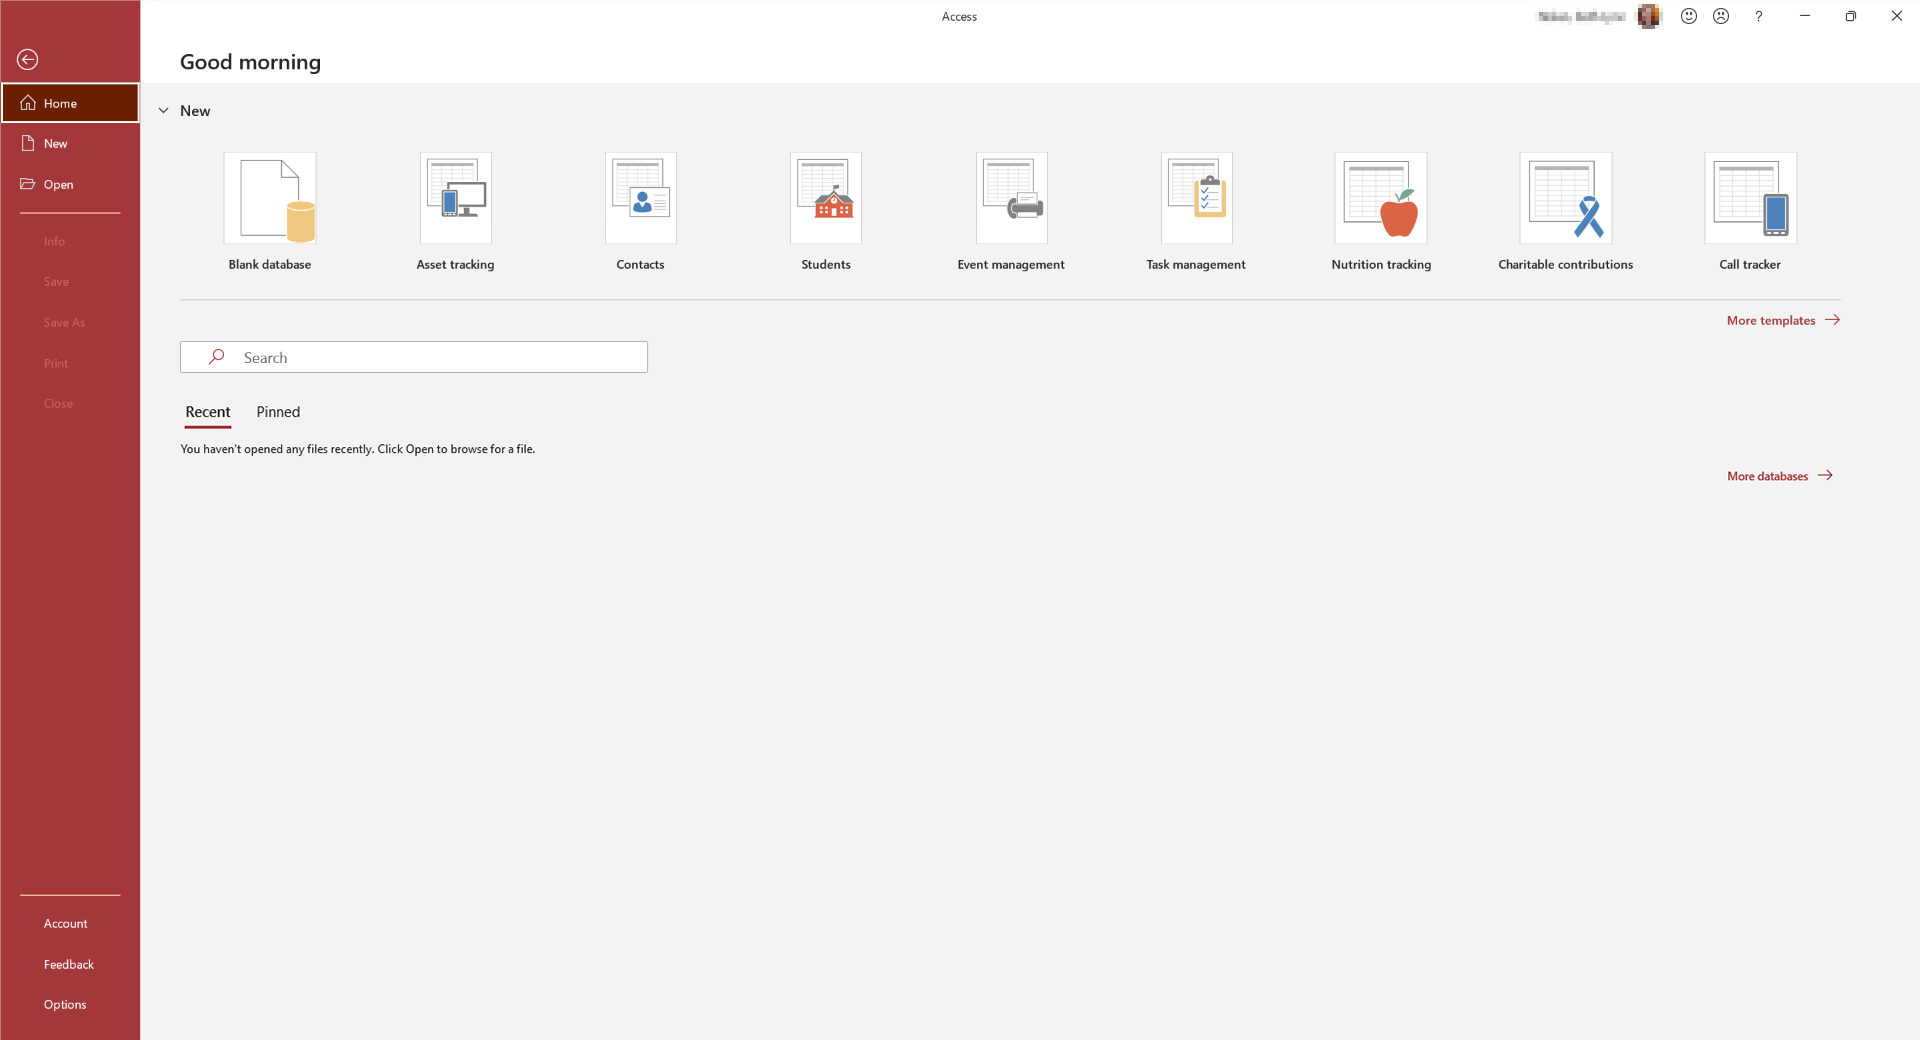
In our case, we're going to navigate to our existing Access database file and open it.
Step2. In the pane on the left,
Click Open
Step3. To brows to a location on the computer, under the Other Locations heading,
Click Browse
Step4. Navigate to the epclass folder on the desktop.
Step5. To open the Access-The Basics folder,
Double-Click Access-The Basics
Step6. To open the correct file,
Double-Click UofMW.accdb
The UofMW.accdb file opens in Access. You may get a warning about opening content that was downloaded from a network drive. Since databases can contain programming code, they can potentially contain viruses. We trust this document, so we're going to indicate to Access that this is trusted content.
Step7. To dismiss the security warning, in the yellow bar at the top of the document window,
Click
The security warning is dismissed.
If you are opening this database from an untrusted network location, you will see the following dialog box:
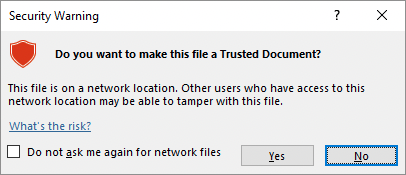
You can choose to make this document trusted, which will mean that Access will not warn you about enabling content every time you open the database. In general, you should only make documents trusted if they have come from someone you trust, and you were expecting the file. Otherwise, click No.
Step8. To make this file a trusted document, if necessary,
Click
Now that we have our database open in Access, next we'll familiarize ourselves with the Access interface.
Exploring the Interface
The Access interface is very similar to other Microsoft Office applications. There are two main areas that we will be working with: the navigation pane and the object workspace:
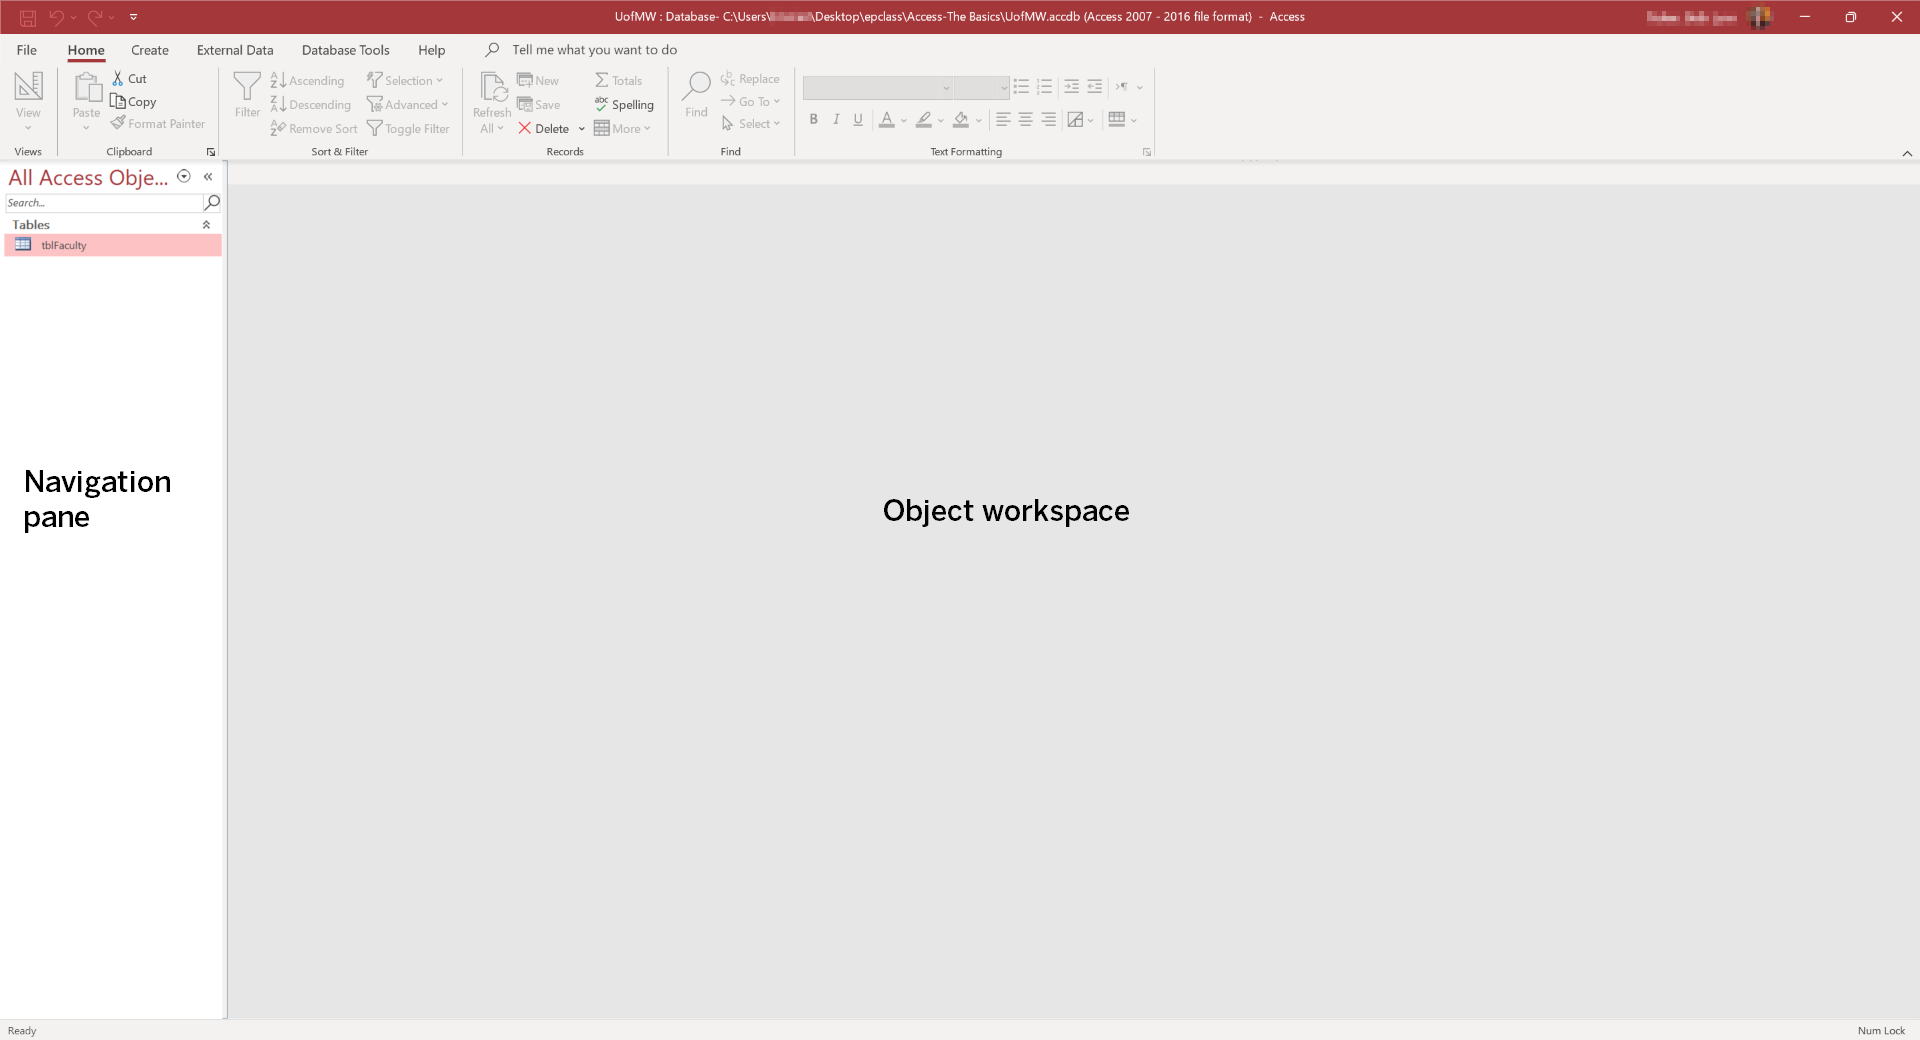
The navigation pane will contain all of the different objects in a database (i.e., queries, forms, tables, reports, etc.). We can organize the objects in our database into categories and groups. Categories let you arrange the objects in the navigation pane, and groups can be filtered. The search field can be used to find database objects quickly. The object workspace is where most editing and data entry will take place. Each open database object will have a separate tab in this section.
In the next section, we'll open tblFaculty and learn more about the characteristics of the fields it contains.
Exploring a Table
In our file, there is only one object: the faculty table. We'll open it and explore some of the properties of a table object in Access.
Step1. To open the faculty table, in the navigation pane,
Double-Click tblFaculty
The faculty table opens in the object workspace.
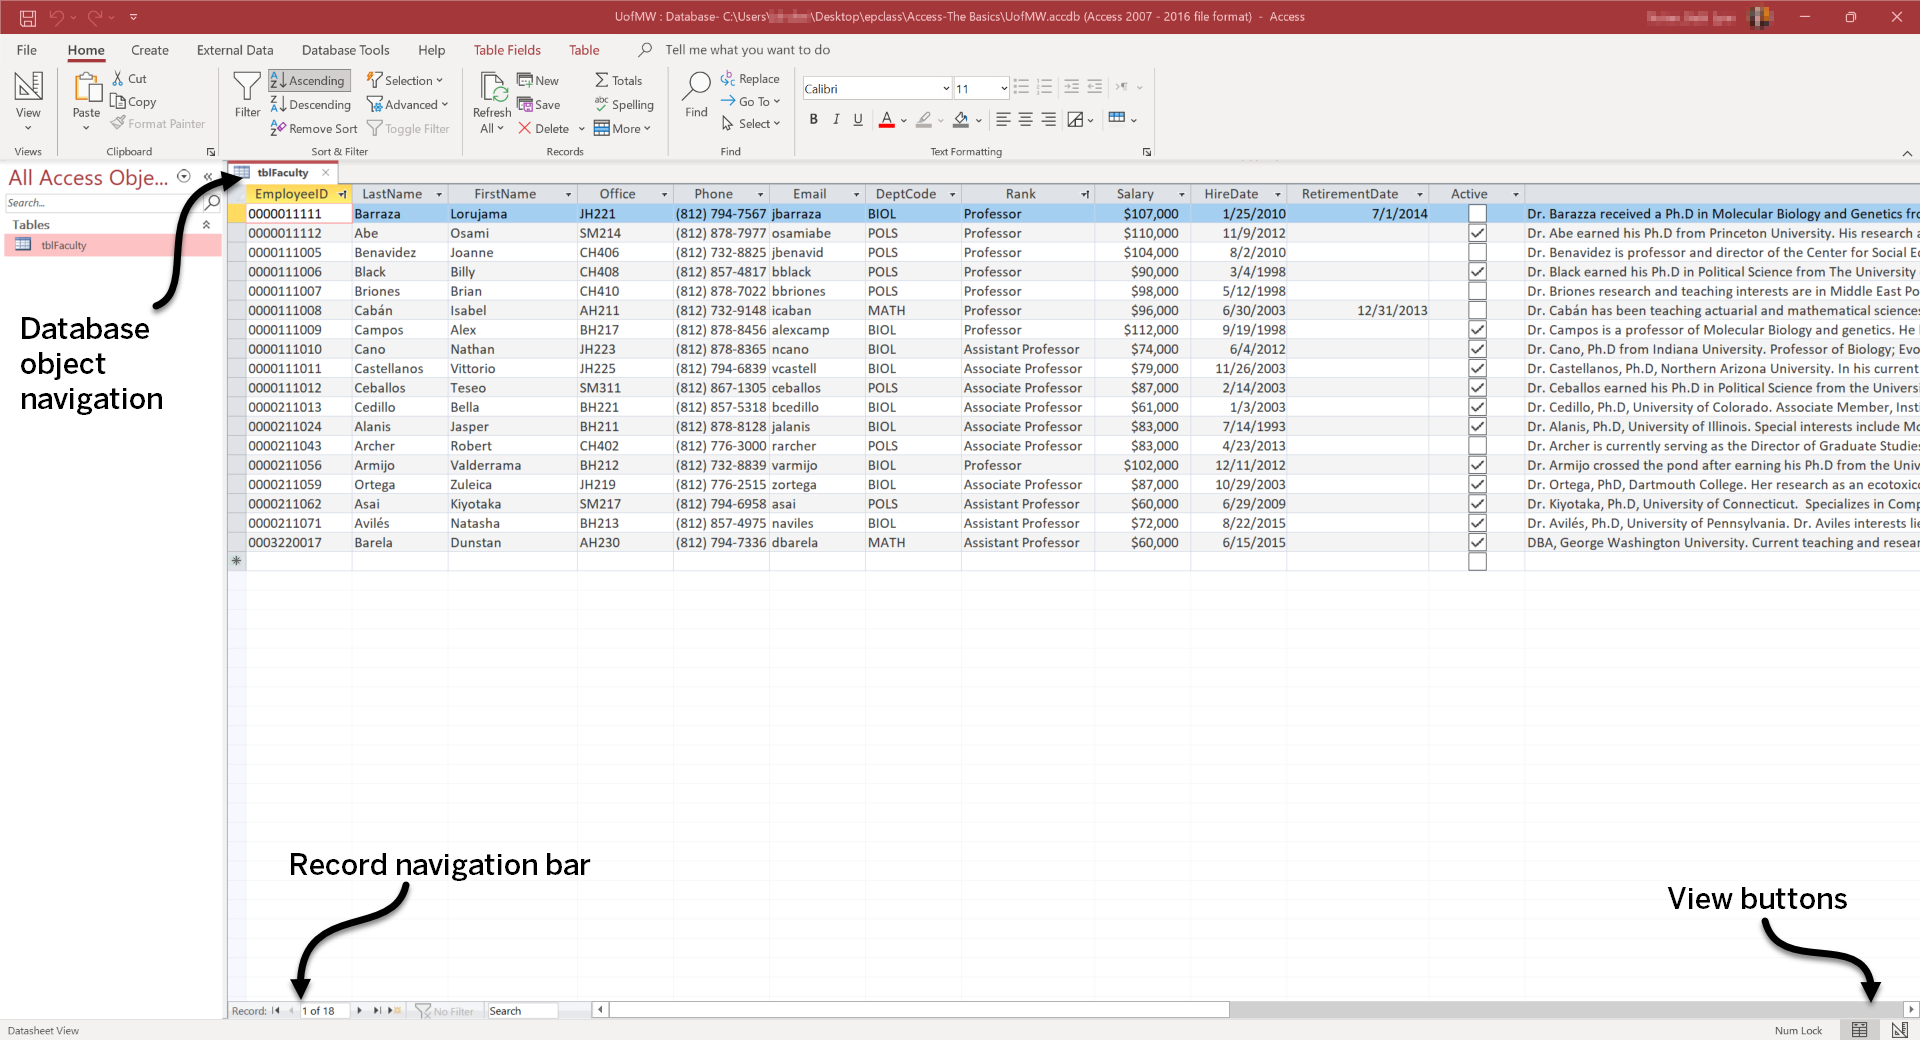
Now that we have a table open, we can see some additional areas of the Access interface. Record navigation is done by using the arrows and search field that will appear in the record navigation bar when an object is open. As we open additional database objects, they will appear in new tabs in the database object navigation.
In the object workspace, we see the contents of tblFaculty in datasheet view. Across the top we see the various fields that form part of this table, including the faculty employee ID number, first and last names, office, email, phone number, and so forth. Let's explore each of these fields and their properties.
Before we begin, we'll minimize the navigation pane, which will give us more room in the workspace to view our data.
Step2. To minimize the navigation pane,
Click
The navigation pane is collapsed, and we can see more of our table in datasheet view.
In the Ribbon, there are two additional command tabs that only appear when a table is open:

We'll start by clicking on the Table Fields tab, which will allow us to see information about the fields themselves.
Step3. To open the Table Fields command tab, in the Ribbon,
Click Table Fields
The Table Fields tab opens, and because the first cell in our table is automatically selected, we see information about the EmployeeID field.
In the Formatting group, we can see that the data type is short text:
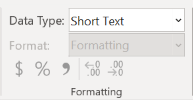
This might seem strange at first, since the employee ID is made up entirely of numbers, but for the purposes of the database, the ID number is considered text. This is because we will never perform any calculations on this number; no one will ever ask what the sum or average of all the employee ID numbers in a department is, for example. Other examples of numbers that are treated as text are phone numbers and zip codes.
At the University of the Midwest, we have a business rule that all employee IDs will be 10 characters long. Being aware of business rules, or standardized ways of defining important concepts, allows us to set up our database with helpful constraints.
Here are some additional business rules that helped structure this table:
|
| Office | Rooms on campus all have a 5- or 6-character abbreviation: two letters for the building and 3-4 characters for the room number |
| Email | Usernames cannot be longer than 8 characters |
| DeptCode | All departments have a 4-letter abbreviation |
| Rank | Ranks for faculty are Assistant Professor, Associate Professor, and (Full) Professor |
Let's look at our next field.
Step4. To make the LastName field active, in the LastName column,
Click the first row of data
The LastName field is selected. If you look in the Properties group of the Ribbon, you'll see that the field size is set to 50.

This field size should be big enough to accommodate the longest last name of the faculty members. The default size for short text is 255 characters, but we don't anticipate anyone's name being that long. By setting the field size to a smaller amount, we can reduce the overall size of the database.
Let's explore the Phone field next.
Step5. To move to the Phone field, on the keyboard, press:
Tab key 3 times
The field size is set to 14 characters for the Phone field, even though there are only 10 digits in each phone number. This is to allow room for the parentheses, the space, and the hyphen that we see in the table.
NOTE: While it is possible to store the phone number as 10 characters and just have Access show it in the table with the additional characters, storing the phone number with room for the extra characters makes it possible to export data with the phone number format, instead of just a string of 10 digits.
Let's examine the DeptCode field.
Step6. To move to the DeptCode field, on the keyboard, press:
Tab key twice
Our business rules at the university allow us to limit the field size to just four characters. Note that all DeptCodes are also listed in uppercase; this table has been set up so that all entries will automatically be switched to uppercase, so that the look of the DeptCode is uniform no matter how it might be entered.
Next, we'll look at a field that has a different data type.
Step7. To move to the Salary field, on the keyboard, press:
Tab key twice
We can see that the data type is set to currency for this field. Underneath the data type, we see the format is also set to currency.

Currency format means the number in this field is displayed as a dollar amount (with a dollar sign), a comma after the thousandths place, and two decimals for the cents. Our database has the cents removed, so all we see are the round dollar amounts.
Step8. To move to the HireDate field, on the keyboard, press:
Tab key
The data type is set to date/time for this field, as well as the RetirementDate field. Note that there is no limit set on the field size; this is because Access has a very specific way that it stores dates and times.
Step9. To move to the Active field, on the keyboard, press:
Tab key twice
The data type for Active is yes/no. This type of field has only two options: true (yes) or false (no), and is usually represented in datasheet view with a simple checkbox. As with date/time, there is no option to set the field size. Access simply stores the equivalent of yes or no in this field.
Step10. To move to the Bio field, on the keyboard, press:
Tab key
The data type here is long text, which also has a default field size, but in this case it's 64,000 characters, versus only 255 for short text.
Next, we'll take a look at our table and identify the primary key.
Identifying the Primary Key
As we've seen, the primary key for a table should be a field that is unique for every record. Looking at tblFaculty, one obvious candidate for primary key seems to be the EmployeeID field. This number should be unique for every faculty member. However, in datasheet view, it's hard to tell if this field, or any other, has already been established as the primary key.
There are some clues, however, that suggest that EmployeeID has been set up as the primary key for this table. Let's examine that field again.
Step1. To move to the EmployeeID field, on the keyboard, press:
Home key
The first cell in the record is once again selected.
The characteristics that let us know that this field is particularly important appear in the Table Fields tab of the Ribbon, in the Field Validation group.

Notice that this field is required, which means that a record cannot be entered without including a value in this field. The unique checkbox is also selected; this says that Access will not accept duplicate values in this field for any record. Both of these conditions are required for a field to be used as a primary key; we must always have a value in this field, and it can't be duplicated by any other record.
These are important clues, but they are not conclusive. To determine for sure if EmployeeID is the primary key, we must switch from datasheet view to design view.
Step2. To switch to design view, on the left side of the Ribbon,
Click
Design view opens:
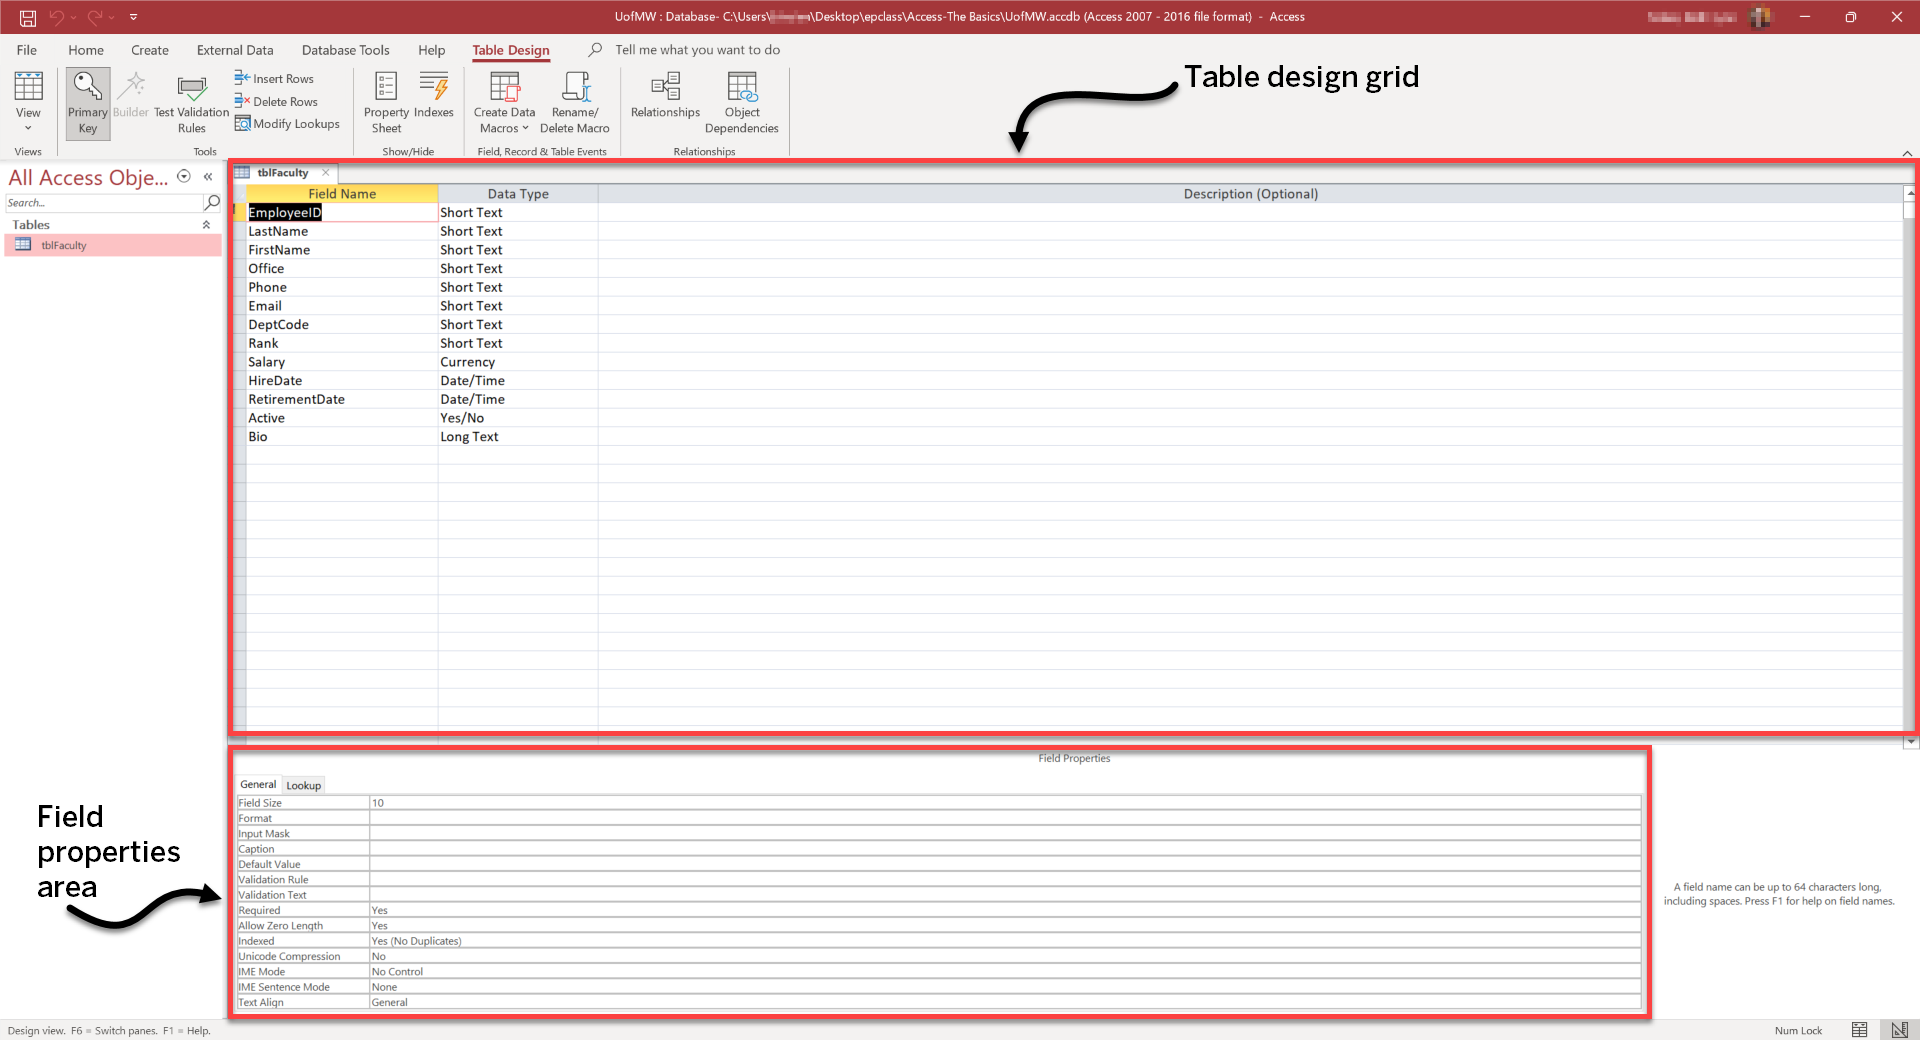
Design view in Access provides us more details about fields in our table as well as more flexibility in modifying some of the field properties.
In the upper section, the table design grid, we see a list of the fields in the table. In the lower part of the screen, we can see the field properties area, which shows more detailed properties we can set for each field. We'll be exploring this area later in the workshop.
For now, let's look at the list of fields in the table. If we examine the first field in the list, we see a small key symbol to the left of the field name.

Let's select the EmployeeID field.
Step3. To select the EmployeeID field, if necessary, in the list of fields,
Click EmployeeID
With the EmployeeID field active, we see that the primary key icon on the Ribbon is also highlighted.
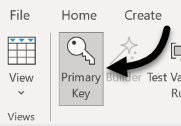
This indicates that the table was in fact set up correctly, with the EmployeeID field established as the primary key.
NOTE: You can change a primary key by selecting the desired field in design view, and then clicking the primary key button.
Step4. To return to datasheet view,
Click
We return to datasheet view.
Now we'll add a new record to our table.
Adding a New Record
The University of the Midwest has just hired a new faculty member, so we're going to add her information to tblFaculty.
Step1. To begin adding a new record, at the bottom of the table's entries,
Click in the first cell of the first empty row
The EmployeeID field is now active. We'll start filling out our new faculty member's information.
Step2. To add the employee ID, in the EmployeeID field, type:
0000211027 Tab key
The Tab key moves us into the next cell in the record, the LastName field. Let's continue entering information for this record.
Step3. To add the last name, in the LastName field, type:
Alfaro Tab key
Step4. To add the first name, in the FirstName field, type:
Bernice Tab key
Step5. To add the office location, in the Office field, type:
AH201 Tab key
Step6. To add the phone number, in the Phone field, type:
8127761403 Tab key
If we look closely at the screen as we type the phone number, the parentheses and hyphen are already in the field; we don't have to type them separately. This field was set up with an input mask. We will learn more about input masks later in the workshop.
Step7. To add the username, in the Email field, type:
balfaro Tab key
Step8. To add the department code, in the DeptCode field, type:
math Tab key
Note that even if we try to enter the department code as lowercase, Access changes our entry to uppercase as we type. This is another example of an input mask that we will examine later in the workshop.
Step9. To add the rank, in the Rank field, type:
Assistant Professor Tab key
As we tab to the Salary field, note that the cursor is at the right edge of the cell. This happens whenever a data type is set to number, currency, or date/time.
Step10. To add the salary, in the Salary field, type:
60000 Tab key
Once we press the Tab key, we notice that the format of the number has changed. A dollar sign appears at the front, and a comma has been inserted as a separator at the thousandths place. The format changed because the data type was set to currency for this field.
Next, we'll enter the hire date. We could enter today's date by typing, but we're going to take advantage of the date picker to choose today's date. The date picker is a small calendar icon that is enabled next to active fields that have the date/time data type.
Step11. To select the date picker,
Click
The date picker opens. We could navigate to any date using the calendar widget, and click on the desired date to enter it. At the bottom of the date picker is a button that allows us to choose today's date. We'll use that button now.
Step12. To select today's date,
Click
Today's date is entered in the HireDate field.
Step13. To move to the RetirementDate field, on the keyboard, press:
Tab key
Since this faculty member was just hired, we will leave the retirement date blank.
Step14. To move to the next field, on the keyboard, press:
Tab key
The checkbox in this field indicates that the field is set to the yes/no data type. This type of field allows us to quickly indicate whether a record meets a specific criteria, without taking very much room in the database at all. In this case, it allows us to indicate that this person is an active employee (versus retired, or having left the university). Our new faculty member is indeed active, so we will click the checkbox.
Step15. To set the Active field to Yes, on the keyboard, press:
Spacebar
The checkbox has been checked, so we can move on to our last field.
NOTE: You can also check the checkbox using the mouse.
Step16. To move to the Bio field, on the keyboard, press:
Tab key
We will need to ask our new faculty member for her biography, but for now, let's put in some placeholder text.
Step17. To fill in some placeholder text for the Bio field, type:
Bio goes here
We have finished entering data for this record, but the data is still tentative because we're in edit mode. We can tell that Access is still in edit mode by looking to the very left of the active record, where we will see a pencil icon:

Should we need to cancel the data entry that we've done, while still in edit mode, we can press the Esc key and the data will be cleared. To save the data we've entered, unlike with other Microsoft Office programs, we do not have to click save. Instead, all we need to do is press enter, or simply click in a field in another record. Let's do that now.
Step18. To save our data entry,
Click in a cell in another record
The pencil icon next to our new record disappears, and our data has been incorporated (that is, saved) into the database.
NOTE: The save function in Access is used to save design changes to the database itself, not to save data that has been entered. We will use the save function later in the workshop.
Sorting Records
Notice that by default, tables in Access are displayed in primary key order. Thus, our faculty list is sorted by employee ID. However, our newest faculty member's record is still at the bottom of the list. This allows us to enter a series of new records, all of which remain at the bottom of the table until we close it. The next time Access opens the table, the entries will be reordered by primary key.
Let's close our table and reopen it to see the new order. Then, we'll show how to sort our data by other fields.
Step1. To close our table, in the table's tab at the top left corner of the object workspace,
Click
NOTE: Be careful not to click the Close button for the entire database, which can be found in the far upper-right corner of the Access window. If you accidentally closed Access, simply reopen it and choose the UofMW.accdb file from the Recent Files menu.
Step2. To reopen the navigation pane, in the upper-left corner of the workspace,
Click
The navigation pane has been reopened, and we can see our table in the list again.
Step3. To reopen the table, in the navigation pane,
Double-Click tblFaculty
The faculty table reopens. Now, we'll find our newest faculty member, Bernice Alfaro, located about two-thirds of the way down the list, in EmployeeID order.
We may want to list our faculty in a different order, such as by last name. Let's do that now.
Step4. To sort the faculty table by the LastName field, in the field headers,
Click
A drop-down menu appears, with sort and selection options:
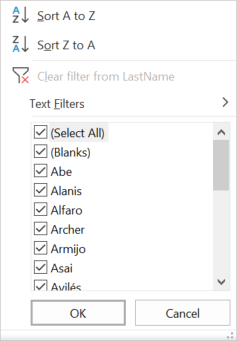
Step5. To sort the records A to Z,
Click Sort A to Z
The records now are sorted by the LastName field.
This same method can be used to sort entries numerically, for numerical fields, or by date, for date/time fields. Let's sort by hire date.
Step6. To make the HireDate field visible, if necessary,
scroll right
Step7. To sort the records by hire date, in the HireDate field,
Click
Step8. To sort the records with the newest hire on top, from the drop-down menu,
Click Sort Newest to Oldest
Bernice Alfaro is now the first record in our table.
If we want to keep the data in this order, we could use the Save button in the Quick Access toolbar. Instead, we'll close the table without saving the sort. We'll use an alternate method of closing the table, using the right button on the mouse.
Step9. To begin closing tblFaculty,
Right-Click
A drop-down menu appears.
Step10. To finish closing tblFaculty, in the drop-down menu,
Click Close
You will get the following warning:

Access wants to know if want to save the changes we made to the sorting order. In this case, we are going to close without saving the changes.
Step11. To close without saving the new order of records,
Click
The faculty table closes, but the database remains open in Access.
Now, we'll import some more records into our faculty table from an Excel spreadsheet.

![]()

![]()


![]()


![]()


![]()
![]()

![]()


![]()

![]()

