Our form has the basic design and functionality we need, but we can make it easier to use by creating a combo box to find specific students' records. We will create a combo box to help us find records for specific students. A combo box creates a drop-down list. In this case, we will create a combo box to select a student record to view and modify.
Creating a Record Navigation Combo Box
We must be in Design View to add combo boxes, so we will first switch to that view and then add the combo box.
Step1. Switch to Design View, if necessary.
Step2. To select the combo box tool, on the Ribbon,
Click the Form Design tab, Click
When adding a record navigation combo box to a form, we usually want to put it in the form header area. That way, it's visually separated from the data.
Step3. To add a record navigation combo box, with the combo box tool selected,
Click in the form header at the 5" mark on the ruler
The Combo Box Wizard appears. The first screen of the wizard allows us to define whether we are selecting a value to store or to use for record navigation.
Step4. To tell Access we are creating a record navigation combo box,
Click the "Find a record on my form based on the value I selected in my combo box" radio button
Step5. To move to the next screen,
Click
This screen enables you to select the fields to appear in your combo box. It is essential that we include Student ID because, even though we aren't showing it on our form, it is the key field Access needs to find the record we identify. We will also add the name fields to identify the students, and the email field to distinguish between two students who happen to have the same first and last name.
Step6. To add the fields we want in our combo box, in the Available Fields column,
Double-Click student_id, last_name, first_name, email
The fields we want to include are now listed in the Selected Fields column.
Step7. To continue,
Click
This next screen shows what our combo box will look like. Note that Access has already chosen to hide the key column. In this case, it means that the student ID will not be displayed in the drop-down list. The records are not listed in alphabetical order, but we will fix that soon.
Step8. To accept these default choices and continue,
Click
The last screen of the combo box Wizard allows you to provide a label for the combo box.
Step9. To label the combo box and finish creating it, type:
Find Student: Enter key
The combo box is created and you are back in Design View. Notice that the combo box field currently says "Unbound." This means that as we move from record to record in the form the data in the combo box does not change.
The combo box is not particularly wide and will thus not effectively display long last names. Let's widen the combo box.
Step10. To widen the combo box,
Point to a handle on the right, with the left-right arrow, Press & Drag to the right
Try to align the right edge of the combo box with the right edge of the subform. This will make the form more visually appealing and make it wide enough to be able to display long last names.
However, the label for the combo box is hard to read due to low contrast. Let's fix that.
Step11. To make the combo box's label text white,
Click the combo box label, Click the Format tab, Click
Your finished combo box should look like this:

Using the Record Navigation Combo Box
Let's switch into Form view, then use our new combo box to find a student record.
Step1. Switch to Form view.
Step2. To open the combo box,
Click
Step3. To select Brenda Sanchez's record, in the dropdown menu that appears,
Click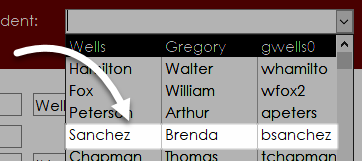
NOTE: Brenda Sanchez is the fifth record in the dropdown list.
You see Brenda Sanchez's record.
Refining the Record Navigation Combo Box
In using the combo box the first time, we can see ways it can be improved. First, it needs to list students in alphabetical order. Second, the list itself might need to be wider. We already widened the combo box, but that doesn't affect the width of the drop-down list. In the drop-down list, the email address might be cut off due to the scrollbar. We can widen the list to prevent that problem.
Step1. Switch to Design View.
Step2. To select the combo box,
Click the combo box
Step3. To view the Property Sheet, if necessary, on the Ribbon,
Click the Design tab, Click
Now that we can see the Property Sheet, we are ready to adjust two of the properties: the Row Source, which defines how the data in the list is being constructed, and the List Width, which sets how wide the list will be. We will edit the Row Source to get the drop-down list records to show in alphabetical order, and the List Width to adjust the width of the list.
The challenge with the Property Sheet is to figure out where to find the property you want to adjust since there are so many. Think of it this way: the Row Source property is a Data property since it defines how the data in the drop-down list is put together. The List Width is a Format property since it describes a property of how the list is displayed.
Step 4. In the Property Sheet pane, if necessary, switch to the Data tab.
Step5. To begin modifying the drop-down list to display its records in alphabetical order, in the Property Sheet,
Click Row Source
You see a drop-down list which allows you to select an existing table or query for supplying the date and an ellipsis button on the right end of the row for modifying the underlying query behind the combo box. The ellipsis is what we want; it will enable us to modify the underlying query that Access created to generate the combo box data.
Step6. To modify the underlying query for the combo box,
Click
Access opens a query window. This proves that the contents of the drop-down list are being generated by a query. The Combo Box Wizard, which created this query, did not allow us to adjust the display order for the records, but we can do that here.
We want to sort alphabetically by last name, then first name, then email. We can do that in the query design grid.
Step7. To modify the query to display its records in alphabetical order, in the Sort row for the last_name field, type:
a Tab key a Tab key a
The last_name, first_name, and email fields will now be sorted in alphabetic order.
Step8. To preview the query, on the Ribbon,
Click
We should see the records listed in alphabetical order. To verify the listing is correct, make sure that all of the records with the last name of Alexander are sorted by first name, and that the records for the two different people named Paul Allen are sorted by their email address.
Since our query is working correctly, we can save it.
Step9. Save the changes.
Now that the changes are saved, we can close the query and return to Design View.
Step10. To close the query window,
Right-Click , Click Close
We are back in Design View again.
Before we test our changes in the form itself, let's widen the combo box list. This is a matter of adjusting the List Width property.
Step11. To begin changing the list width, in the Property Sheet pane,
Click the Format tab
The List Width property is in the eighth row. It is currently set to 3 inches. The Column Widths, listed a few rows above, add up to 3 inches, so we might think it would be wide enough. The problem is that a total list width of 3 inches does not account for the width of the scroll bar. We only have to increase the total list width by a small amount to account for the scroll bar width. If we don't, we will have to scroll horizontally to see the full contents.
If we click the List Width title at the beginning of the row, the current value will be selected and we can type the new value we want.
Step12. To change the list width,
Click List Width, type: 3.15, press: Enter key
The width of the list is now changed.
Using the Refined Combo Box
Now that we have addressed the two main usability concerns with the combo box, let's return to Form View and test it out.
Step1. Return to Form view.
Step2. To select a different student record, in the combo box,
Click , scroll down, Click
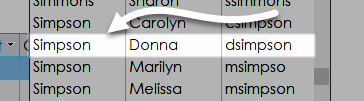
We see Donna Simpson's record. More importantly, as we scrolled, we could see that all of the students were listed in alphabetical order and that no records were truncated by the list width.
We're done with this form for now, so let's close it.
Step3. Save and close frmStudentRegistration.
There are a few things we still want to adjust, but we'll do that directly in the subform.

