Today we will be using Microsoft Access to refine our University of the Midwest database.
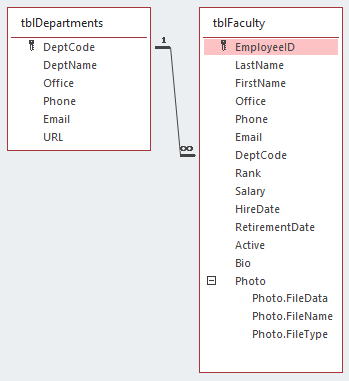
In Access: The Basics, we began creating a database with two related tables: tblFaculty and tblDepartments. Today, we start with the same database with an additional table: tblCourses. Our major task today is to continue expanding the data structure by creating tables for course sections, section instructors, and meeting days and times and fully incorporating them into our data structure. At the end of today's workshop, there will be an opportunity to practice the skills we will learn by expanding the database to include information about students and their enrollments.
Let's start by taking a look at our database and reviewing some of the relevant concepts from Access: The Basics.
An important note about these materials
Before getting started, it's important to note that these materials were written using the Office 365 version of Access. If you are using a different version of Access to follow along with the materials, such as Access 2016 or older, your interface may look different and certain interface elements may have different names than those shown in these materials. While you'll be able to complete many of the exercises in this course using an older version of Access, some of the steps may refer to interface elements or dialog boxes that have had their names and locations changed.
Opening the Database
The database we are using today has the same name as the database from the previous workshop. Let's open it now.
Step1. Launch Microsoft Access.
Step2. To begin opening the database, in the navigation on the left side of the screen,
Click Open
Step 3. To browse to a specific location on your computer, under the Other Locations heading,
Click Browse
Setting the Location for Opening Your File
When the dialog box opens, it lists a default location from where the file will be opened. All of our exercise files are contained in the epclass folder, located on the desktop. We'll want to change our location to this folder.
We will start at the desktop, since our exercise file folder, epclass, is located there.
Step1. To move to the desktop,
Click
Step2. To open the epclass folder,
Double-Click![]()
Step3. To open the correct folder,
Double-Click the Access_Structure folder
Step4. To open the database,
Double-Click UofMW.accdb
Step5. To enable content and finish opening the database,
Click![]()
Step6. To confirm that we would like to trust the document, if necessary,
Click![]()
Reviewing the Database
Before we get started, let's review the structure of the database. To begin, let's go to the Database Tools tab and take a peek at the relationships.
Step1. To review the database relationships,
Click the Database Tools tab, Click

Exploring tblCourses
A new addition to the data from where we finished in Access: The Basics is tblCourses. Let's open it and take a look at the data.
Step1. To open tblCourses, in the Navigation pane,
Double-Click tblCourses
- Each course is required to have a code, title, description, department, and number of credits.
- Courses cannot be worth more than 6 credit hours.
- Course codes are unique across the entire university.
Step2. To switch to Design view, on the Ribbon,
Click![]()
Step3. To set CourseCode as the primary key,
Click CourseCode, Click![]()
Refining Table Design
The table is already in pretty good shape, but we could add some validation and set some fields as required to ensure that we are storing high quality data. In the case of tblCourses, we want to only allow users to input a value less than or equal to six for the number of credit hours a course is worth. Validation rules allow us to restrict the values that a user enters based on a particular condition. Let's add the validation rule now.
Step1. To select the CreditHours field,
Click the CreditHours field
Step2. To edit the validation rule for CreditHours, at the bottom of the screen,
Click Validation Rule, type: <=6
Step3. To add validation text, on the keyboard, press:
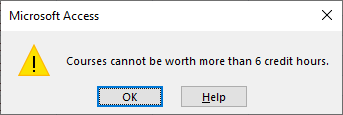
Tab key, type: Courses cannot be worth more than 6 credit hours.
Step4. Save tblCourses.


Step5. To test the data against the new rules,
Click![]()
Step6. To switch to Datasheet view, on the Ribbon,
Click![]()
Step7. To test the rule,
Double-Click one of the CreditHours fields, type: 7 Down Arrow key

Step8. To revert the record to its previous state,
Click![]() , press: Esc key
, press: Esc key
Step9. Return to Design view.
Step10. To make CourseTitle a required field,
Click the CourseTitle field, Double-Click the Required property
Step11. To make Description a required field,
Click the Description field, Double-Click the Required property
Step12. To make the DeptCode a required field,
Click the DeptCode field, Double-Click the Required property
Step13. Save tblCourses.

Step14. To check our existing data against our new rules,
Click![]()
Step15. Close tblCourses.

