One of the most common effects in video editing work is the lower third. A lower third graphic can be any kind of text on the screen that takes up space in the lower third of the screen.
A good example of this is during an interview on television. When the footage appears and the interviewee begins talking, a couple of lines of text with their name and affiliation appears for a few seconds. This technique is used to introduce the interviewee to the viewers and is commonly used on news programs and documentaries.
More complicated lower thirds can include graphics and animation. Today we will do a simple lower third that fades in and out. To do this, we will create a new composition, add some video, create some text, and learn how to add animation and effects.
Let's see how we might create a project like this now.
Importing Assets
As we look at our untitled project now, nothing is happening. We must have assets to work on in an After Effects project. These assets can be audio or video files, graphics, and even Illustrator and Photoshop files.
Let's add an asset now. We have the video file for the background stored on our computer.
We can add assets from the File menu or the Projects panel. We can see the Project panel on the left side of the interface.
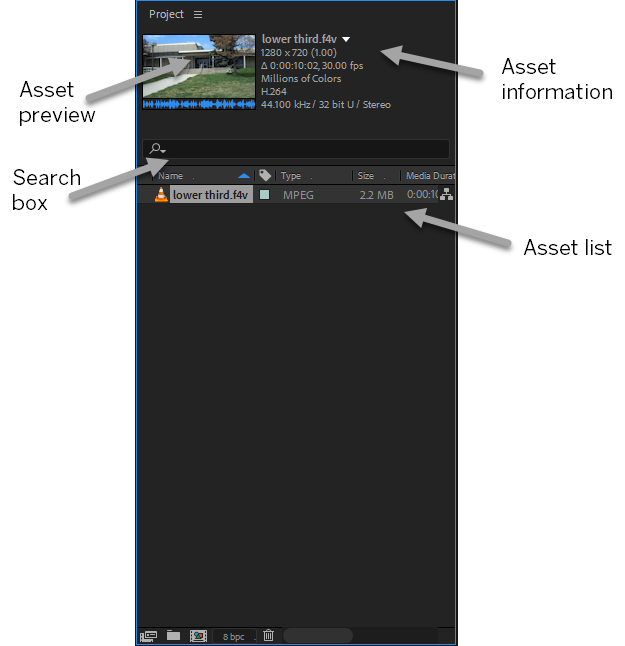
NOTE: This screenshot shows a file already in place, even though we haven't imported a file into our project yet.
This is where all of our assets for the project will be stored. The lower section will consist of a list of our imported assets, and we also have a search box, so that we can quickly locate assets.
The first asset we'll be adding to the project is a video file, which can be added by using the File menu.
Step 1. To add the video file asset, from the Menu bar,
Click File, Point Import, Click File...
Setting the Location for Opening Your File
When the dialog box opens, it lists a default location from where the file will be opened. All of our exercise files are contained in the AE_Basics folder, located on the desktop. We'll want to change our location to this folder.
Step 1. To move to the desktop,
Click
Step 2. To open the correct folder,
Double-Click the AE_Basics folder
Step 3. To select the file,
Double-Clicklower third.f4v
Creating a Composition
The basic building block of any After Effects project is called a composition. To create anything in After Effects, we must first create a composition — once we have a composition created, we can add content to it. Compositions are created at a specific video size (pixel dimensions) and have a specific duration. We can change the length and size later, but it's best to plan ahead how long your composition will be. We can also nest compositions, in which we create a composition that includes other compositions. We will see how to do that later.
When we imported lower third.f4v, After Effects automatically created a composition based on the footage we imported. If desired, we can edit the existing composition's settings to change the length or size later on.
If we look at the Timeline panel, we'll see the composition and its layers there – currently, we only have one layer that contains the video we imported.
Step 1. To save the project, from the Menu bar,
Click File, Click Save
Working with the Timeline
The timeline is one of the most essential pieces when working in any video or animation program. Each layer in a composition will have its own timeline. The timeline gives us the ability to make changes over time. Let's look at the components now.
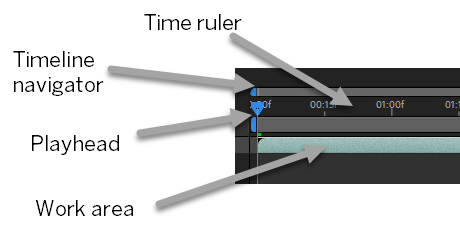
- Timeline Navigator - This section allows us to zoom in or out on the timeline. If we press and drag one of the yellow handles towards the middle, we will see less of the timeline displayed. We can scroll horizontally to see the hidden portion. To zoom in, Press & Drag the yellow handles on either side of the bar at the top of the timeline. You can then Press & Drag the entire ruler to scroll through the timeline.
- Time Ruler - This shows us the increments of the timeline. Depending on the length of the video, this might be shown in seconds or minutes. IN the screenshot above, the increments we see are listed in seconds. But depending on the resolution, your screen might show every other second, or even every 5 seconds.
- Playhead - This indicates our current location in time. By moving this to a new location, we can see how our video and animations will look at a different point in time. We can also Press & Drag this back and forth to see the motion of our project.
- Work Area - We can Press & Drag the yellow handles on either side of this bar to focus on a specific area of the timeline. When we preview the animation, only this section will be viewed. This can help us if we're trying to get a small section just right. We can also use this to select a specific part of the project to output as a movie file.
Our movie file currently is 10 seconds long, as we can see by the timeline, which is now separated by seconds. This is because the video was 10 seconds long. For our project however, we want to have a 5-second video. Let's fix this now.
Adjusting the Length of a Video Clip
With video files, it is common to keep only the section that is needed. We can do this easily in After Effects with the layer editor.
We can trim the ends off of the video file in the Timeline panel; but we can do it much more precisely by editing the video directly. Let's do this now.
Step 1. To edit the lower third layer directly, in the Timeline panel,
Double-Click

Step 2. To place the playhead at 2 seconds, on the Timeline,
Press & Drag![]() to 02:00f
to 02:00f
NOTE: Depending on your screen's size, After Effects may display the time in seconds instead of frames - if this is the case, Press & Drag the playhead to 02s on the Timeline.
Understanding the Timecode
We can see that our playhead is in approximately the correct place, but it is important for us to know that it is in exactly the right place, so we can ensure we set our IN and OUT points exactly 5 seconds apart. We can accomplish this with great precision..
Video typically includes a timecode, which is a way to identify a specific location within the length of an entire video. One second of video can be divided into smaller units called frames. Timecode is an address code, which uses time units to easily and uniquely label each specific frame in a video. Timecode is independent from frame rate, which describes how quickly individual video or film frames are recorded or played back. Timecode is displayed in the following format:
hours;minutes;seconds;frames
Notice that our final field is not milliseconds, but frames. The maximum value for this field will change based on your frames per second (fps). In our video, 30 frames would equal one second. The highest value we will ever see in the frames field is 29, because the next frame would roll the seconds value over to the next highest value.
With this format, a timecode showing that 2 seconds had elapsed would look like this:
0;00;02;00
NOTE: In Adobe software, the punctuation marks separating the timecode units indicate which timecode format is being used to identify specific frames in the video. Semicolons are used for drop-frame timecode, which is most commonly used for color broadcast video in North America and Japan. When counting frames using drop-frame timecode, some of the timecode numbers are periodically skipped, since the frame numbering can only be represented using whole numbers. In every minute of drop-frame video, two frame numbers disappear from the frame count. This adjustment is analogous to leap years in a calendar. Colons indicate the timecode format is non-drop frame timecode. This workshop works with videos that use both types of timecode.
We can move our playhead to a specific timecode with the Current Timecode button.
Step 1. To set the playhead at exactly 3 seconds, in the Layer lower third.f4v panel,
Click 
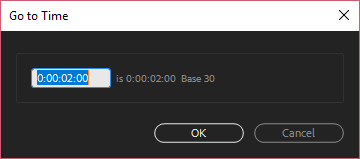
Step 2. To set the timecode at 3 seconds, in the time field, type:
0:00:03:00 Enter
Setting the IN and OUT Points
With the IN and OUT points, we can easily trim video. Let's place them now. We can do this using the tools below the video preview.
Step 1. To set the IN point, at the bottom of the Layer lower third.f4v panel,
Click 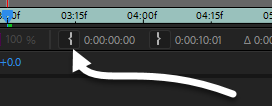
Step 2. To set the playhead at exactly 8 seconds, at the bottom of the Layer lower third.f4v panel,
Click 
Step 3. To set the timecode at 8 seconds, in the time field, type:
0:00:08:00 Enter
Step 4. To set the OUT point, in the Layer lower third.f4v panel,
Click 
Step 5. To close the layer, at the top of the screen,
Click 
Editing a Composition
When we created our composition, we created it to be 10 seconds long to match our video. However, now our video is only 5 seconds long, but the length of our composition is still 10 seconds.
By examining the timeline of our composition, we can see that part of it is grayed out. This indicates that the video still exists, but it will not be displayed. We can press and drag the edges of the highlighted timeline to expand or contract it, but this is a less precise way to trim the timeline.
We need to change our composition to only take up 5 seconds. We can do this by editing the composition settings. Let's see how to do this now.
Step 1. To begin editing the composition settings, in the Timeline panel at the bottom of the screen,
Right-Click in the blank area underneath the lower third.f4v layer, Click Composition Settings...
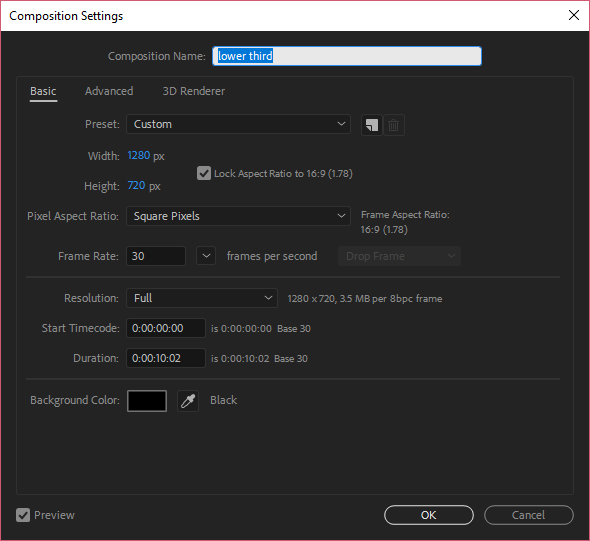
NOTE: This is similar to the window that would appear if we clicked the New Composition button in the Project panel.
Step 2. To change the duration, in the duration field, type:
0:00:05:00 Enter
Adding Text to a Composition
For the lower third graphic, we'll add some basic text and in the process examine some of the simple functions of the animation system. Lower thirds generally incorporate text and graphics in combination, and they are occasionally animated. We could create some of these graphics in After Effects, but it is often more efficient to create the graphic assets in Illustrator or Photoshop, and then import them.
Let's create our lower third graphic. We'll do this using the Type tool.
Step 1. To activate the Type tool, in the Tools panel,
Click
NOTE: If the Type tool is grayed out, click inside the Timeline panel and it will become selectable.
Step 2. To start adding text to the composition,
Click anywhere in the lower portion of the video
Step 3. To add some text, on the keyboard, type:
today's date
Working with the Properties panel
When we're working with text in After Effects, the Properties panel changes to show us options for editing the appearance of text. We can change the font, font style, color, and alignment from the Properties panel. Let's see how to do this.
We see the Properties panel on the far right side of the After Effects interface:
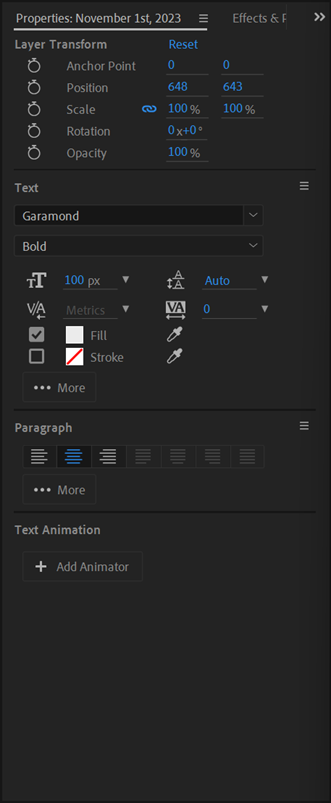
Using the Text section of the Properites panel, we can change several attributes of text including size, character spacing, and leading. If we select a portion of the text with the Text tool, we will be able to change just the selected text using the Properties panel. The Paragraph section of the Properties panel covers alignment and indentation. These options will all affect the entire block of text, rather than just the selected portion.
Let's go ahead and select the text we just added, and then style it using the Properties panel.
Step 1. To select the text, in the Tools panel,
Click
Step 2. To change the font, in the font drop-down menu in the Text section of the Properties panel,
Click![]() , type: Garamond, Click Garamond Bold
, type: Garamond, Click Garamond Bold
Step 3. To set the font size, in the font size field,
Click , type: 100 Enter
Step 4. To set the alignment to center, in the Paragraph section of the Properties panel,
Click ![]()
Step 5. To move the text, in the Composition panel,
Press & Drag the text to the center of the screen
Adding a Drop Shadow
Adding a drop shadow to our text can help make it more readable, especially against a light-colored or busy background. We can add a drop shadow by using a Layer Style. Let's do this now.
Step 1. To select the text, in the video window, if necessary,
Click the date
Step 2. To add a Drop Shadow, from the Menu bar,
Click Layer, Point Layer Styles, Click Drop Shadow
Understanding Safe Areas
In video production, we have to keep in mind how our audience will be viewing our project. Because there are many different types of televisions and monitors that our end product can be viewed on, there are some precautions we must take to ensure our video can be viewed as we intend it.
Some televisions have a tendency to cut off the edges of our video. Older tube televisions and monitors have curved edges which can make things right on the edge difficult to see. Because of this, all video editing programs include guides that map out the action safe and title safe areas, which we will explain once they are visible. By keeping information within these guides, we can ensure that all of our content will be visible and readable.
Let's look at these guides now.
Step 1. To view the safe areas, in the Composition panel,
Click![]() , Click Title/Action Safe
, Click Title/Action Safe
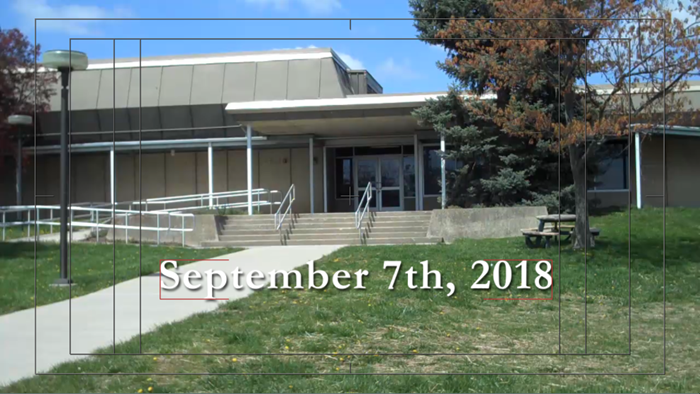
Step 2. To move the text, if necessary,
Press & Drag the text inside the Title Safe area
Previewing the Composition
It is important to preview our composition to ensure that things are working the way we expect them to. Let's go ahead and preview our lower third composition.
Step 1. To preview the composition, on the keyboard, press:
Spacebar
Step 2. To stop the preview, on the keyboard, press:
Spacebar

