For this animation, we will make use of the extensive preset animations that are available in After Effects. These are various packaged animations that allow us to complete common tasks without having to create all of the animation settings manually.
We use preset animations in the exact same way that we use Effects. The main difference between the two is that Effects are controlled through the Effect Controls panel, while animation presets are controlled through the timeline.
We'll select the object we wish to animate and then double click the preset animation to apply it.
We already have much of our title card completed. We just need to apply the animations and any effects we wish to add.
Let's check our title card now.
Step 1. To move to the Project panel, from the Menu bar,
Click Window, Click Project
Step 2. To open the title card in the Composition panel,
Double-Click Movie Title Card
Step 3. Preview the animation.
Step 4. To select the appropriate layer, in the Timeline panel,
Click the Moving Day layer
Step 5. To ensure the playhead is at the beginning of the timeline, on the keyboard, press:
Home key
Step 9. Preview the animation.
Step 10. Save the file.
Moving Keyframes to Alter Timing
Earlier, we talked about the idea of a keyframe being a package. The keyframe package includes a series of settings. These settings can be placed at a specific point in time. By moving the keyframe on the timeline, we are changing how long it takes for the object to reflect those settings. Two keyframes close together will make the change quickly, while two keyframes far apart will make the change more gradually.
In our current timeline, the two keyframes are about 1 second apart. We can't see them yet, since they're hidden underneath the layers they are attached to. We'd like the tracking to expand as long as the text is visible. This means that for the text to get to its maximum length at the end of the animation, we need to move the second keyframe to the very end of the Moving Day timeline, or possibly even beyond the end.
Before we move the keyframes, we need to be able to see them. Since After Effects will keep keyframes in several places on various timelines, we'll use a keyboard shortcut to show all the keyframes in the animation.
Step 1. To view all the keyframes in the animation,
Click the Moving Day layer, then type: u
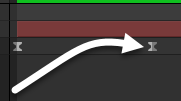
Step 2. To move the rightmost keyframe, in the timeline,
Press & Drag to the right until it reaches 8 seconds
Reversing an Animation with Keyframes
There are many animation presets that deal with fading in and out in interesting ways. All of these are possible to create without using the preset, but creating the animation will be easier as we are beginning to learn how to use the vast animation options available in After Effects.
Let's prepare and create the effect now.
Step 1. To verify that the Moving Day layer is selected, in the Timeline panel,
Click Moving Day
Step 2. To move the playhead to the correct place on the timeline,
Press & Drag the playhead near the 6-second mark
Step 3. To search for an effect, in the search bar in the Effects & Presets panel, type:
Transporter
Step 4. To apply the appropriate effect, in the Effects & Presets panel,
Double-Click Transporter
Step 5. Preview the animation.
Step 6. To deselect all of the layers, in the Timeline panel,
Click a blank area of the panel
Step 7. To see the keyframes for the new animation, on the keyboard, type:
u u
NOTE: We need to press the key twice to first hide the original property layer we're working with, then show all the properties for the selected layer.
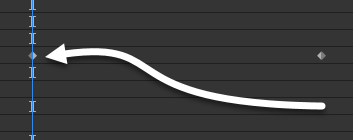
Step 8. To move the leftmost keyframe to the end, in the Range Selector 1 sublayer of the Transporter Animator layer,
Press & Drag to the right until it reaches the 9-second mark
Step 9. To move the end keyframe,
Press & Drag  to the left until it reaches the 6-second mark
Step 12. To move the final keyframe,
Press & Drag the far right keyframe to the 8-second mark on the timeline
Step 13. Preview the animation.
Step 14. To shy the Moving Day layer, in the Timeline panel,
Click![]() , Click
, Click 
Step 15. Save the file.
Challenge Exercise - Animate the Coming Soon Layer
We want to animate the Coming Soon layer in the same way the Moving Day layer is set. Rather than duplicate the steps from above, we will attempt to create it with a minimum amount of assistance.
Here are some basic steps we will have to complete.
Step 1. Select the Coming Soon layer.
Step 2. Move the playhead to the beginning of the Coming Soon layer.
Step 3. Add the Increase Tracking animation preset.
Step 4. Adjust the keyframes (type u on the keyboard to view them), so the tracking animation continually extends while the text is visible.
Step 5. Select the Coming Soon layer.
Step 6. Move the playhead to the 7-second mark.
Step 7. Add the Transporter animation preset.
Step 8. Reverse the keyframes of the Transporter animation, similarly to how the we did for the Moving Day layer.
Step 9. Preview the animation.
Step 10. Make any final adjustments.
Step 11. Save the file.
NOTE: Each preset places keyframes at a certain distance apart; if you don't see the second keyframe in the animation, you might need to undo and replace your playhead. To undo, on the keyboard, press Control key + Z.


