Exploring the Multitrack Interface
Let's take a moment to familiarize ourselves with the Multitrack editor before assembling the podcast. The following video provides an introduction to the Multitrack editor, and explains some differences between the Multitrack editor and the single-file editing interface.
Description of the video:
In this video, I'll introduce you to the multitrack interface in Audition. You'll notice it looks a little different than it does when you're editing a single file.
To better show the options that are available in the multitrack editor, I've got a multitrack session open already.
On the left side of the screen, we still have the Files, Media Browser, and History panels open, and the Levels panel is still present at the bottom of the screen. However, the editor panel has changed.
In the Editor panel, you can see that there are now multiple tracks present, each with their own name and basic controls. The tracks can be renamed to indicate the contents of a specific track.
We can add clips to a track by pressing and dragging the desired clip from the Files panel to a track.
Once clips are added to a track, we can select them and use the Essential Sound panel to adjust the clip. First, you'll need to indicate what type of audio the clip contains before you can access the additional editing options in the Essential Sound panel. We can assign clips the following tags: dialogue, music, sound effects, or ambiance.
After a clip is tagged, we're given many different options for adjusting how a clip sounds and making it sound its best, as well as options that will affect how a clip will interact with other clips.
As you can see in the video, there are now multiple tracks visible in the Editor panel. Audition includes six tracks in a multitrack session by default, and each track is color-coded. When a track is selected, its color is highlighted in the Editor panel to help make it easier to determine which track is currently being edited. Not only are individual tracks color-coded, they also have their own names. Giving a track a descriptive name will help immensely when working with multitrack sessions, especially ones that have many different tracks.
The Files panel is essential when working on a multitrack session. As we created and edited files, you'll remember that we didn't close any of our files when we were finished editing them — now that we're working on a multitrack session, we can simply press and drag a file to a track to add it to that track's timeline, as demonstrated in the video. When working with a multitrack session, it's generally a good idea to add the clips you're working with to the Files panel if they're not already open, to make it easier to populate the tracks with audio clips. When you open a saved multitrack session, any files used in the session will show in the Files panel without having to re-add them. At this point, all the audio files we'll need should be open in the Files panel.
NOTE: If the Files panel isn't showing all the tracks needed for the podcast, or if you're not working through the course content in one sitting, you may need to add the audio clips to the Files panel manually at this point. To import a file, in the Files panel, Click  and navigate to the file, then open it. The files panel should display the following files: intro.wav, outro.wav, intro_song.wav, outro_song.wav, tech_news.wav, tech_term.wav, and favorite_app.wav.
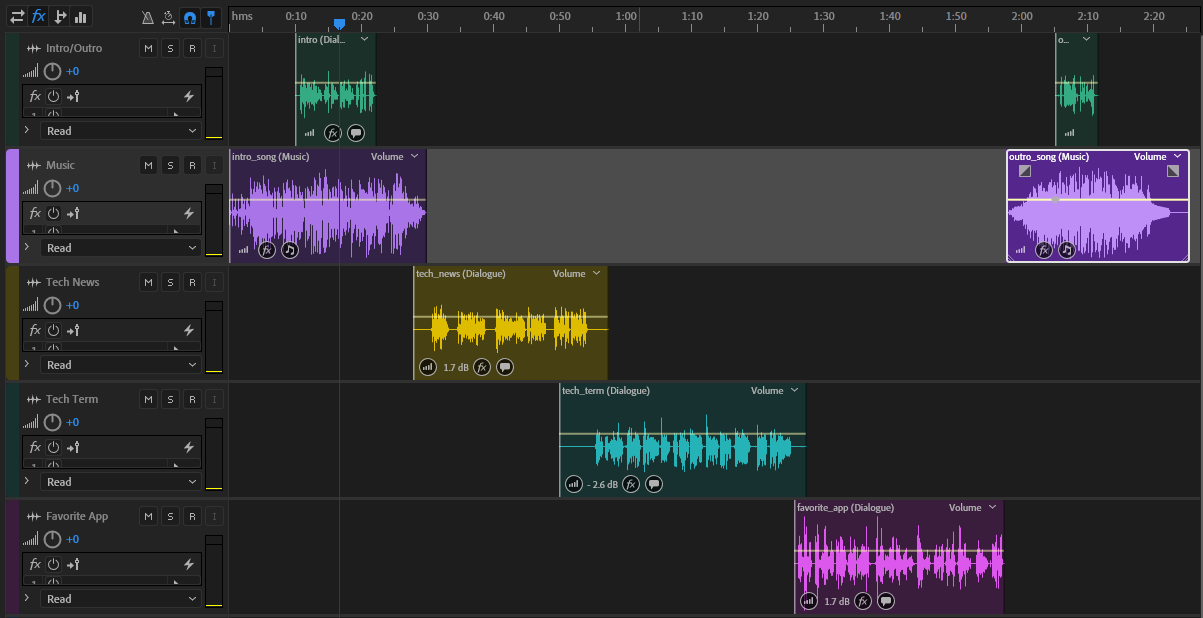
Let's go ahead and rename the tracks in the Multitrack editor to reflect the audio they'll hold, remove any unused tracks, and then drag the clips onto their specific tracks in the Editor panel. Once the clips are on the appropriate tracks, we'll position them where they need to be on the timeline.
At this point, the arrangement of the clips on their timelines should look similar to the following image:

Now that all the audio clips are on their individual tracks and positioned where they need to be, let's take a look at the Essential Sound panel and learn how it can help make our audio sound even better.


