Now we're ready to start exploring Microsoft Excel.
Exploring the Excel interface
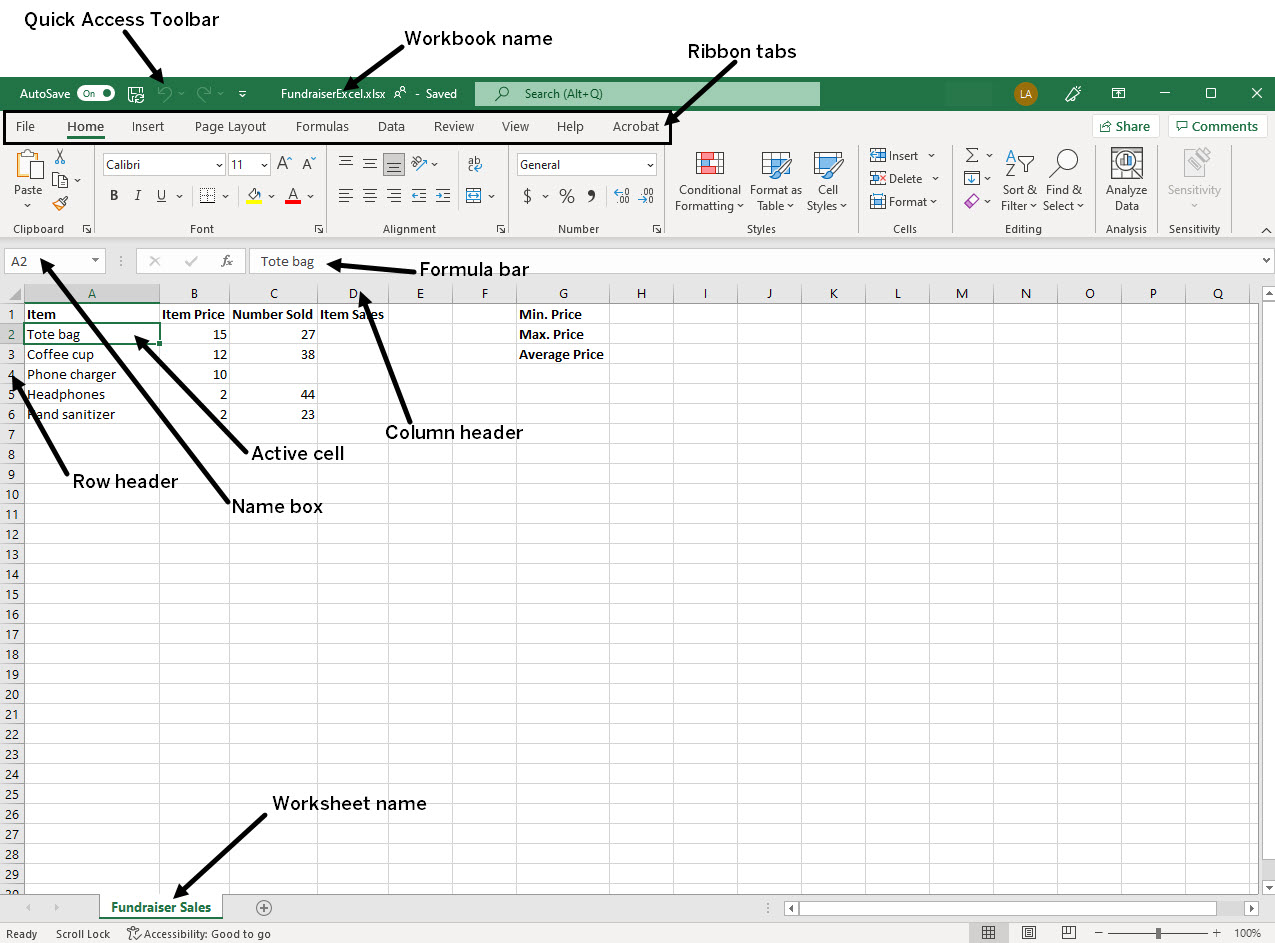
When a file is saved in Microsoft Excel, it is saved as a workbook, which is a file consisting of one or more related spreadsheets known as worksheets. At the bottom of the workbook, there are tabs for each worksheet. You can see that this worksheet is named "Fundraiser Sales." New worksheets can be added as needed.
Exploring the worksheet
Some elements of the Excel workspace are described below:

At the top of the worksheet, we see the workbook name. The file we're using today is named FundraiserExcel.xlsx. Under the file name, we see the ribbon. The ribbon is divided into tabs according to the type of task. It is important to note that the appearance of the buttons on the ribbon may change depending on the size of your monitor or window.
Microsoft Excel for macOS users will see a menu bar displayed at the top of the screen:

The worksheet is made up of rows and columns. The rows are labeled with numbers on the left and the columns are labeled with letters across the top of the worksheet. Microsoft Excel can support several thousand columns and over a million rows.
Columns and rows are made up of consecutive cells. The currently selected cell is referred to as the active cell. Any data entered or formatting applied will take place in the active cell. The reference to the active cell appears in the name box. The contents of the active cell, whether text, a formula, or function, appears in the Formula bar.
Each cell has a unique address, called a cell reference. This address is made up of the column letter followed by the row number. In the following example, the selected cell is in column A and row 2. Therefore the cell reference is A2.

Column letters are not case-sensitive. The cell reference for A2 can also be written as a2.
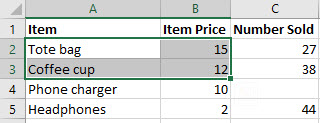
Microsoft Excel refers to a cell or group of cells as a range. A range can contain a single cell or an entire workbook. The address of a range is determined by the address of its upper-left cell, followed by a colon (:), and the address of the lower-right cell. In this example, the selected range would be A2:B3.

Navigating the worksheet
Both the mouse and the keyboard can be used to move around within the worksheet.
It is important to note that there are several different cursor shapes in Excel. The cursor shape will change depending upon the task to be accomplished (selecting, moving, typing, etc.). It is important to pay attention to the shape of the cursor to avoid unexpected results.
Let's practice navigating through the worksheet before we continue.
Now that we're familiar with the Microsoft Excel interface, we're ready to explore data types, formulas, and functions.


