Macros are written in a programming language called Visual Basic for Applications, or VBA; however, knowledge of this language isn't required to create and use simple macros. When a series of actions is recorded, Excel translates them into VBA code as they are performed.
When Excel records a macro, it retains the sequence of keystrokes and menu selections so they can be repeated as needed. This process is very much like recording a voice with a tape recorder and then listening to it later as it plays back. When the macro is run, Excel exactly repeats the recorded steps, mistakes and all.
When the workbook is opened, some of the columns are not wide enough to show all of their contents. The first macro we will record will fix this.
Turning on Excel's Recorder
Let's begin by enabling Excel's macro recorder.
Step1. To switch to the View tab, on the Ribbon,
Click the View tab
Step2. To access the macro commands, on the right side of the Ribbon,
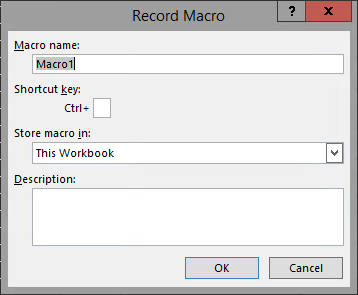
Click Click Record Macro...
NOTE for MacOS Users: On MacOS, to access the macro commands, on the right side of the Ribbon, Click .
.

Naming Macros
Macro names are quite flexible, but they must adhere to the following rules:
- Names cannot contain spaces.
- Names must start with a letter.
- Names cannot be the same name as a named range or cell reference, i.e. A1.
Let's name our macro AutoFit.
Step1. To enter the macro name, type:
AutoFit
NOTE for MacOS Users: You will encounter a warning message if you try to overwrite an existing keyboard shortcut.
Storing Macros
Macros can be stored in three locations: in this workbook, in a new workbook, or in the personal macro workbook. Each of these storage options has its own set of strengths and limitations. Let's explore them now:
- This Workbook - Macros stored in the current workbook are only accessible when the workbook is open. Selecting this option is best if the macros you are recording will only be applicable to a particular workbook's data. It can also be useful if you are creating a workbook to store macros related to a specific task. For example, you can create a workbook that has a collection of macros you find helpful for working with IU's institutional data. That workbook can then be transported from machine to machine just like carpenters carry around the tools of their trade in a toolbox.
- New Workbook - Macros stored in a new workbook have the same restrictions and benefits of macros stored in the current workbook; they're just stored in a separate workbook. This option is best if you are starting to create a collection of macros to help with a series of related tasks or would like to keep a particular workbook macro-free. Just like with the This Workbook option, this option creates an easily transportable workbook full of macros.
- Personal Macro Workbook - Macros stored in the Personal Macro Workbook are accessible to any workbook opened in Excel by a specific user on a specific machine. The Personal Macro Workbook is hidden within a user's Windows or Mac profile. If it exists, it is opened every time that user launches Excel. Since this workbook is hidden within a user's profile, it is difficult to locate and transport.
A workbook's macros are available to all other open workbooks when it's open. Whether you use a separate workbook, the Personal Macro Workbook, or the current workbook, it's important to know where your macro is recorded so you can find it when you need it.
Since we are using an individual workbook and all the macros we record will only be useful to this workbook, let's store the macro in This Workbook.
Step1. To select This Workbook, in the "Store macro in:" field, if necessary,
Click , Click This Workbook
Step2. To enter a description of the macro, in the Description field, type:
Automatically fit columns to their data.
Step3. To begin recording,
Click

NOTE: The recorder does not record movement of the mouse.
Recording a Sequence of Actions
In order to record a macro that will automatically fit column widths to the data contained in that column's cells, we need to select the whole worksheet.
Selecting the Whole Worksheet
By selecting the whole worksheet, we can adjust all columns at the same time, not just the columns that currently contain data. This allows us to expand our worksheet without rewriting our macro. This is a concept known as scalability. Scalability is the ability of a system to handle expansion or contraction without having to redesign core functionality.
Step1. To select the entire worksheet,
Click
Step2. To resize all the columns at once,
Double-Click
Step3. To place the cursor in the first cell of the worksheet,
Click cell B2
NOTE: We select B2 here since A1 is often the default selected cell in a worksheet.
Finishing Recording the Macro
We will finish the macro by leaving cell B2 as the active cell.
Step1. To stop the recorder, on the left side of the status bar,
Click
Saving the Workbook
Now that we have recorded a macro, it is time to save our workbook.
Understanding Excel File Formats
Excel workbooks come in a few different configurations. Today, we need to understand two of the formats, Excel Workbooks (.xlsx) and Excel Macro-Enabled Workbooks (.xlsm). An Excel Workbook (.xlsx) is what most people think of when they think of an Excel file. It contains worksheets, the data on the worksheets, and any formulas to gain insight from the data. Excel Macro-Enabled Workbooks (.xlsm) contain all the same capabilities as Excel Workbooks (.xlsx), but they also have the capability to store VBA code (macros).
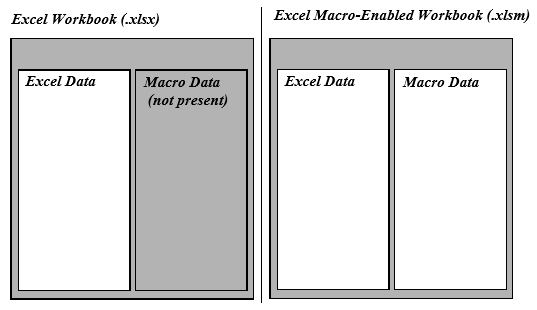
There are a couple reasons for having both file formats. First, if you open an.xlsx file, you know upfront that there are not macros within. Second, if you open a macro enabled workbook, you can still view the data without enabling the macros. This is accomplished by having two separate parts within an Excel file, Excel data and macro data.
To see how this works, consider the following diagram:

As you can see,.xlsx files cannot save macro data. You can create macros within an.xlsx file, but they cannot be saved within that format because the macro data portion of the file format is not present. Since our workbook is still the.xlsx format, we cannot retain the macros we have created.
By contrast, an.xlsm file can save macros. As you can see from the previous diagram,.xlsm files do have an available macro data portion.
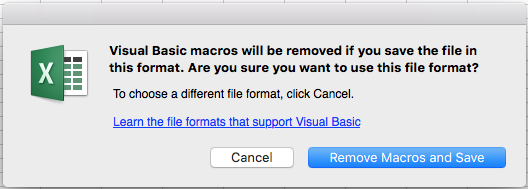
We will begin saving this workbook. When try to save a workbook that contains macros as a file type that cannot store macros, Excel gives us the option to continue saving as a macro-free workbook (.xlsx) or to change the file type to a macro-enabled workbook (.xlsm).
Let's save now.
Step3. To begin saving the workbook, on the Quick Access Toolbar,
Click

NOTE for MacOS Users: You will see this dialog box:

Step4. To save the file as a macro-enabled workbook,
Click , Click Current Folder (Excel Macros)
NOTE for MacOS Users: To save the file as a macro-enabled workbook, Click .
.
Step5. To change the file format, in the Save As Type text box,
Click , Click Excel Macro-Enabled Workbook (*.xlsm)
NOTE: We may choose No from the warning, but if we don't change this file format, we will still save a file without preserving the macro information.
Step6. To keep the original filename and the new file format,
Click
NOTE for MacOS Users: To select the Excel Macros folder, in the Save As dialog box, Click , Click Excel Macros, Click
 .
.

