So far, we've only talked about class, element, and id selectors in CSS. There is another type of selector called a pseudo-class. These classes are called "pseudo" because they effect a particular state of an element within the viewport. They also do not have to be referenced in the HTML code to have their effects be visible. For example, in HTML, hyperlinks have several states:
| Pseudo-class | Appears When |
|---|---|
| a:link | the link is viewed without having been visited |
| a:visited | the link is visited by the web browser |
| a:hover | the mouse pointer is directly over the clickable area of the hyperlink |
| a:active | the mouse clicks the hyperlink |
| a:focus | the keyboard focus is on the hyperlink |
Pseudo-classes allow us to define specific styles for the five different states of these hyperlinks.
When you are defining style for all or some of these pseudo-classes, they must be defined in the order listed above within the style sheet.
When a user points to a hyperlink, we want it to be underlined.
Step1. Activate style.css in the code editor.
Step2. To make our hyperlinks underlined during their hover state, type:
a {
    color: #852c28;
    text-decoration: none;
}
a:hover {
    text-decoration: underline;
}
Exiting code block.
Step3. Save style.css and refresh index.html.

NOTE: Sometimes, you will see pseudo-classes referred to as pseudo-elements or pseudo-selectors. All three names are equivalent.
Using Other Pseudo-Class Selectors
Every element that can be rendered on a page can have the :before or :after pseudo-class applied to it. These classes refer to the space immediately before or after the element in the document flow.
The :before pseudo-class is commonly used to apply iconography to a page:
![]()
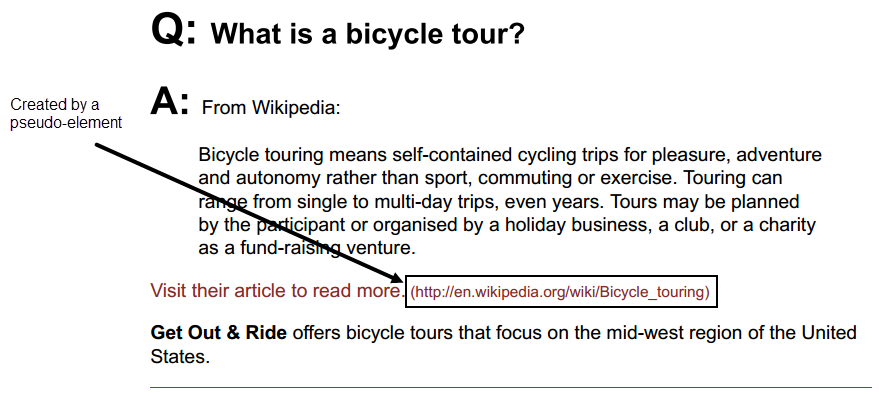
The :after pseudo-class is commonly used to grab the value of a hyperlink's href attribute upon printing:

For a rundown of many different possible uses for pseudo-classes, see the CSS-Tricks page about pseudo elements.
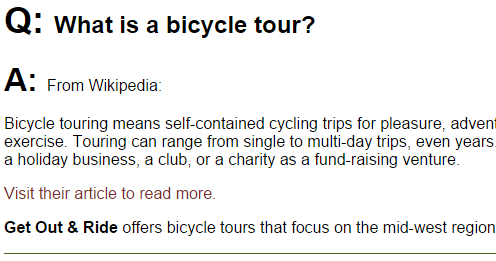
In our exercise, we would like to add a "Q:" before the question portion of the FAQ, and an "A:" before the answer:

Let's talk about how to target each piece individually. This is the markup for the previous screenshot:
<section class="question-answer">
    <h2>Do you offer trips for beginning tourists?</h2>
    <p>Yes, we absolutely do!</p>
</section>
Exiting code block.
Since we would like to affect only the <h2> element, and only the <h2> element within a <section> element with the class .question-answer, we need to create a rule that looks like this:
.question-answer h2Exiting code block.
This will only affect <h2> elements within any element with the .question-answer class applied. Now that we have the code that targets the appropriate element, let's look at how :before works.
Take the following code example:
<h2>This is some content</h2>Exiting code block.
This generates markup that looks like this:
This is some content
We can add some text before with this CSS rule:
h2:before {
    content: " DECORATIVE TEXT ";
}
Exiting code block.
And we will see this:
DECORATIVE TEXT This is some content
The important thing to understand with the content property is that whatever is included there cannot be selected or clicked on by the user and will not be read by a screen reader. As another example, changing the :before to :after yields this:
This is some content DECORATIVE TEXT
Adding content this way should only be used for purely decorative text. Any text that adds content to the site should be added using HTML.
Let's add the "Q:" to the beginning of each <h2> element.
Step1. To add the :before pseudo-class selector to each <h2> element within the .question-answer sections, type:
.question-answer {
    border-top: 1px solid #462;
    margin-bottom: 10px;
}
.question-answer h2:before {
    content: "Q: ";
    font-size: 150%;
}
Exiting code block.
NOTE: This code is immediately before the Table Styles section.
Step2. Save style.css and refresh index.html.

NOTE: We are also changing its font-size to be slightly larger than the default <h2> element text size.
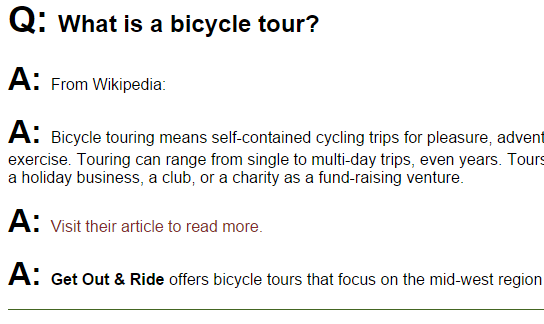
Step3. To add the :before pseudo-class selector to each <p> element within the .question-answer sections, type:
.question-answer h2:before {
    content: "Q: ";
    font-size: 150%;
}
.question-answer p:before {
    content: "A: ";
    font-weight: bold;
    font-size: 200%;
}
Exiting code block.
NOTE: The font sizes are different in order to match the relative sizes of the "Q:" and the "A:." Because the "Q:" is part of an <h2> element, it will have a larger default font. To make the text before the <p> element similarly sized, we have to increase the font size more and make the <p> element's :before text bold.
Step4. Save style.css and refresh index.html.


Step5. To apply the "A:" to the first <p> element within each .question-answer section, type:
.question-answer p:first-of-type:before {
    content: "A: ";
    font-weight: bold;
    font-size: 200%;
}
Exiting code block.
Step6. Save style.css and refresh index.html.


