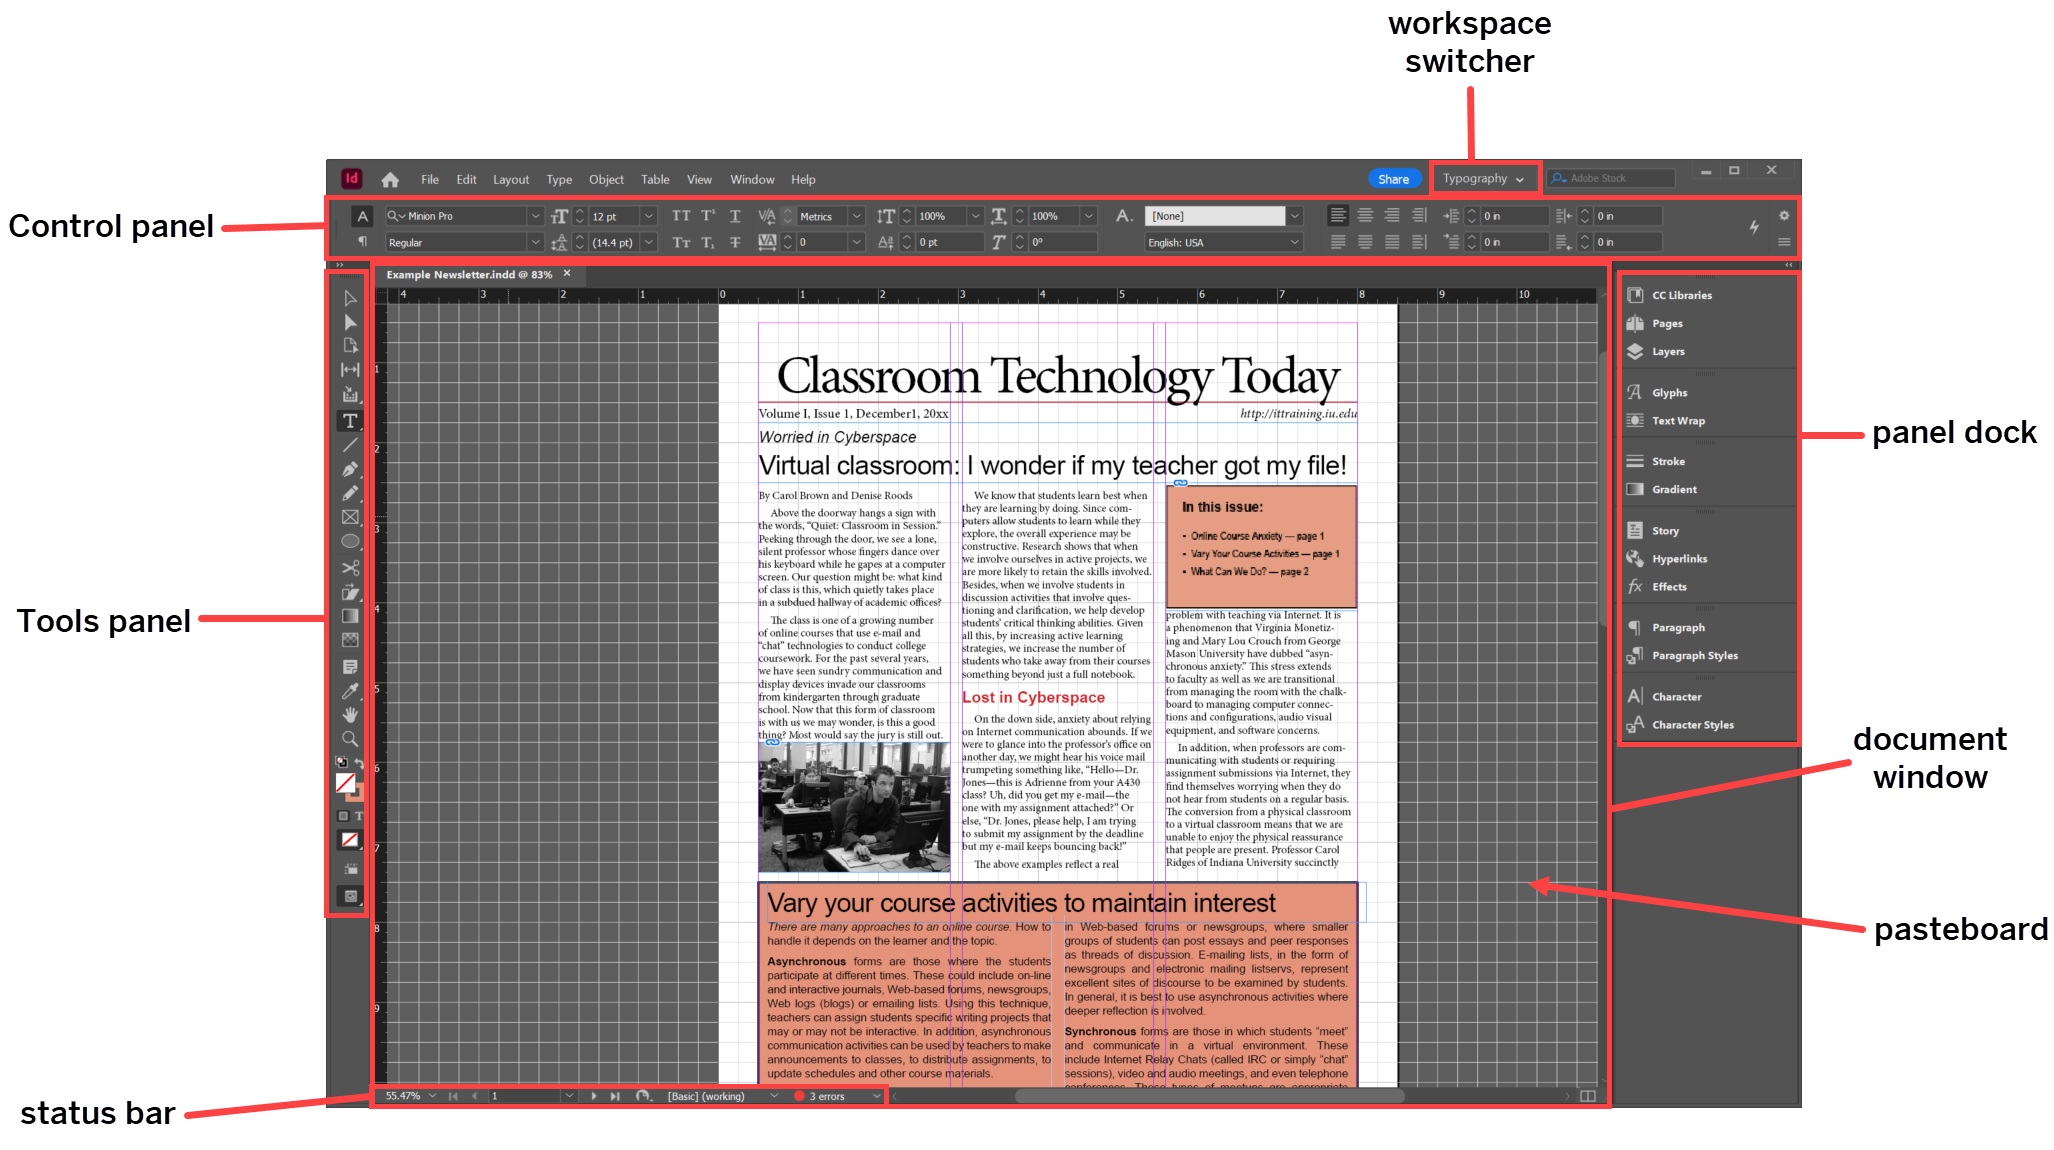
InDesign has a collection of workspaces available that collect different interface elements and tools that focus on specific tasks, such as creating a book or an interactive PDF. These workspaces are available through the workspace switcher located in the top right corner of the InDesign window, and can also be accessed through the Window menu. The workspace shown in the above diagram is the Typography workspace – if this is the first time you're using InDesign on your computer, you're likely seeing the Essentials workspace right now, which looks different than the above diagram.
The Tools panel is located on the left side of the InDesign window, and contains all the tools you’ll need to lay out text and graphics in a document.
There are two ways to activate a tool — you can either click on the tool’s icon in the Tools panel or use the tool’s keyboard shortcut. To find the keyboard shortcut for a specific tool, hover over the tool and a tooltip with the tool’s name and the keyboard shortcut in parentheses will appear, as shown in the following screenshot:

In the image above, we see that the keyboard shortcut for the Pen tool is the P key.
The Control panel, when present, is located at the top of the InDesign window underneath the Menu bar. (Not all workspaces display the Control Panel.) The Control panel is context-sensitive, meaning that the options visible will change depending on what tool we have selected.
For example, the following image shows the available options in the Control panel when the Selection tool is active:

When the Type tool is active, a different set of options are visible in the Control panel, as shown in the following image:

Some tools may have multiple sets of controls available - for example, the Type tool has a set of controls for formatting characters and a second set for formatting paragraphs. We can switch between the two sets of options by clicking on the appropriate icon on the far left side of the Control panel, as highlighted below:

NOTE: In the Essentials workspace, the Control panel is not shown by default — to show the Control panel, in the Menu bar, Click Window, Click Control.
The paneldock is located on the right side of the screen, and contains the various panels needed for laying out a document.
If you’ve worked with Photoshop and Illustrator in the past, you might notice that the panel dock looks different in InDesign. In some workspaces the panels are listed by name and collapsed by default — to open a specific panel, click on its name. The selected panel will display until we switch to a different panel or collapse the open panel.
There are more panels available than what is currently shown in the panel dock. All of the available panels are located in the Window menu, and clicking on a panel’s name in the Window menu will open the panel in the InDesign workspace.
The document window is located in the middle of the InDesign interface, and displays the file you’re currently working on. Multiple files can be open at the same time - you can switch between open files by clicking on the document tabs at the top of the document window.
Inside the document window, you’ll see one or more pages - this is where you’ll lay out your individual pages of content. The gray area surrounding the pages is called the pasteboard, and we can use this space to store layout elements we’re not currently using. Objects that are on the pasteboard won’t print or appear in an exported PDF version of the document.
At the bottom of the document window is the status bar. This gives us some information about our document at a quick glance, including the zoom level, what page we're working on, and whether or not there are any errors present in the document. We can also quickly navigate to different pages in the document here, and open the Preflight panel to fix any issues in the document.


