InDesign documents are made up of two different types of pages: document pages (or spreads, when two document pages are displayed side-by-side), which hold the content of our publication; and parent pages, which are underlying templates that can be applied to selected pages in a document and typically contain elements we want to repeat on multiple pages of a publication, such as page numbers, headers, and footers. In this section, we'll learn more about what parent pages are for and how they can be applied to document pages. We'll also gain some familiarity with the Pages panel and how it's structured.
Available Files
The following files are available for download:
Understanding parent pages
When a new document is created in InDesign, a set of blank parent pages are automatically created for us to use in the document, if desired. As mentioned previously, parent pages are templates that we can apply to multiple pages in a document. Parent pages can be used to create structure for a document, and can also hold elements we want to repeat on multiple pages to ensure our document has a consistent appearance.
An InDesign document can contain a variety of different parent pages based on the document's specific needs. For example, if we were creating a book, we might have different parent pages for chapter title pages, body text pages, the table of contents, and the book's index. When adding new pages to the book, all we need to do is select the appropriate parent page for the type of content we're adding, and all the relevant page elements for that content type will automatically be added to the page.
Using parent pages enables us to use consistent repeating elements throughout a document without needing to manually add the elements to each page we want to use them on. Additionally, elements that are located on parent pages can't be edited from a document page, which means they can't accidentally be moved or deleted when working on the content on a document page. This can be helpful when we have page elements that need to stay in a specific location on the page — we can simply add them to a parent page, and apply that parent to the document page we want the element to display on.
In addition to using parent pages within a single document, we can also copy parent pages from one document to another. This can be especially useful when working with repeating publications — you can add any repeating elements and other items that need to appear in consistent locations to parent pages in the first document, then reuse them in subsequent editions of the publication.
For the issue of the Midwest Pet Pals Gazette newsletter that we're working on, we'll be creating three parent pages: one for the front page of the newsletter, and two side-by-side in a spread for the inside pages. The parent pages we create will add structure to the document and contain elements we want to repeat throughout the newsletter.
Let's take a look at some parent pages in action - specifically, we'll look at the parent pages used in Example Newsletter.indd. We'll need to switch back to that document before we can look at its contents.
- To switch the active document to Example Newsletter.indd, in the top of the document window,
Click

With the Example Newsletter showing, now we'll explore the Pages panel.
Introducing the Pages panel
In InDesign, all of the pages in a document — both document pages and parent pages — live in the Pages panel. Let's open up the Pages panel and take a closer look at its contents.
- To open the Pages panel, in the Panel dock on the right side of the screen,
Click

The Pages panel appears:

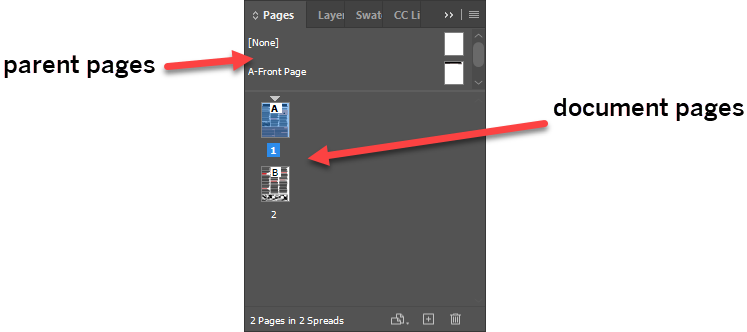
The Pages panel is split into two sections, one for each type of page we have in our document — the top section contains the parent pages, while the bottom section contains the document pages. Each section contains thumbnails representing the content in our document. In Example Newsletter.indd, the parent page section contains two parent pages, and the document page section has two pages of content, one underneath the other.
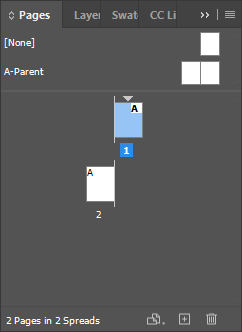
In comparison, if we were to look at the document pages section of the Pages panel for Pet Pals Gazette.indd, we'd see that the arrangement of the document pages looks slightly different:

That's because our newsletter was made using facing pages, while the example newsletter uses a single-page layout. Since our newsletter will be printed in such a way that people will be viewing the two middle pages at the same time, we'll want to see those two pages together as we design so we can see the pages as they'll look when people view the finished document. As such, the thumbnails are aligned along a central bar that indicates the binding or center fold of the document. Page 1 will be on the right side of that bar, and the final page of the document will be on the left.
There are many ways we can navigate between pages in a document - we can scroll through the pages visible in the document window, use the thumbnails in the Pages panel to jump to a specific page, or use the page navigation in the status bar at the bottom of the page. As we explore how parent pages work, we'll also learn how to navigate to different pages using the Pages panel.
Exploring how parent pages work
Let's take a look at a parent page and see one in action on a document page, then see how we can tell which parent page is applied to a document page. First, let's expand the parent page section of the Pages panel so we can see all the parent pages in this document.
- To resize the parent page section of the Pages panel,
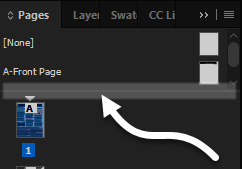
Press & Drag the divider separating the sections downward until the thumbnail for B-Content is visible, as shown in the following image:

Now that we can see all the parent pages, we might notice something about how they're named. Each parent has a letter at the beginning of its name, then the name of the parent page itself. The letter at the beginning of each page's name is the page's prefix — in other words, a quick way of identifying the parent page.
Let's go ahead and view the Front Page parent page.
- To navigate to the Front Page parent page, in the top section of the Pages panel,
Double-Click

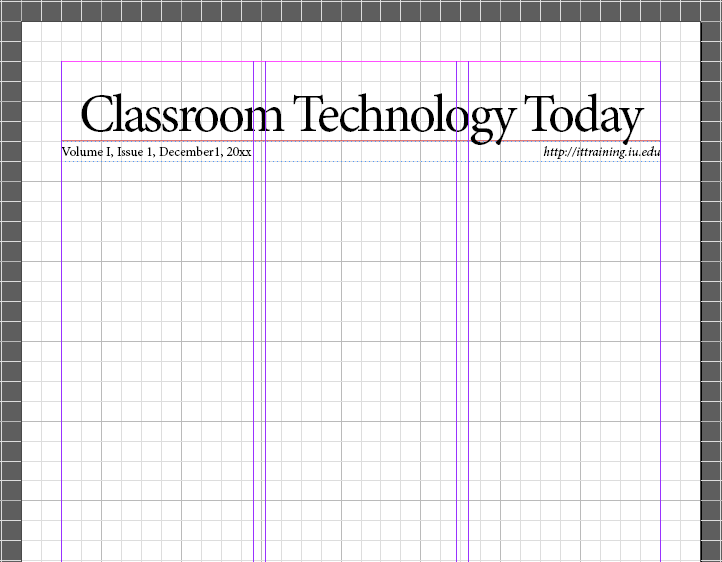
The parent page A-Front Page is displayed, and we see that it contains the newsletter's nameplate at the top of the page, as shown in the image below:

We can see what parent pages are applied to a document page by looking at the page's thumbnail in the Pages panel. In Example Newsletter.indd, if we look at the page thumbnails, we'll see a letter at the top of each thumbnail:

Those letters match the prefixes shown in the names of the parent pages. Page 1 has the A-Front Page parent applied to it, as we can see by the A at the top of the thumbnail.
As mentioned previously, items that are located on parent pages can't be edited on the document pages they're applied to. Let's see how that works by switching to the first page of the newsletter, then attempting to move the nameplate using the Selection tool.
- To navigate to page 1, in the document page section of the Pages panel,
Double-Click

- To activate the Selection tool, in the Tools panel, if necessary,
Click

- To attempt to move the Classroom Technology Today text, with the Selection tool active,
Press & Drag the Classroom Technology Today text at the top of the page
When attempting to select the name of the newsletter, nothing happened — this is because that content actually lives in the A-Front Page parent page. In order to make any changes to that content, we'd need to switch to viewing that page. Only then can we select the content and make changes to it.
Now that we're familiar with the Pages panel, as well as where parent pages are located and how they might be used in a document, we'll create some parent pages in the Pet Pals Gazette newsletter in the next section of the course.
At this point, we're done with the example newsletter, so we can close the file.
- To close Example Newsletter.indd, at the top of the document workspace,
Click

- To indicate we want want to close the file without saving changes, if necessary, in the dialog box that appears,
Click Don't Save

