There may be an occasion when you want to send personalized messages with customized details. For example, we want to send letters to recipients confirming that their proposal was accepted. In this letter, we will include the name of the contact person based on the category of the proposal. We can use an if...then...else rule to have Word choose the correct contact person.
Available Files
The following files are available for download:
Creating the document
We are ready to send letters to the people whose proposals were accepted. To create these letters, we will begin with a Microsoft Word document that contains the letterhead of the Midwest Cycling Cooperative. We will create the text of the messages by using the merge fields.
- To open the Letterhead document,
Navigate to the correct drive, Double-click Letterhead.docx
- To begin saving the document with a new name, in Microsoft Word,
Click File, Click Save As
- To select the current name, in the name field,
Click the current name
- To rename the file, in the name field, type:
Accepted-MM.docx Enter key
Examining the data source
Now that the letterhead has been saved with a new name, let's examine the data source. For these letters, we will use the workbook, Reviewed.xlsx. This workbook contains all of the conference proposals as well as columns indicating if the proposal was accepted.
- To open the Reviewed workbook,
Navigate to the correct drive, Double-click Reviewed.xlsx
The Reviewed workbook contains all of the information for the submitted proposals. Column J indicates if the proposal was accepted. In addition, the accepted entries have been sorted into categories (column K) and assigned a room (column L) and a time (column M).
- Close the Excel workbook.
Filtering source data
The letters we are composing will be sent to the people whose proposals were accepted. Our source file will need to be filtered to show only those entries. Filtering can be done as part of the mail merge process.
- To move to the Mailings tab, on the ribbon,
Click the Mailings tab
- To begin the mail merge for email messages, in the Start Mail Merge group,
Click
 , Click Letters
- To begin selecting the data source, in the Start Mail Merge group,
Click
 , Click Using an Existing List...
 - To choose the correct file,
Navigate to the folder containing the exercise files, Double-click Reviewed.xlsx, Click

The correct workbook is now ready to be merged with the document.
Because we are sending this letter only to the people whose proposals were accepted, we need to filter the source data. We can do that now.
- To open the Mail Merge Recipients dialog box, in the Start Mail Merge group,
Click

The Mail Merge Recipients dialog box opens:
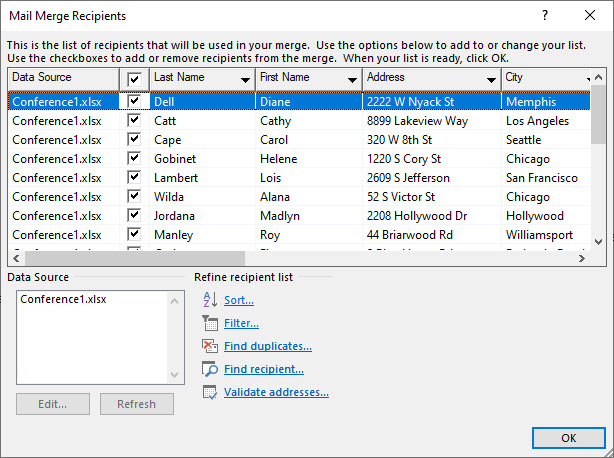
This dialog box shows all of the fields and entries in the Reviewed worksheet. Using this dialog box we can sort or filter the source data as well as find specific recipients or duplicate records. We will filter to see only the accepted proposals.
- To see the Accepted column, in the Mail Merge Recipients dialog box,
Scroll to the right
- To filter the Accepted column,
Click
 , Click Yes
The unaccepted proposals are removed and we see the remaining 15 accepted proposals.
- To accept the filter, in the Mail Merge Recipients dialog box,
Click

There is no visible change to the email document. However, when we begin adding merge fields, only the recipients with unaccepted proposals will be available to us.
Inserting merge fields
Now that the letter is connected to the source data, we can use the Address Block and Greeting Line tools to begin our letter.
- To select the correct location for the address,
Click at the left margin below the letterhead
- To move to the Mailings tab, on the ribbon,
Click the Mailings tab
- To open the Insert Address Block dialog box, in the Write & Insert Fields group,
Click

The Insert Address Block dialog box opens:
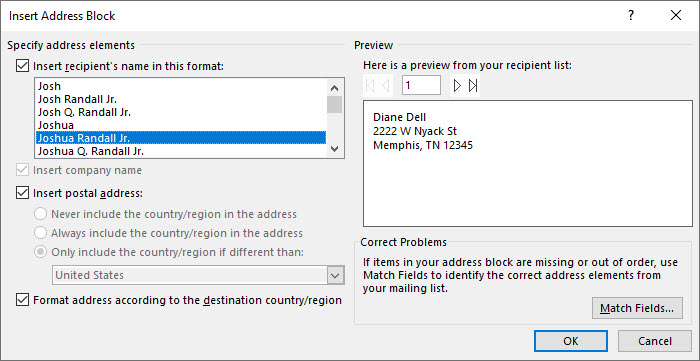
In this dialog box, we have the option to change the format of the recipients' names, insert a postal address, format the addresses based on the destination country, preview the addresses, and correct any problems.
We will accept the default formatting.
- To insert the address block, in the Insert Address Block dialog box,
Click

With the address block in place, let's move down a couple of lines and add the greeting line.
- To correctly place the cursor, if necessary, on the keyboard, press:
Enter key Enter key
- To open the Insert Greeting Line dialog box, in the Write and Insert Fields group,
Click

The Insert Greeting Line dialog box opens:
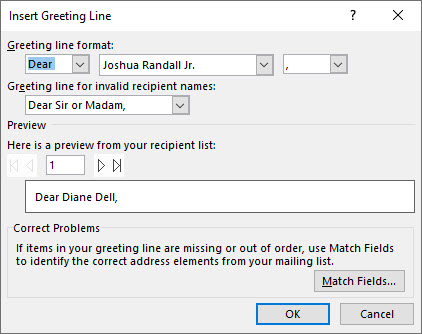
In this dialog box, we can modify the format of a greeting and see a preview of what the greeting line will look like. By default, Word starts the greeting with the word "Dear" followed by the recipient's first name, last name, and a comma.
The Greeting line for invalid recipient names drop-down shows us what would happen if one or more of our recipients' records did not have first or last names. Luckily, our database is thorough, so we won't need to worry about this.
Let's accept the default formatting and insert the greeting line.
- To insert the address block, in the Insert Address Block dialog box,
Click

With the inside address and greeting line in place, we are ready to add the content to our letter.
Using the If...Then...Else rule
We are ready to add the content to our letter. We want to send these letters to recipients confirming that their proposal was accepted. In the letter, we will include the name of a contact person. Which contact person is named will depend on the category of the specific proposal.
In this example, any person whose proposal falls in the Infrastructure category will contact Irma Taylor. All other recipients will contact Iseul Dae-Jung. Instead of creating the letters individually, we can accomplish this using mail merge and an If...Then...Else rule.
We will begin by typing the letter content and using mail merge fields to add the proposal names and categories.
- To move the cursor below the greeting line, if necessary, on the keyboard, pres:
Enter key Enter key
- To begin adding the letter content, type:
We have selected your proposal,
- To insert the merge field, Proposal, in the Write & Insert Fields group,
Click
 , Click Proposal
 - To add a comma and a space after the proposal name, type:
, Space bar
- To continue adding content, type:
for this year's conference. We think it would be a good fit for our
- To insert the merge field, Category, in the Write and Insert Fields group,
Click
 , Click Category
 - To add a space after the proposal name, on the keyboard, press:
Space bar
- To end the sentence, type:
series.
The letter should look like this:

We can now create the If...Then...Else rule to insert a contact person based on the category. If...Then...Else rules are commonly used in programming. The concept is binary: if one qualification is met, a certain value is returned or displayed. If the qualification is not met, another value is returned or displayed.
In our example, any recipient with a proposal in the Infrastructure category will be in contact with Irma Taylor. All other recipients should hear from Iseul Dae-Jung.
- To insert a blank line after the first paragraph, on the keyboard, press:
Enter key Enter key
- To open the Insert Word Field: IF dialog box, in the Write & Insert Fields group,
Click
 , Click If...Then...Else
The Insert Word Field: IF dialog box opens:
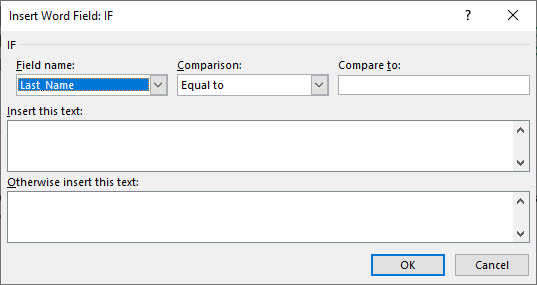
We can use this dialog box to build our If...Then...Else rule. We can enter the field that needs to be met (Category) as well as what type of comparison we want to make (Equal to). The following sections give us areas to add the text to be inserted if the category is met as well as text to be inserted if the category isn't met.
- To insert the correct field, in the Field name field,
Click
 , Click Category
 - To select the type of comparison, if necessary, in the Comparison field,
Click
 , Click Equal to
 - To enter the category to be compared, in the Compare to field, type:
Infrastructure
Now that the If statement has been created, we can add the text we want Word to use if the category is Infrastructure and the text to use if the category isn't Infrastruture.
- To add the text to be inserted, in the Insert this text field, type:
Irma Taylor is handling scheduling for that series and they will contact you soon regarding the details.
- To add the text to be inserted, in the Otherwise insert this text field, type:
Iseul Dea-Jung is handling the scheduling for that series and they will contact you soon regarding the details.
- To accept the If...Then...Else statement and close the dialog box,
Click

The result of the If...Then...Else statement appears in the letter. We will review the letters for accuracy in a few moments. For now, let's add a brief signature.
- To place the cursor, on the keyboard, press:
Enter key Enter key
- To add a signature, type:
Please let me know if you have any questions. Enter key Enter key Sincerely, Enter key Your Name
- To preview the letters, in the Preview Results group,
Click

The letter should look like this:
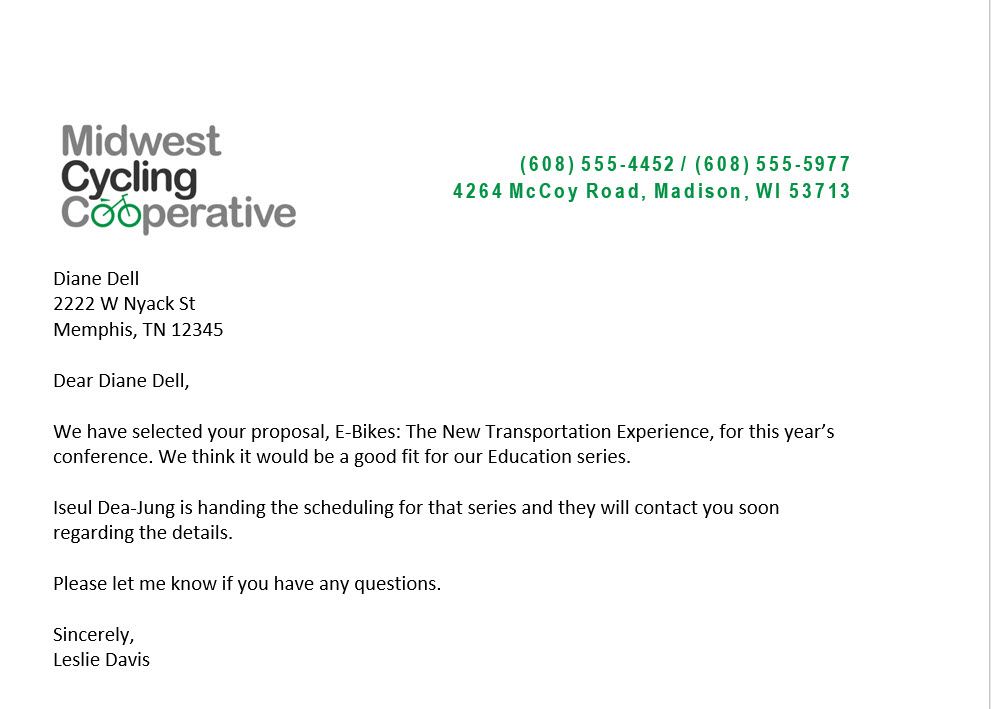
This is the first recipient, Diane Dell. We see their address as well as the greeting line. Their proposal was titled E-Bikes: The New Transportation Experience and is part of the Infrastructure series. Iseul Dae-Jung is their contact person.
- To preview the remaining letters, in the Preview Results group,
Click
 several times
- Make any necessary edits or adjustments.
Completing the mail merge
Now that we are sure our letters are correct, we can complete the mail merge. As always when finishing a mail merge, we have three choices: Edit individual documents, Print the documents, or email the documents. Let's edit the individual documents. This will create a new Word document that will contain a copy of each letter.
- To open the Merge to New Document dialog box, in the Finish group,
Click
 , Click Edit Individual Documents...
The Merge to New Document dialog box opens:
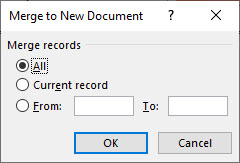
This dialog box gives us the options to merge all of the records, the current records, or other specific records.
- To merge all of the records, in the Merge to New Document dialog box,
Click

A new Microsoft Word document, LettersX, opens. A letter for each of the accepted recipients is in this document. At this point, we can save the document, print the letters, or edit the letters.
- To begin saving the document, on the keyboard, press:
Control key + s
- To name the document, in the File Name field, type:
accepted.docx
- To save the document,
Navigate to the correct folder, Click

- To close the document, on the keyboard, press:
Control key + w
- To save the changes to Accepted-MM.docx, on the keyboard, press:
Control key + s

