With the letters and emails sent to the participants of our conference, we can now start planning for the meeting. Our presenters and attendees are going to need name tags. While the term "mail merge" implies the creation of letters and envelopes, the mail merge process can be used to create many other types of documents including name tags.
Available Files
The following files are available for download:
Creating a blank label
To create the name tags, we will use the mail merge Labels option. By starting with a label, we will have several different size choices.
- To create a new document, in Microsoft Word,
Click the File menu, Click New Document
- To begin saving the document, in Microsoft Word,
Click File, Click Save As
- To choose a file location, in the Save as dialog box,
navigate to the downloaded folder
- To name the document, in the name field,
Press & Drag the current name, type: NameTags-MM Return key
The new document is now ready to be formatted as a label and merged with the data source.
All of the mail merge tools are located on the Mailings tab.
- To move to the Mailings tab, on the Ribbon,
Click the Mailings tab
- To begin mail merge for labels,
Click
 , Click Labels...
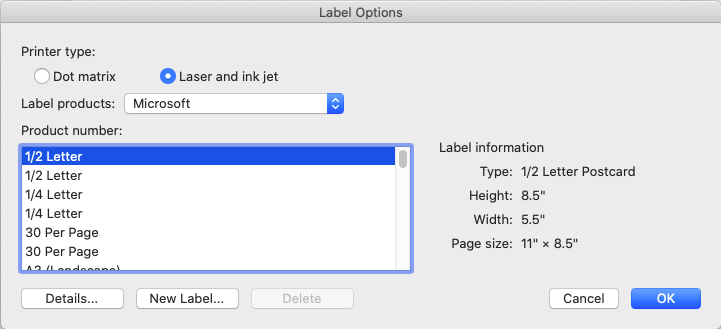
The Label Options dialog box opens:

In this dialog box, we can choose the type of printer we will be using, dot matrix or laser and ink jet, the label vendor, and the label number.
NOTE: Depending on the last label created, your Label Options dialog box may show different settings.
For the purpose of this exercise, we will use Avery US Letter 5140 Name Badge Labels.
- To choose the label vendor Avery US Letter, in the Label Options dialog box,
Click
 , Click Avery US Letter
 - To begin searching for 5140, on the keyboard, press:
5
- To choose the product number, in the Product number area,
Click 5140 Name Badge Labels
- To accept these choices and close the dialog box,
Click

The document changes and now resembles peel and stick name tags. It may not be obvious, but Microsoft Word uses a 1x2 table to create the layout for the labels.
NOTE: It is important to note that Microsoft Word uses a table to create the labels, which is not an accessible method of creating a document. Tables should be used to organize information, not lay out a document.
To see the labels, it may be necessary to resize the document.
- To move to the View tab, on the ribbon,
Click the View tab
- To resize the document,
Click

- To return to the Mailings tab, on the ribbon,
Click the Mailings tab
Selecting the source data
With the name tags document ready, it's time to choose the data source. We will create name tags for all of the presenters. Therefore we will use the Reviewed worksheet that contains the accepted proposals.
- To begin selecting the data source,
Click
 , Click Use an Existing List...
 Navigate to the downloaded folder.
- To choose the correct file,
Double-Click Attendees.xlsx
- To confirm that the spreadsheet is a trusted file,
Click

- To use the entire worksheet,
Click

The document changes slightly.

We now see <<Next Record>> in the second label. This is a command directing Word to put the next record, or name tag, in this label instead of starting a new page in the document.
Inserting merge fields
We will insert individual merge fields to create the name tags. We will also need to center the merge fields in the labels.
- To correctly place the cursor,
Click in the top label
- To insert the First_Name field,
Click
 , Click First_Name
 - To put a space between the first and last names, on the keyboard, press:
Spacebar
- To insert the Last_Name field,
Click
 , Click Last_Name
With the recipient's name inserted, we are ready to add the affiliation field to the name tag. We want to place this field below the person's name.
- To move down two lines, on the keyboard, press:
Return key Return key
- To insert the affiliation field,
Click
 , Click Affiliation
Formatting merge fields
Now that the necessary fields have been added to our name tag, we can spend some time formatting the text. We want to center the recipient's name and affiliation on the name tag. We also need to make the font larger.
- To move to the Table Design Layout tab, on the ribbon,
Click the Table Design Layout tab
- To center the merge fields,
Click

The name and affiliation fields are now centered in the name tag. Let's adjust the font size.
- To move to the Home tab, on the ribbon,
Click the Home tab
- To make the font larger,
Click
 , Click 18
 - To deselect the fields,
Click in a blank area of the document
The first name tag is complete. We now need to create tags for the remaining attendees.
Updating labels
When creating labels, not all of the labels are created automatically. We will need to prompt Word to create the remaining name tags.
- To return to the Mailings tab, on the ribbon,
Click the Mailings tab
- To update the labels,
Click

The merge fields now appear in the second label.
Completing the merge
Let's preview the results and check the spacing of the text. When any adjustments have been made, we can complete the merge.
- To preview the name tags,
Click

The labels now look like name tags.

- To preview additional name tags,
Click
 several times
 - Make any adjustments to the font or spacing.
- To turn off the Preview Results and return to the merge document,
Click

- To merge to individual documents,
Click
 , Click Edit Individual Documents...
A new Microsoft Word document named LabelsX opens. This document contains several pages with two name tags on each page. At this point, we could edit the individual name tags, print them, or save the document to return to at a later time.
- Review the individual envelopes and make any necessary adjustments.
- To begin saving the document, on the keyboard, press:
Command key + S
Navigate to the downloaded folder.
- To name the document, in the File Name field, type:
Conference_Name_Tags
- To save the document,
Click

- To close the document, on the keyboard, press:
Command key + W
- To save the changes to NameTags-MM.docx on the keyboard, press:
Command key + S
- To close the document, on the keyboard, press:
Command key + W
The name tags have been saved.
Revising a merged document
There may be a need to edit a document that has already been merged. Maybe the source data has changed. Maybe text has been added to a sign. Maybe a typo is discovered in a letter.
Changes are easy to make. But because the document is connected to the source data, there are a couple of extra steps.
Let's add another attendee to the Attendees.xlsx workbook. We will then open the mail merge document and re-merge the name tags.
Navigate to the downloaded folder.
- To open the Attendees.xlsx workbook,
Double-Click Attendees.xlsx
- To correctly place the cursor, in the workbook,
Click in cell A45
- To add a last name to the workbook, type:
Mancini
- To move to the next cell, on the keyboard, press
Tab key
- To add the remaining information to the new entry, type:
Monica Tab key IU Bike Group
- To save the source data, on the keyboard, press:
Command key + S
- To close the workbook, on the keyboard press:
Command key + W
With the source data updated, we can open the merge document, NameTags-MM.docx. The merge will rerun when the document is opened. Because the Word document will be connecting to the Excel workbook, we will need to confirm that the file is safe.
Navigate to the downloaded folder.
- To open the document,
Double-Click NameTags-MM.docx
- To confirm that the file is safe,
Click

- To use the entire workbook,
Click

The merged document opens. It may be necessary to return to the Mailings tab and preview the name tags.
- Return to the Mailings tab, if necessary.
- To preview the name tags,
Click

- To move to the new name tag, if necessary,
Click

The new name tag appears on a page alone.
We are ready to merge this new entry and create a document.
- To merge the new record,
Click
 , Click Edit Individual Documents...
A new document, LabelsX opens. We will have to name and save this document.
- To begin saving the document, on the keyboard, press:
Command key + S
Navigate to the downloaded folder.
- To name the document, in the File Name field, type:
Conference_Name_Tags2
- To save the document,
Click

- To close the document, on the keyboard, press:
Command key + W
- To save the changes to NameTags-MM.docx on the keyboard, press:
Command key + S
- To close NameTags-MM.docx, on the keyboard, press:
Command key + W

