The final things we need to create for our conference are signs telling attendees which presentation is taking place in a specific room at a specific time. Using a pre-designed document, we can insert merge fields to quickly create these signs.
Available Files
The following files are available for download:
Creating the document
To create the signs, we will begin with a Microsoft Word document that contains the standard text as well as placeholders for the merge fields.
- Navigate to the downloaded folder.
- To open the SessionSign document,
Double-Click SessionSign.docx
- To begin saving the document with a new name, in Microsoft Word,
Click File, Click Save As
- To select the current name, in the Name field,
Click the current name
- To rename the file, in the Name field, type:
SessionSign-MM Return key
Selecting and filtering the data source
We need to create a sign for each conference session. The proposals, along with the corresponding category, time, and room number, are in the Reviewed workbook. We will need to filter the worksheet to only show the accepted proposals.
There is no option in Mail Merge for Office for creating a sign. Therefore we will use the Letters option.
- To move to the Mailings tab, on the ribbon,
Click the Mailings tab
- To begin the mail merge for letters,
Click
 , Click Letters
- To begin selecting the data source,
Click
 , Click Use an Existing List...
 Navigate to the downloaded folder.
- To choose the correct file,
Double-Click Reviewed.xlsx
- To confirm that the file is safe,
Click

- To use the entire workbook,
Click

The Reviewed worksheet contains all of the proposals submitted to the conference. We only need to create signs for the proposals that were accepted and will be presented. This means we will need to filter the source data to only show the accepted proposals and presenters.
- To open the Query Options dialog box,
Click

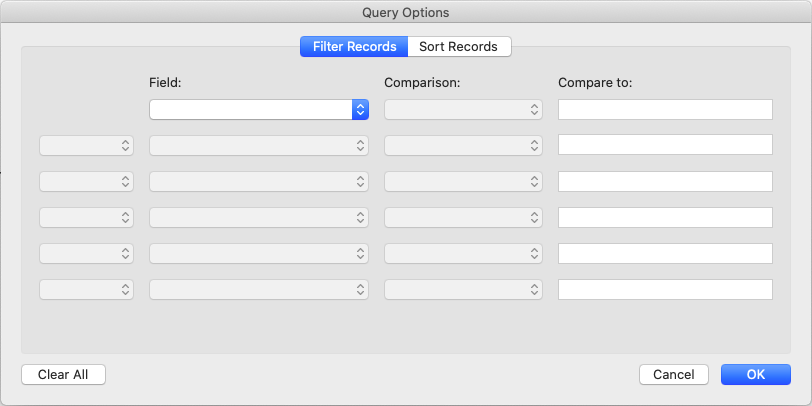
The Query Options dialog box opens:

This dialog box allows us to filter or sort our source data. We can choose which field to filter, the type of comparison, and the text we want to compare.
We are filtering to see the proposals that were accepted. Therefore we will filter the Accepted field to show only the Yes values.
- To filter the Accepted field, in the Query Options dialog box,
Click
 , Click Accepted
 - To compare the Accepted field to "Yes," in the Query Options dialog box,
Click
 , type: Yes
 - To complete the filter process, in the Query Options dialog box,
Click

There is no visible change to the document. However, when we begin adding merge fields, only the accepted proposals will be available to us.
Inserting merge fields
Now that the sign document has been connected to the filtered source data, we can begin replacing the placeholder text with merge fields.
The creator of the sign put the merge field placeholders in italics.
- To select the First Name placeholder,
Press & Drag the text First Name
- To replace the placeholder text with the First_Name merge field,
Click
 , Click First_Name
- To put a space between the first and last names, on the keyboard, press:
Spacebar
- To select the Last Name placeholder,
Press & Drag the text Last Name
- To replace the placeholder text with the Last_Name merge field,
Click
 , Click Last_Name
Now that the first and last name merge fields have been inserted, let's continue adding merge fields to the sign. We will add the proposal, category, time, and room.
- To select the Proposal placeholder,
Press & Drag the text Proposal
- To replace the placeholder text with the Proposal merge field,
Click
 , Click Proposal
 - To select the Category placeholder,
Press & Drag the text Category
- To replace the placeholder text with the Category merge field,
Click
 , Click Category
 - To select the Time placeholder,
Press & Drag the text Time
- To replace the placeholder text with the Time merge field,
Click
 , Click Time
 - To select the Rooms placeholder,
Press & Drag the text Rooms
- To replace the placeholder text with the Rooms merge field,
Click
 , Click Rooms
The sign should now look like this:

Previewing the merge results
Now that all of the merge fields have been inserted, let's preview the sign. This will give us an opportunity to make any spacing, punctuation, or other adjustments.
- To preview the merged signs,
Click

Using this preview, it may be easier to notice and fix any issues.
It is immediately obvious that the italic style used to designate the merge field placeholders has remained. The merged fields are still in italics on the sign. Let's remove this style from the text.
While we could select the individual merged fields, we'll select all of the text on the sign, apply, and then remove the italic style.
- To move to the Home tab, on the ribbon,
Click the Home tab
- To select all of the text, on the keyboard, press:
Command key + A
- To apply the italic style,
Click

- To remove the italic style,
Click

- Return to the Mailings tab.
- To preview the next sign,
Click

- To preview several more signs,
Click
 several times
- To turn off the Preview Results and return to the merge document,
Click

Now that we've made any necessary edits, we're ready to complete the merge.
Completing the merge
When finishing a mail merge, we have three choices: edit individual documents, print the documents, or email the documents. Let's choose to edit the individual documents. This will create a new Word document that will contain a copy of each sign. We can then print all or some of the signs or save the document for later.
- To open merge to individual documents,
Click
 , Click Edit Individual Documents...
A new Microsoft Word document, LetterX, opens. There is a page for each sign. At this point, we can save the document, print the signs, or edit the signs.
- To begin saving the document, on the keyboard, press:
Command key + S
Navigate to the downloaded folder.
- To name the document, in the File name field, type:
Signs
- To save the document,
Click

- To close the document, on the keyboard, press:
Command key + W
- To save the changes to SessionSign-MM.docx, on the keyboard, press:
Command key + S
- To close the document, on the keyboard, press:
Command key + W

