Now that the letters are complete, we need to create envelopes to use for mailing. We will use Microsoft Word's Address Block feature to quickly and easily create envelopes.
Available Files
The following files are available for download:
Creating a blank envelope
Before starting the mail merge, we will need to create a blank document and choose for this document to resemble an envelope. As with the previous exercise, we will want to name this document in such a way that it is obvious it is a mail merge document. An easy way to do this is to add "MM" at the end of the file name.
- To create a new document, in Microsoft Word,
Click the File tab, Click New, Click Blank document
- To begin saving the document, in Microsoft Word,
Click File, Click Save As
- To choose a file location, in the Save as dialog box,
Navigate to the MailMerge_Office folder
- To name the document, in the File name field,
Press & Drag to remove existing text, type: EnvelopesMM Enter key
The new document is almost ready for the envelope mail merge. Before we can begin inserting merge fields, we need to format the document to look like an envelope.
When working with Microsoft Word's mail merge features, all of the tools are on the Mailings tab.
- To move to the Mailings tab, on the Ribbon,
Click the Mailings tab
- To begin mail merge for envelopes, in the Start Mail Merge group,
Click
 , Click Envelopes...
The Envelope Options dialog box opens:
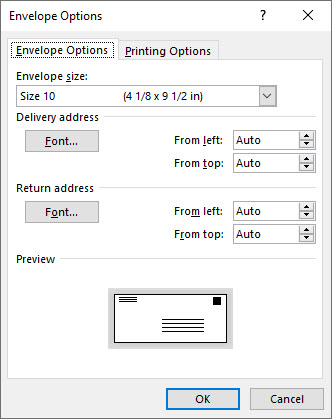
In this dialog box, we can choose the envelope size as well as the font and placement of both the delivery and return addresses. For today's exercise, we will accept the default envelope size, 10, and the default fonts and placements.
- To accept the defaults and create the envelope, in the Envelope Options dialog box,
Click

The document adjusts and now resembles an envelope.
Selecting the source data
With the document ready and the mail merge process started, it's time to choose our data source. The envelopes will be used to mail the letters to the people who submitted proposals to the bicycle advocacy conference. Therefore, we will use the same Excel worksheet, Applicants, as our data source.
- To begin selecting the data source, in the Start Mail Merge group,
Click
 , Click Use an Existing List...
 Navigate to the MailMerge_Office folder.
- To choose the correct file,
Double-Click Applicants.xlsx
There is no obvious change to the envelope document, but the source file is now ready to be merged with our envelopes.
Utilizing the address block feature
When working with standard addresses, it is sometimes easier to use the address block feature instead of inserting individual merge fields. The address block tool will insert a properly formatted address (including spacing, line breaks, and punctuation) with just a couple of clicks.
In order to properly place the recipient address and return address, we will need to see where the default paragraphs and text boxes are located. To do this, we will need to turn on the Show Formatting feature.
- To move to the Home tab, on the ribbon,
Click the Home tab
- To turn on the Show Formatting feature, in the Paragraph group,
Click

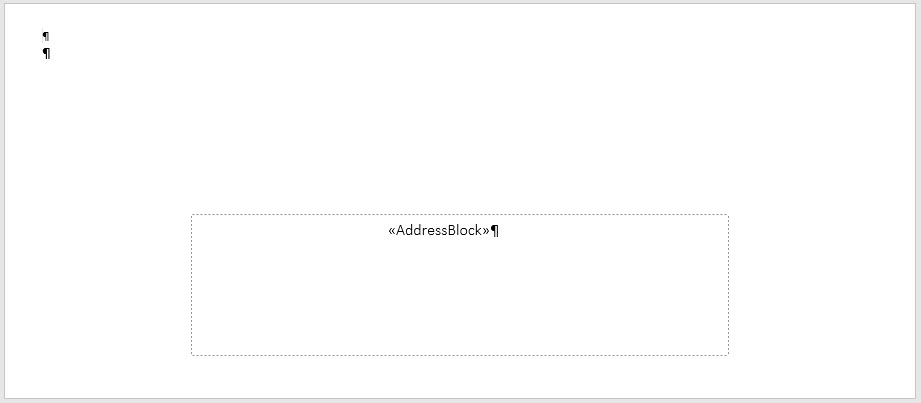
With the formatting marks visible, we can see that there is a paragraph almost in the center of the envelope. This is where we will place the recipient's address. In the upper left corner are the paragraph marks representing the return address.
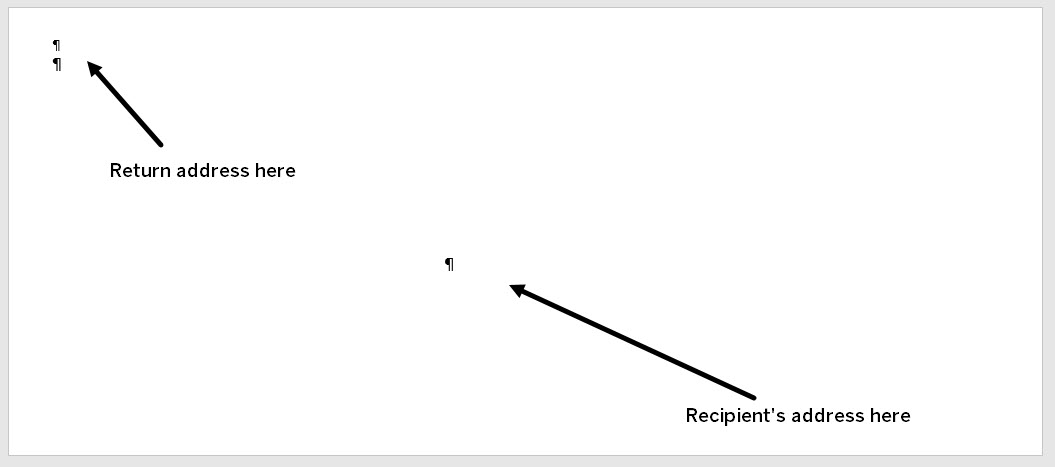
- To select the correct location for the address,
Click to the left of the paragraph mark in the center of the envelope
- To move to the Mailings tab, on the ribbon,
Click the Mailings tab
- To open the Insert Address Block dialog box, in the Write & Insert Fields group,
Click

The Insert Address Block dialog box opens:
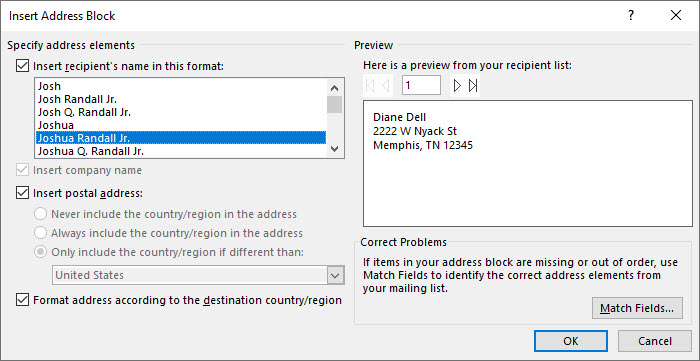
In this dialog box, we have the option to change the format of the recipients' names, insert a postal address, format the addresses based on the destination country, preview the addresses, and correct any problems.
We can see in the preview that the default address block does not include the recipient's affiliation. We can fix this.
Matching fields
Errors, such as missing fields or fields that do not correctly represent the data, can often be solved by manually matching field names to the data source. We will use the Match Fields tool to add the affiliation to our address block.
- To open the Match Fields dialog box, in the Insert Address Block dialog box,
Click

The Match Fields dialog box opens:
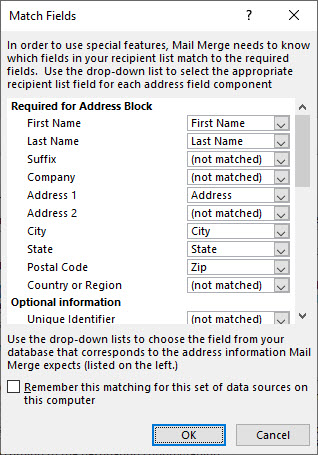
The fields required for the address block are on the left side of the dialog box. The fields in our data source that correspond to the required fields are on the right side of the dialog box. These fields are in drop-down menus. Using these drop-down lists, we can match a field in our data source to a field in the address block.
There is no field called Affiliation in the address block so the Affiliation field in our data source was not matched. There is, however, a Company field in the address block. We can match the Affiliation field to this.
- To match the Affiliation field, in the Match Fields dialog box, to the right of the Company field,
Click
 , Click Affiliation
 - To accept this change, at the bottom of the Match Fields dialog box,
Click

The preview in the Insert Address dialog box changes and now includes the recipient's affiliation on the second line.
- To insert the address block, in the Insert Address Block dialog box,
Click

The address block appears in the center of the envelope.
Inserting a graphic
Now that the recipient's address has been placed, we're ready to add the return address. This could be accomplished by typing the return address in the upper left corner of the envelope. However, we are going to insert a graphic of the conference logo and return address.
- To position the cursor for the return address,
Click in the upper left corner of the envelope
- To move to the Insert tab, on the ribbon,
Click the Insert tab
- To begin inserting the graphic, on the ribbon, in the Illustrations group,
Click
 , Click This Device...
 Navigate to the MailMerge_Office folder.
- To insert the graphic, in the Insert Picture dialog box,
Click ReturnAddress.png, Click

Previewing the envelopes
Let's preview the results. By previewing the envelopes, we can find and fix any errors before merging.
Return to the Mailings tab.
- To preview the merged envelopes, in the Preview Results group,
Click

The envelope now shows us the recipient's address and return address.
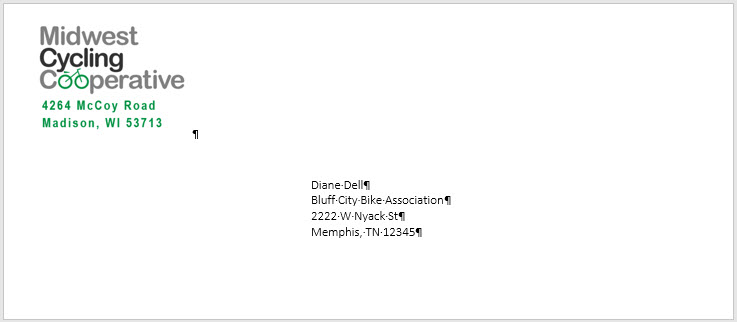
We can preview additional envelopes and make any needed edits or adjustments.
- To preview additional envelopes, in the Preview Results group,
Click
 several times
 - Make any adjustments to punctuation or spacing, if necessary.
- To turn off Preview Results and return to the merge document, in the Preview Results group,
Click

- To move to the Home tab, on the ribbon,
Click the Home tab
- To turn off the Show Formatting feature, in the Paragraph group,
Click

Completing the mail merge
Now that we have previewed and corrected our envelopes, we can complete the merge.
When completing a mail merge we have the option to edit individual documents, print the documents, or email the documents. If we choose to edit the individual documents, a new Word document will be created with an envelope for each participant. Let's do that now.
Return to the Mailings tab.
- To open the Merge to New Document dialog box, in the Finish group,
Click
 , Click Edit Individual Documents...
- To choose all of the records, in the Merge to New Document dialog box, if necessary,
Click the All radio button
- To merge all of the records, in the Merge to New Document dialog box,
Click

A new Microsoft Word document named EnvelopesX opens. This document contains 20 envelopes, one for each recipient. At this point, we could edit the individual envelopes, print them, or simply save the document to return to at a later time.
- Review the individual envelopes and make any necessary adjustments.
- To begin saving the document, on the keyboard, press:
Control key + S
Navigate to the MailMerge_Office folder.
- To name the document, in the File Name field, type:
Acknowledgment envelopes
- To save the document,
Click

- To close the Acknowledgment envelopes document, on the keyboard, press:
Control key + W
- To save the EnvelopesMM document, on the keyboard, press:
Control key + S
- To close the EnvelopesMM document, on the keyboard, press:
Control key + W
The merged envelopes have been saved.

