Next we will edit the text in a bulleted list so that it is easier to read. On slide 8, we have a list of school clubs and organizations and the amount of money that each group earned in a recent fundraiser. While the names of the clubs are left aligned, the dollar figures are not aligned. This makes the bulleted list difficult to read. We will use tab stops to arrange this text into columns.
Before setting up a second column, we will move to slide 8 and then display the horizontal and vertical rulers.
Step 1. To move to slide 8, in the slide thumbnail list,
Click slide 8
Step 2. To move to the View tab, on the Ribbon,
Click the View tab
Step 3. To display the rulers, in the Show group,
Click ![]()
Step 4. To see the default indents and tab stops on slide 8,
Click anywhere in the bulleted text

Step 5. To select the bulleted text,
Point immediately after $425.00,
Press & Drag upwards to select the bulleted text
NOTE: By starting at the end of the text, rather than at the beginning, we are less likely to inadvertently move the bullets.
Step 6. To add a left tab stop, on the horizontal ruler,
Click 
Step 7. To remove the left tab marker,
Press & Drag the left tab marker straight down and off the ruler

Step 8. To begin setting a decimal tab stop,
Click ![]() three times
three times
NOTE for MacOS Users: The left tab looks like this: ![]() .
.
NOTE for MacOS Users: The decimal tab looks like this: ![]() .
.
Step 9. To align the second column of numbers according to the decimal point,
Click 
Step 10. Save the presentation Creating_a_Presentation.pptx.
Customizing Bullets
In addition to formatting text and setting tabs, we can customize bullets for individual bullet points or for all the bullet points in a placeholder. We can change a bullet's font, style, and color, and we can even replace a bullet with a picture or a number. We can also control the distance between a bullet and its text in the same manner that we control indents in Microsoft Word.
Let's format the bullets on the current slide with a different symbol.
Step 1. Verify that the bulleted text is still selected.
Step 2. To move to the Home tab, on the Ribbon,
Click the Home tab
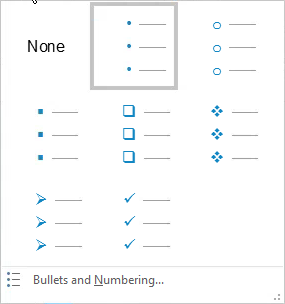
Step 3. To open the Bullets and Numbering dialog box, in the Paragraph group,
Click 

4. To select a bullet style,
Click any bullet style
NOTE: If we Click ![]() at the bottom of the dialog box, we will see many additional options. We can change the color of the bullets, or we can customize the bullets by choosing a picture or symbol.
at the bottom of the dialog box, we will see many additional options. We can change the color of the bullets, or we can customize the bullets by choosing a picture or symbol.
Step 5. To select the text,
Click anywhere in "Poetry Club"
Step 6. To toggle the bullet off, in the Paragraph group,
Click  , Click None
Step 7. To deselect the text and placeholder,
Click the outer edge of the slide
Step 8. Save the presentation Creating_a_Presentation.pptx.
Applying Quick Styles
It is possible to change the color and style of a text box, table, bulleted list, shape, or graphic. While themes change the overall colors, fonts, and effects that are used on all of the slides in the presentation, Quick Styles change how the different colors, fonts, and effects are combined on specific areas of a slide.
Let's add a Quick Style to the bulleted text on slide 9.
Step 1. To move to slide 9, on the slide thumbnail list,
Click slide 9
Step 2. Verify that the Home tab is selected.
Step 3. To select the bulleted text,
Click anywhere in the bulleted text
Step 4. To select a new color and style option for the placeholder, in the Drawing group,
Click ![]() , Click any style
, Click any style
Step 5. To undo our last action, on the Quick Access Toolbar,
Click ![]()
NOTE: When working in Windows, we can also press Control key + Z to undo an action.
NOTE for MacOS Users: When working on a Mac, we can press Command key+Z to undo an action.
Step 6. To deselect the placeholder,
Click on the edge of the slide

