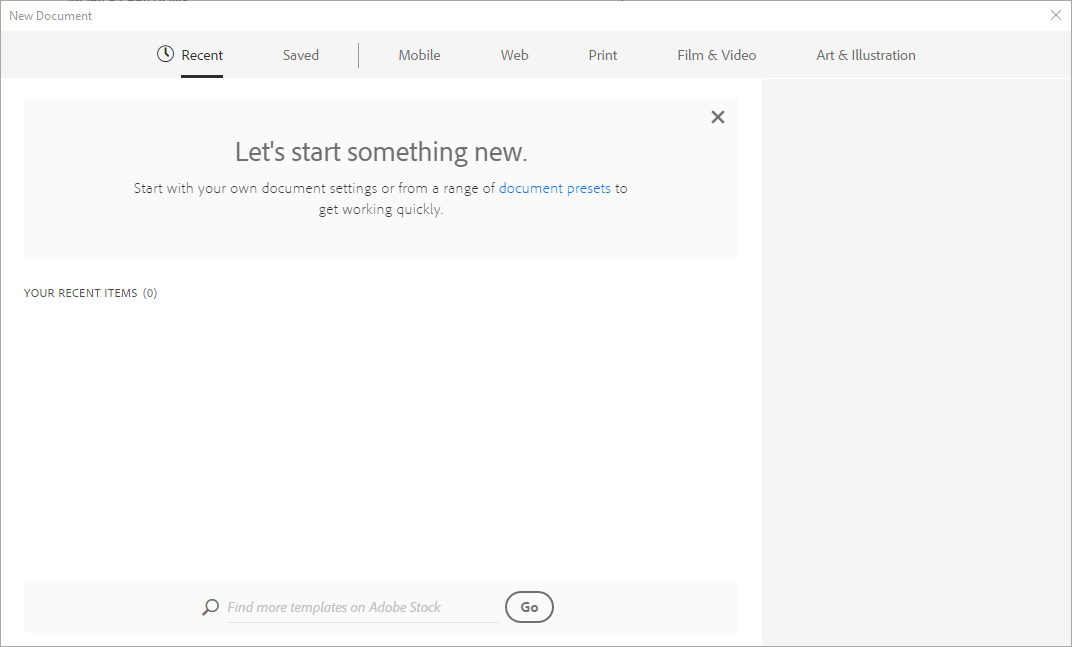
When using Illustrator to create web graphics, we'll need to create our images from scratch. Using the basic shape tools available to us, we can create graphics for a website using combinations of different shapes. We can also easily add color to graphics to help them stand out. For our first Illustrator graphic, we'll create a website logo composed of shapes and some text. Later, we'll create some icons to use in the website.
Creating a New Web Graphic in Illustrator
The first thing we'll need to do is set up a new document where we can create our shape. Let's open Illustrator and do that now.
Step1. Launch Illustrator CC.
Step2. To create a new file, in the Menu bar,
Click File, Click New...

Step3. To change to the Web profile, in the bar at the top of the New Document window,
Click Web
Step4. To specify the size of the document, in the Width field,
Press & Drag the current value, type: 250 Tab key 100
Step5. To finish creating our new document,
Click
NOTE: If you are working with a device that has touch options available, such as a touchscreen monitor, you may get a message about switching to the Touch interface, or may be switched into the Touch workspace - to switch back to the traditional Illustrator interface, simply switch back to the Essentials workspace using the workspace switcher at the top right corner of the screen.
Step7. To ensure our objects will align to the pixel grid, on the right side of the Control Panel, if necessary,
Click![]()
Setting Up Illustrator for Efficient Web Graphic Creation
There are a few more things we'll need to do in order to enhance our web graphics workflow. First, we'll turn on our rulers and grids, then we'll adjust the grid size so we can more easily visually measure the objects we add to the artboard. We'll also want to make sure we're working with the Essentials Classic workspace (or the Essentials workspace, if working with an older version of Illustrator), which will bring out many of the panels we'll need to use while creating web graphics.
Step1. To switch to the Essentials Classic interface, if necessary, in the upper right corner of the screen,
Click , Click Essentials Classic
NOTE: In Illustrator CC 2017 and older, ensure that the Essentials workspace is the active workspace, and skip ahead to step 4.
The interface changes slightly, and you'll see some additional panels appear in the Panel dock at the right of the screen. You'll also see the Control Panel appear across the top of the Illustrator interface. The panels we'll be using most frequently are currently collapsed, and displaying as icons — we'll expand that section of the Panel dock so we can see them all. We'll also collapse the section of the Panel dock that we won't be using.
Step2. To expand the panel dock in order to view all the available panels, at the top of the Panel dock,
Click 
Step3. To collapse the panels that won't be used, at the top of the Panel dock,
Click 
Now we're ready to turn on the rulers and grids.
Step4. To view the rulers, in the Menu bar,
Click View, Point Rulers, Click Show Rulers
Step3. To turn on the grid, in the Menu bar,
Click View, Click Show Grid
Step4. To change the grid measurements, in the Menu bar,
Click Edit, Point Preferences, Click Guides and Grid
NOTE for MacOS Users: To open the preferences, from the Menu bar, Click Illustrator, Click Preferences, Click Guides and Grid.
Step5. To change the location of the major grid lines, in the Gridline Every field,
Press & Drag the current value, type: 50
Step6. To change the number of subdivisions, in the Subdivisions field,
Press & Drag the current value, type 5 Enter
Step7. To save the file, on the keyboard, press:
Control key+S
NOTE for MacOS Users: The keyboard shortcut for saving a file is Command key+S.
Setting the Location and Filename
When the dialog box opens, it lists a default location for saving the file. On a PC, this location is displayed in the field near the top-left corner of the dialog box.
We want to move to the epclass folder, which is where we will save our file.
Step1. To move to the desktop,
Click
Step2. To open the epclass folder,
Double-Click![]()
Step3. To open the correct subfolder,
Double-Click the Bunny Trails Site folder
Step4. If the filename is not highlighted,
Press & Drag across the default filename
Step5. To name the file, in the file name field, type:
bunnytrails Enter
Step6. To accept the settings for our document, in the Illustrator Options dialog box,
Click

