Microsoft Word has many features that can be used to create professional-looking documents. Earlier, we changed the line spacing. Now we will adjust the margins and modify the indents.
The following files are available for download:
Adjusting the margins
Before we begin changing the text alignment, let's confirm that the ruler is visible. By default, the ruler is turned on, and you will see it on the left side of the screen and directly underneath the ribbon.
If the ruler is not visible, you can easily change this.
- To move to the View tab, on the ribbon,
Click the View tab
- To turn on the ruler, if necessary, on the View tab,
Click the Ruler checkbox
To adjust the margins, we can use the Margins tool or the Page Setup dialog box.
The Margins tool is on the Layout tab of the ribbon.
The Page Setup dialog box allows the adjustment of the margins, paper size, paper source, and layout of the document. Adjustments can be applied to specific parts of a document by highlighting sections of text before opening the Page Setup dialog box.
- To move to the Layout tab, on the ribbon,
Click the Layout tab
- To see the margin options, on the Layout tab,
Click

- To change the margins to .5 inches,
Click

The margins are both much closer to the edge of the document and the text spans more of the page. This isn't the look we want. Let's change the margins back to 1 inch. This time, let's use the Page Setup dialog box.
- To open the Page Setup dialog box, on the Layout tab,
Click
 , Click Custom Margins...
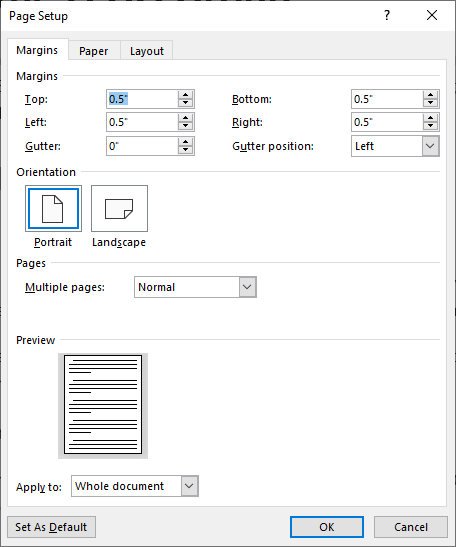
The Page Setup dialog box opens:

The Page Setup dialog box can be used to make changes to the margins, paper, and layout of the document. Currently, the Margins tab is active. On this tab, we can change the margins, orientation, multiple pages options, and see a preview of the page.
- To change the Top margin to 1.0",
Double-Click 0.5", type: 1
- To move to the Bottom margin, on the keyboard, press:
Tab key
- To change the Bottom margin to 1.0" and move to the Left margin, type:
1 Tab key
- To change the Left margin to 1.0" and move to the Right margin, type:
1 Tab key
- To change the Right margin to 1.0", type:
1
- To close the Page Setup dialog box,
Click

Adjusting Paragraph Indents
When working in Microsoft Word, we can use the tab key to indent the first line of a paragraph. However, using an indent will move the entire left side of a selected section of text to the right. Either a tab or an indent will alter the appearance of the ruler.
Let's use Microsoft Word’s Increase Indent button to indent the first paragraph. The Increase Indent button will indent the selected paragraph in .5 inch increments.
- To move to the first paragraph, if necessary,
scroll to the top of the document
- To place the cursor in the first paragraph,
Click in the first paragraph
- To move to the Home tab, on the ribbon
Click the Home tab
- To indent the first paragraph, on the Home tab,
Click
 three times
The paragraph is indented one and a half inches. The Left Indent marker on the ruler has moved as well.
![]()
NOTE: The Left Indent marker is the small square. The triangles represent Hanging Indent and First Line Indent.
Let's use the Left Indent marker to move the text back to the margin.
- To return the text to the margin, in the ruler,
Press & Drag the Left Indent marker to the margin
Adding a hanging indent
Another form of indent is the hanging indent, in which every line after the first line is indented. This type of indent is often used for bibliographic citations.
Let's add hanging indents to our project sources at the end of our document. We will need to move our cursor there before adding the indent.
- To move to the Sources section,
Scroll towards the end of the document
- To move the cursor to the first source,
Click in the first source
- To open the Paragraph dialog box,
Right-Click the text, Click Paragraph...
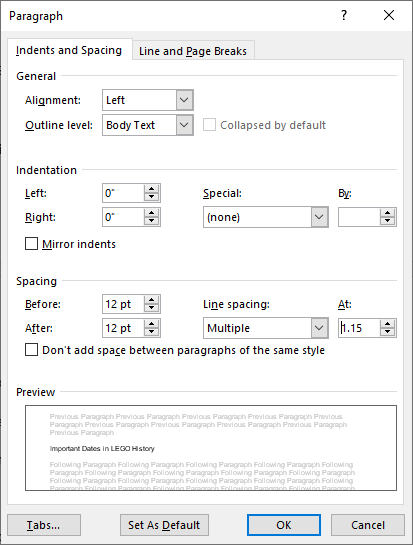
The Paragraph dialog box opens:

In the Indentation section, there are options to adjust the Left and Right indents as well as set a Special indent. The hanging indent is considered a Special indent.
- To set a hanging indent, in the Special drop-down menu,
Click
 , Click Hanging
By default, the indent is .5 inch. This is what we want.
- To accept the changes we've made,
Click

The first source is now correctly formatted. We could follow the above steps to format each source individually. Instead, let's select the remaining sources and apply the Hanging indent to them all at the same time. Let's use the keyboard shortcut.
- To select the remaining sources,
Press & Drag the remaining sources
- To apply the .5 inch Hanging indent, on the keyboard, press:
Control key + T
- To deselect the text,
Click in a blank area of the document
The sources are now indented correctly and may span two pages:

- To save the document, on the keyboard, press:
Control key + S

