There are several changes we can make to the formatting of the document text and layout. These changes can not only make the document more attractive, but also easier to read and understand.
The following files are available for download:
Opening a Microsoft Word document
Today we're going to be working with an existing document. This document gives a brief, yet incomplete, history of the LEGO Group.
Use the link and instructions in the upper right corner of this page to download and extract the exercise file.
- To open the file named History of the LEGO Group.docx,
Navigate to the folder containing the exercise files, Double-Click History of the LEGO Group.docx
The document opens. Because this file was downloaded from the internet, there is a security warning us about possible viruses. Because we know this file is safe, we will enable editing.
- To enable editing of the document, at the top of the document,
Click

The warning is gone and we are now ready to format the document.
Changing the font
Now that the document is open, take a moment to inspect it. We can see that this is a brief, incomplete history of the LEGO Group. There are several distinct sections to the document, including a Sources page. The first paragraph has more space between the lines than the other paragraphs. Additionally, the font, Times New Roman, is acceptable, but not very inviting. We can make some simple changes and improve the legibility and appearance of this document.
Let's begin by changing the font to something more appealing. To do this, we will first need to select all of the text in the document.
- To select all of the text in the document, on the keyboard, press:
Control key + A
- To change the font to Calibri, on the ribbon,
Click
 , Click Calibri
NOTE: Because multiple fonts are selected, the Font drop-down list is currently blank.
- To deselect the text,
Click in a blank area of the document
Adjusting the line spacing
Now that the font has been updated, let's adjust some of the line spacing. The first paragraph appears to be double-spaced. Let's change this to match the other content paragraphs.
Line spacing changes affect the current paragraph. It isn't necessary to select the paragraph. Simply place your cursor in the text of the paragraph you wish to change, then make the desired changes.
- To place the cursor in the correct paragraph,
Click in the first paragraph
- To change the line spacing, on the ribbon,
Click
 , Click 1.15
The line spacing adjusts. The first paragraph now matches the following text.
Adjusting the paragraph spacing
Included in the document are two lists: Important Dates in LEGO History and Ten Product Characteristics of LEGO Toys. Looking at these lists, they appear to be double-spaced. However, they are not. Because the author of this document pressed Enter key (or Return key on macOS) after each entry, each line is seen by Microsoft Word as being its own paragraph. Therefore, each line has the default paragraph spacing (12 points before and 12 points after) applied to it. This paragraph spacing can be adjusted to bring the list items closer together.
Because we are going to be working with several paragraphs at the same time, it will be more efficient to select all of the list text before making changes.
- To select the list items,
Press & Drag from "LEGO produces..." to "1978"
- To open the Paragraph dialog box, on the ribbon,
Click
 , Click Line Spacing Options...
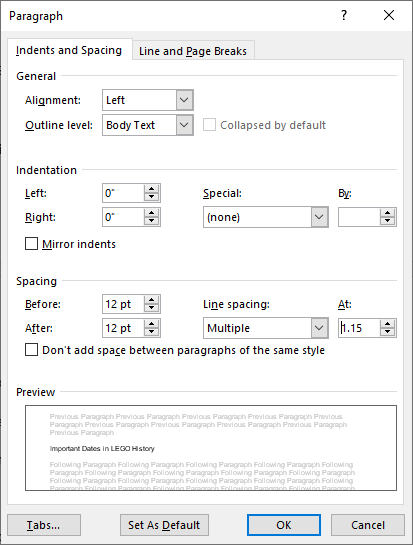
The Paragraph dialog box opens:

The Paragraph dialog box has many different options for indenting and spacing text. In the General section, alignment and outline levels can be assigned. In the Indentation section, default indents can be modified and special indents can be applied. In the Spacing section, the spacing before and after a paragraph can be adjusted.
We want to remove much of the space before and after each selected paragraph.
- To change the Before spacing, in the Before field of the Paragraph dialog box,
Double-click the current value, type: 1 Tab key
The cursor moves to the After value.
- To change the After spacing, type:
1 Enter key
- To deselect the text,
Click in a blank area of the document
The dialog box closes. The list now appears to be single spaced.
Those same steps can be used to modify the spacing of the Ten Product Characteristics of LEGO Toys list.
- To select the list items,
Press & Drag from "Unlimited..." to "detail"
- To open the Paragraph dialog box, on the ribbon,
Click
 , Click Line Spacing Options...
 - To change the Before spacing, in the Before field of the Paragraph dialog box,
Double-Click the current value, type: 1 Tab key
- To change the After spacing, type:
1 Enter key
- To deselect the text,
Click in a blank area of the document
Now that our font and spacing have been adjusted, let's see how to use Styles to format the section headings. Before we move on, let's save the file.
- To save the file, on the keyboard, press:
Control key + S

