

Now that we have confirmed that our <script> element is up and running properly, we can begin to use JavaScript to work with our HTML code.
But first let's understand the mechanics of our code a bit better.
Understanding Statements and Execution
In the Console window, we were able to send commands to the interpreter by typing the line and hitting enter. In an actual script, we write a series of commands, and the interpreter will then read them off sequentially. Each command that we send the interpreter is called a statement.
In the Console window, we ended a statement and began a new one by pressing Enter on the keyboard. In a JavaScript script, we tell the interpreter when a statement ends by using a semicolon (;) at the end of the statement. This way, we can technically put all of our code statements on one line, as long as we properly close each statement with semicolons. Even so, for the sake of code legibility, we will put each statement on a separate line.
When the interpreter runs a statement, it is called code execution. The JavaScript interpreter executes statements.
Understanding Built-in Methods and Functions
Earlier in the workshop, we learned about expressions, variable definition, and a few operators, such as the assignment operator, the addition/concatenation operator, and increment/decrement operators.
In addition to the variety of operators that exist within JavaScript, there are many powerful built-in functions designed to perform specific tasks. An example of a function is the log function we used in order to send a value to the Console.
When we use a function, we say that we are calling the function. To call a function, we type in the function name followed by a pair of parentheses.
In between the function's parentheses we type what are called arguments. An argument is an expression (a value) we give to the function in order for it to operate.
This is the basic syntax of a function:
functionName(argument1, argument2,...)
Exiting code block
In the case of the log function we used earlier, log is the name of the function and the string "testing" is the argument it needed in order for it to work. The log function then took that argument and put it in the Console feed.
In order to use the log function, we had to tell the interpreter where specifically to log the value. In this case, we used the log function on the console. We did so by typing console followed by a period and then the function we want to use on console. This period is referred to as the dot operator. A function that follows the dot operator is called a method. For the sake of today's workshop, you can just think of the terms "function" and "method" interchangeably.
We will be learning more about the dot operator in the coming sections of this workshop.
Introducing the Document Object Model
Each HTML document has a <body> element. The <body> element typically has a variety of child elements, and many of those children will likely have child elements of their own.
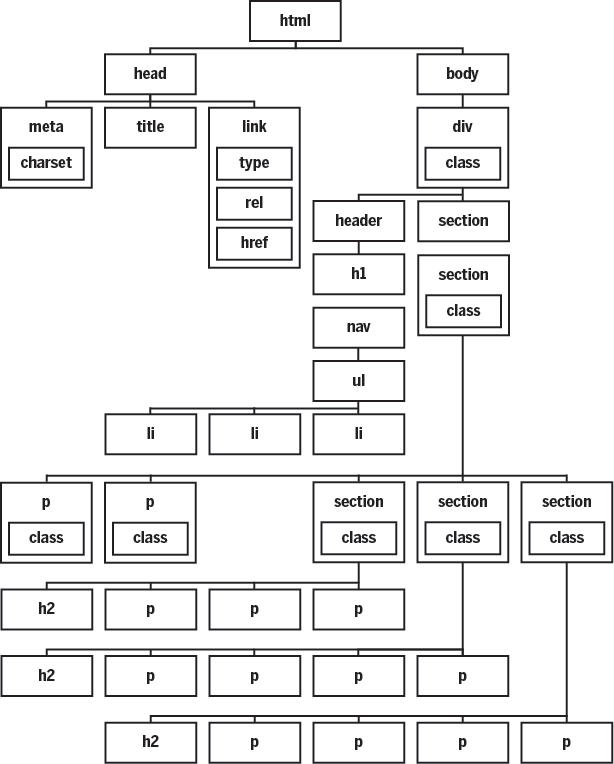
This hierarchical structure belongs to a concept called the Document Object Model (DOM) which is a universal way to organize the nodes of an HTML, XHTML, or XML document. The DOM for each HTML document can be represented by a tree structure, typically called the document tree or DOM tree.
Following is a representation of the document tree for programming_basics.html:
Understanding Nodes and Objects
The document tree is entirely made up of nodes, including but not limited to element nodes, attribute nodes, and text nodes. Don't worry, nodes aren't really anything new. Every time you've referred to a "paragraph element," you were actually technically referring to a <p> element node within the document tree. Node is just the official name for that kind of object.
Nodes are a type of object in JavaScript, but not all objects are nodes. For example, the console is an object within JavaScript, and we were able to access the console object in the <script> element when we used the console object's log method. However, the console is not a node.
A general rule of thumb is that anything in JavaScript that can use the dot operator is an object. For example, we used the dot operator on the console object in order to access its log method.
We will continue working with nodes and objects throughout the rest of the workshop.
Accessing an Element Node
JavaScript is designed to create, delete, and modify nodes within the document tree. To get started, we must first learn how to reference a node in the tree.
Assigning an Element ID
To be able to easily target a single specific element node, it can be helpful to give that element an id attribute, since that would uniquely identify that element.
Step 1. At the bottom of the document, find the final <p> element.
Step 2. To assign an id to the opening paragraph tag, add:
<p id="penguin">
Exiting code block
You may have also noticed that some of the languages in the example had a keyword like int or var while other languages did not use them.
Referencing an Element By Its ID in JavaScript
We have given the final paragraph an id attribute with the value of "penguin". We should now be able to easily reference just that paragraph inside our <script> element.
We can reference an element node by its id attribute value using the function getElementById. This function is called from the document object, which represents the entire HTML document.
We will use the getElementById method to store the "penguin" element node into a variable we will create called finalP.
Step 1. To assign our final paragraph node to a variable, in the <script> element, type:
<script>
var finalP = document.getElementById("penguin");
console.log("testing");
</script>
Exiting code block
Step 2. To report the value of our new variable in the Console, modify the console.log() command as shown:
var finalP = document.getElementById("penguin");
console.log(finalP);
Exiting code block
Step 3. Save programming_basics.html.
Step 4. Refresh the document in the web browser window.
NOTE: The way the element node is presented in the Console window after using the console.log() method will show up differently depending on the web browser. Don't worry, the way a node appears in the Console has no bearing on the way the JavaScript will be handled on the web page.
Understanding Properties
We learned how an object can have a function that belongs to it. We call this a method. We've already used the log method belonging to the console object, as well as the getElementById method belonging to the document object.
In addition to methods, an object may have variables that belong to it. A variable that belongs to an object is called a property. We can access properties that belong to an object by using the dot operator, the same way we can access methods that belong to an object.
We will be using many different object properties throughout this workshop.
Modifying an Element Node
Element nodes have many different properties. By modifying these properties, we can change how an element looks and operates.
We will begin by modifying the text and appearance of the penguin paragraph using properties built into element nodes.
Modifying Text with innerHTML
The innerHTML property of our element node allows us to modify the HTML text content of an element. We just have to assign it a different string value. For example, consider the following list:
<ol>
    <li>
        Puppies
    </li>
    <li>
        Kittens
    </li>
</ol>
Exiting code block
The innerHTML property of this <ol> would be:<li>
Puppies
</li>
<li>
Kittens
</li>
Exiting code block
One of the key capabilities of JavaScript is that it can modify nodes and their content in a document. Let's see this in action now.
Step 1. To modify the text content of finalP, type:
var finalP = document.getElementById("penguin");
finalP.innerHTML = "Computers are totally rad.";
Exiting code block
Step 2. Save the document and reload it in the browser window.
Modifying Style using the Style Property
We can add or modify the in-line CSS of an element node by using the style object, which is a property of element nodes. The style object has its own set of properties. Specifically, the style object has a property for each CSS property available in the CSS language.
Let's say we want to change the color of the paragraph node to red. We can do this by using the dot operator following finalP, to get the style property, and then another dot operator following the style property in order to get the color property. We will then assign the color property to a value of "red".
Step 1. To modify the style property for finalP, type:
var finalP = document.getElementById("penguin");
finalP.innerHTML = "Computers are totally rad.";
finalP.style.color = "red";
Exiting code block
Step 2. Save the document and reload it in the browser window.
Understanding Arrays
We learned how we can store a value in a variable. We can store multiple values in a single variable with the use of an array. The general term in programming to describe an object that stores multiple values is a collection.
We will use arrays to change multiple nodes, but we first must learn how they work.
Creating an Array
To initialize an array, you can type a series of values in between a pair of brackets
( [ ] ), each value separated by commas. Following is an example of initializing an array and storing it in a variable:
var myArray = [value1, value2, value3,...]
Exiting code block
Let's have a go at this in the Console window.
Step 1. Bring up the Console window.
Step 2. To create a new array in a variable, in the prompt, type:
var fruit = ['apple', 'orange', 'grape'], press: Enter
Step 3. To check the new variable, type:
fruit, press: Enter
Accessing the Array
We now have an array, but in order for it to be useful, we must know how to get a value from it.
Understanding Zero Based Numbering
In order to access a value from the array, we can type the name of the array followed by a pair of brackets surrounding the index of the array in which we are interested. The index refers to the position of the desired item in the array.
This syntax can be represented as myArray[index].
However, it is important to note that the order of numbers starts with 0, not 1. In other words, the first index of the array is 0. Therefore to store the first item of an array in a variable, we could type something like:
var firstItem = myArray[0]
Exiting code block
Let's test this out on the fruit array we just created.
Step 1. To see the contents of the first index of fruit, type:
fruit[0], press: Enter
Step 2. To see the contents of the next item of the array, type:
fruit[1], press: Enter
Getting the Length of the Array
It is useful to be able to find out how many items there are in an array. The length property of the array object keeps an up-to-date track of how many items there are in the array.
Step 1. To see the number of items in the fruit array, type:
fruit.length, press: Enter
Accessing Element Nodes by Element Name
Now that we have a basic grasp of arrays, we can make use of getting multiple nodes at once.
When we referenced an element node by its id using getElementById, we only got one node, which is understandable, because the id attribute uniquely identifies an element node.
However, there are many instances when we would want to reference multiple element nodes at once. Say, for example, we wanted to reference all of our <h2> elements without having to implement id or class attributes. We can do this with the getElementsByTagName function.
Like getElementById, the getElementsByTagName function is a method that belongs to the document object. However, the latter gives back an array of element nodes instead of just one.
Let's try this out back in our programming_basics.html file.
Step 1. Switch back to programming_basics.html in the code editor.
Step 2. To reference the <h2> elements on our page, type:
finalP.style.color = "red";
var allh2 = document.getElementsByTagName("h2");
Exiting code block
Step 3. To see the length of our allh2 array, change the console.log() statement as shown:
console.log(allh2.length);
Exiting code block
Step 4. Save the document and reload it in the web browser.
Step 5. In the code editor, to see the value of an item in the array, change the console.log() statements as shown:
console.log(allh2[1]);
Exiting code block
Step 6. Save the document and reload it in the web browser.
NOTE: If this did not work, try making sure that you spelled the function name correctly. In the getElementById function, "Element" is singular, but in the getElementsByTagName it is "Elements," plural.
Modifying an Element in the Array
Now that we have verified that we successfully stored an array of our heading element nodes in a variable, let's modify one.
For the sake of practice, let's change the color of the first <h2> to gray. We can do this by accessing the first item in our allh2 array and changing its color just as we changed the finalP paragraph node's color.
Step 1. To change the color of one of the items of the allh2 array, type:
finalP.style.color = "red";
var allh2 = document.getElementsByTagName("h2");
allh2[0].style.color = "gray";
Exiting code block
Step 2. Save the document and reload it in the web browser.
Using Comments
So far, all of the code in our <script> element will be executed by the JavaScript interpreter. However, it is often the case that we want to choose areas of our code that we want the interpreter to ignore.
We can do this with a comment. A comment is a line or series of lines of our script that will be ignored by the web browser.
In our case, let's say we are done with all the code we have already written inside the <script> element, as we are finished with practicing and we are ready to start our actual project.
We could delete the code, but it would be nice to keep it here so that we can use it as reference. We can make comments to keep it visible in the code, but at the same time prevent the interpreter from executing it. This technique is colloquially referred to as commenting out code.
There are two types of comments: the block comment and the line comment.
Adding a Block Comment
A block comment allows the programmer to put multiple lines in a comment, and is started by typing a forward slash followed by an asterisk (/*), and finished by typing an asterisk followed by a forward slash (*/).
We can think of the block comment syntax similar to the use of tags in HTML, where between the opening and closing block comment labels, everything will be ignored by the interpreter.
Let's comment out all of the statements in the <script> element except for the log statement.
Step 1. To comment out most of our code, type the block comment:
/* this was practice code
var finalP = document.getElementById("penguin");
finalP.innerHTML = "Computers are totally rad.";
finalP.style.color = "red";
var allh2 = document.getElementsByTagName("h2");
allh2[0].style.color = "gray";
*/
console.log(allh2[1]);
Exiting code block
NOTE: Many code editors have a feature to collapse blocks of code such as a block comment. You can usually find this feature as click-able entities along the left side of the code window.
Adding a Line Comment
A line comment provides another syntax for creating comments in JavaScript, and is particularly useful when you only need the JavaScript interpreter to ignore a single line of code.
To create one, you simply type a pair of forward slashes (//) and all the rest of the code on that line will be ignored.
Let's try this by commenting out our log statement. Using a line comment on this statement is useful because we can easily uncomment it in case we want to quickly send something to the Console again. If we included that statement in the block comment, then it would require slightly more work to uncomment it.
Step 1. To comment out the console.log() statement, change the code as shown:
//console.log(allh2[1]);
Exiting code block
NOTE: Any code that appears on the same line but to the left of the two forward slashes will not be included in the comment.