We want our students to know that the goal in creating a presentation is to be able to effectively deliver it to a specific audience. Besides the creation of slides, the success of a presentation depends on how well you prepare. It's a good idea to rehearse a presentation under actual conditions, if possible, and you should try to anticipate any technical problems that may occur.
Next we will show our students how to prepare a presentation for final delivery.
Adding Slide Timings Manually
We can advance through a slide show in one of two ways:
- Manual advance - Controlled by clicking the mouse button, pressing keys, or clicking commands. This is commonly used when presenting in front of an audience. This method gives the speaker more control over how long he or she wishes to speak, take questions from the audience, or explain the contents of a slide.
- Automatic advance - Moves through the slide show automatically, keeping each slide on the screen for a specified length of time. This method is often used when the presentation is going to be running in the background, at a kiosk, or online.
If we are planning on our slide show automatically advancing, we need to pay attention to the slide timing, or the length of time a slide appears on the screen. We can apply a timing to a single slide, to a group of slides, or to an entire presentation. If we are unsure how much time to allow for the slide timings of a presentation, we can rehearse the slide show while PowerPoint automatically tracks and sets the timings.
First let's set the slide timings manually.
Step 1. To select a slide, in the slide thumbnail list,
Click slide 6
Step 2. To move to the Transitions tab, on the Ribbon,
Click the Transitions tab
Step 3. To begin to set the timing for the selected slide, in the Timing group,
Click the "After" checkbox
Step 4. To increase the timing to five seconds, in the timing box,
Click ![]() five times
five times
NOTE: If both of the "Advance slide" settings are checked, the presenter can still manually advance the slides before the timings have elapsed by using the mouse.
Step 5. To view the slide show from the current slide, on the far-right side of the status bar,
Click ![]()
Step 6. To return to Normal view, press:
Esc key
Rehearsing a Presentation
PowerPoint offers a rehearsal feature that uses a timer. We can move through a presentation and practice our speech while PowerPoint records the time we spend on each slide.
Let's rehearse the presentation.
Step 1. To move to the Slide Show tab, on the Ribbon,
Click the Slide Show tab
Step 2. To access the Rehearsal options, in the Set Up group, on the Ribbon,
Click 

NOTE for MacOS Users: Rehearsal mode looks very different in PowerPoint 2016 for Mac. Use the arrows under the Current Slide to navigate through the presentation.
Step 3. To activate the first animation,
Click ![]()
NOTE: We can also advance through the slide show by clicking anywhere on the slide.
Step 4. To activate the next animation, on the Rehearsal toolbar,
Click ![]()
Step 5. To move to the next slide, on the Rehearsal toolbar,
Click ![]()
Step 6. To move through the rest of the presentation, on the Rehearsal toolbar, press:
until you get to the end of the slide show
Step 7. To record the new timings, in the dialog box,
Click ![]()
Step 8. To switch to Slide Sorter view, on the status bar,
Click ![]()
Step 9. To switch to the Transitions tab, on the Ribbon,
Click the Transitions tab
Step 10. To deselect the automatic timings, in the Timing group, on the Ribbon,
Click the "After" checkbox
Step 11. To apply this setting to all slides, in the Timing group, on the Ribbon,
Click ![]()
Creating Speaker Notes and Handouts
We can create, print, and save several views of our presentation. We can print full slides, presenter handouts, and audience handouts. We can also save these as Word documents or PDF files if we would prefer to provide our audience with electronic versions.
NOTE for MacOS Users: Skip forward to the heading, "Printing Speaker Notes On MacOS".
Printing Speaker Notes On Windows
Speaker Notes, or notes pages, include an image of a slide and the notes associated with that slide. These can be helpful for a speaker who may be more comfortable with paper notes.
Let's see how to print presenter handouts.
Step 1. To move to slide 1,
Click slide 1
Step 2. To view the Backstage area,
Click the File tab
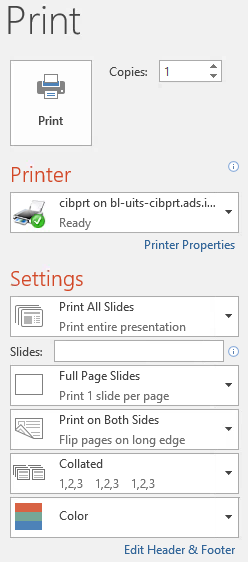
Step 3. To access the Print options,
Click Print

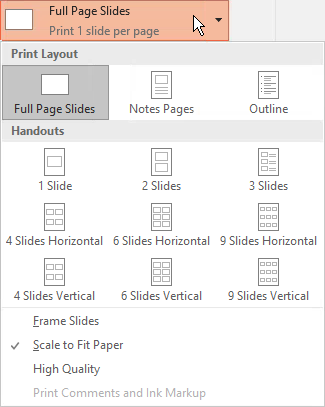
Step 4. To explore print options,
Click 

Step 5. To see the speaker handouts, on the drop-down menu,
Click 
Step 6. To move to slide 2, at the bottom of the print preview area,
Click  until slide 2 is visible
Printing Speaker Notes On MacOS
Let's see how to print speaker notes when working with PowerPoint 2016 for Mac.
Step 1. To see the print options, on the Menu bar,
Click the File menu, Click Print...
Step 2. To see other options, if necessary,
Click ![]()
Step 3. To change the Layout option,
Click Notes
Step 4. To move to slide 2, at the bottom of the print preview area,
Click ![]()
NOTE for MacOS Users: Skip forward to the heading, "Saving Audience Handouts as a PDF On MacOS".
Saving Audience Handouts as a PDF On Windows
We may want to provide our audience with handouts of our presentation. Audience handouts can include any number of slides per page and space for notetaking.
While we could print these handouts, it is often a better choice to provide our audience with an electronic version. PowerPoint gives us easy ways to save our presentation as either a Word document or PDF document. We will create a PDF today.
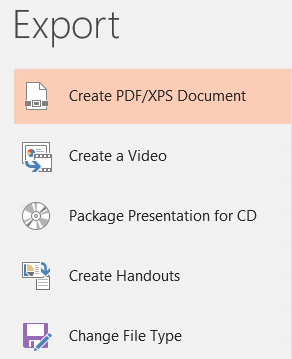
The PDF options are part of the Export tools in the Backstage area.
Step 1. Confirm that we are still in the Backstage area.
Step 2. To see the export options,
Click Export

NOTE: Depending on the configuration of an individual computer, there may be a "Create Adobe PDF" button.
Step 3. To begin creating a PDF, if necessary,
Click 
Step 4. To create the PDF,
Click 
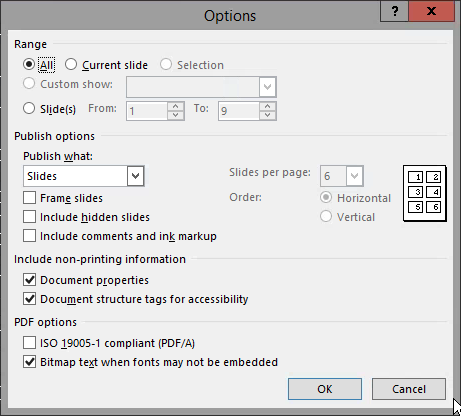
Step 5. To begin publishing handouts,
Click ![]()

Step 6. To choose handouts, on the Publish what list,
Click ![]() , Click Handouts
, Click Handouts
Step 7. To select the number of slides per page,
Click ![]() , Click 3
, Click 3
Step 8. To accept these changes,
Click ![]()
Step 9. To have the PDF open automatically, if necessary,
Click the "Open file after publishing" checkbox
Step 10. To publish the PDF,
Click ![]()
Step 11. To close the PDF and return to PowerPoint,
Click ![]()
Saving Audience Handouts as a PDF On MacOS
The steps for saving audience handouts as a PDF are very different when using PowerPoint 2016 for Mac.
The Print dialog box is still open. To begin saving handouts as a PDF, we will need to change the layout of our document and then save.
Step 1. To change the layout of our print document,
Click ![]() ,
,
Click Handouts (3 slides per page)
Step 2. To begin saving the handouts as a PDF, in the Print dialog box,
Click ![]() , Click Save as PDF...
, Click Save as PDF...
Step 3. To name the PDF, in the Save As field, type:
Creating_a_Presentation_Handouts
Step 4. Navigate to the PPT_Basics folder, if necessary.
Step 5. To save the handouts as a PDF,
Click ![]()
Step 6. To view the PDF document, on the desktop,
Double-Click  , Double-Click PPT_Basics, Double-Click Creating_a_Presentation_Handouts

