As with previous versions of the application, PowerPoint provides a feature called Package for CD, which allows for delivery to another computer that may not have PowerPoint installed. This feature gathers all the presentation components, including linked files, and then PowerPoint compresses and saves them in a specified location.
While the feature is called "Package for CD," this is somewhat misleading, because it is not necessary to save the compressed folder on a CD. Depending on what you will be doing with the slide show, you can save it to an internal or external hard drive, to any type of storage media, or to a network drive.
Let's package our presentation now.
NOTE: For a walkthrough of packaging a presentation on Windows, view this video.
NOTE for MacOS Users: The Package for CD option does not exist in PowerPoint 2016 for Mac. You will have to take care to save all images, videos, and external content in a folder with the PowerPoint presentation. The folder will need to be saved and/or moved as a single object.
Step 1. To move to the File tab,
Click the File tab
Step 2. To begin exporting the presentation, in the left column,
Click Export
Step 3. To begin packaging the presentation, in the middle panel, in the Export section,
Click ![]()
Step 4. To continue, in the third panel,
Click 
Step 5. To change the name, in the Name the CD field,
Press & Drag the text, type: How to - PPT
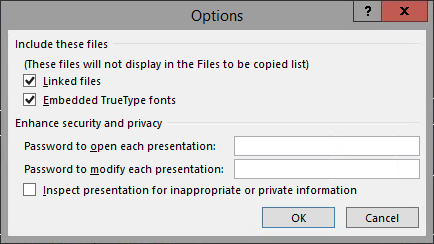
Step 6. To access additional options, in the Package for CD dialog box,
Click ![]()

NOTE: It is important to select the "Embedded TrueType fonts" checkbox if you are using fonts that are not typically installed by Windows. Then when you open the presentation on a computer that does not have these TrueType fonts installed, the presentation looks the same as it did on your computer. However, these embedded fonts can increase the file size dramatically.
Step 7. To continue, at the bottom of the Options dialog box,
Click ![]()
Step 8. To begin the process of packaging the presentation, at the bottom of the Package for CD dialog box,
Click ![]()
Step 9. Verify that the "Open folder when complete" checkbox is checked.
Step 10. To begin to move to the correct location,
Click ![]()
Step 11. To move to the desktop, under Favorites,
Click ![]()
Step 12. To find and open the correct subfolder, in the large pane on the right side of the dialog box,
Double-Click ![]() , Double-Click PPT_Basics
, Double-Click PPT_Basics
Step 13. To accept the new location, at the bottom of the dialog box,
Click ![]() , Click
, Click ![]()
Step 14. To include linked files in our package, at the bottom of the dialog box,
Click ![]()
NOTE: In previous versions of PowerPoint, if you packaged a presentation, the PowerPoint Viewer was included in the folder. This meant that you could then open the presentation on any computer, even if PowerPoint was not installed on the system. The 2016 version only contains a link to a web site where you can download the PowerPoint Viewer. This may be a problem if you attempt to share the presentation on a computer that does not have an Internet connection (and does not have PowerPoint installed), or if you do not have permissions to download and install PowerPoint Viewer on the machine.
Exiting PowerPoint
We've finished today's workshop, so let's close PowerPoint.
Step 1. Close all open windows.
Step 2. Save the presentation Creating_a_Presentation.pptx.
Step 3. Exit PowerPoint.
NOTE: To find more training and information about PowerPoint, visit the IT Training website.

