When working with long documents or reports, it may be necessary to provide a table of contents. As content is added, removed, or rearranged, the associated page numbers will change. If you are manually creating the table of contents, this can be frustrating. Fortunately, Microsoft Word gives us an easy way to automatically create, and update, a table of contents.
The following files are available for download:
Inserting the table of contents
Earlier in these materials, styles were used to create the section headings of this document (See: Working with styles). Using styles not only provides structure and consistency to the document but also gives us a simple way to create a table of contents. Let's see how this works.
- To move to the beginning of the document, on the keyboard, press:
Control key + Home key
NOTE: In Microsoft Word for macOS, press: Function key + Command key + Left Arrow key
- To insert the table of contents, on the References tab, in the Table of Contents group,
Click
 , Click Automatic Table 1
- To insert the table of contents, on the References tab,
Click
 , Click Classic
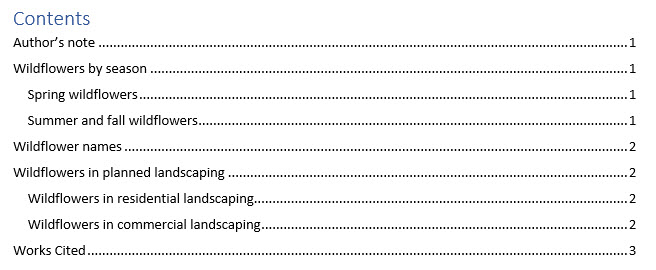
The table of contents is inserted at the top of the document.
The following image shows how the table of contents appears:

Updating the table of contents
When the table of contents is created by using styles, it can be updated when content is added, removed, or rearranged. In addition, the section names are links and can be used to navigate through the document.
Let's move to the Works Cited section, make a change, and update the table of contents.
- To move to the Works Cited section,
Press & hold Control key + Click the heading "Works Cited"
- To select the heading "Works Cited,"
Press & drag the heading
- To change the heading, type:
Bibliography
- To return to the top of the document and the table of contents, press:
Control key + Home key
NOTE: In Microsoft Word for macOS, press: Function key + Command key + Left Arrow key
- To select the table of contents,
Click the table of contents
- To update the table of contents,
In Microsoft Word for Windows, Click

In Microsoft Word for macOS, Click Click Update Table....
 - To update the entire table, if necessary,
Click the Update entire table radio button, Click

- Deselect the table of contents.
The table of contents now shows the revised heading, Bibliography.
Modifying the table of contents title
When working in Microsoft Word, the table of contents contains a title, Contents. The formatting of this title doesn't match the rest of our headings. Let's investigate what style is applied to this title and modify it to match our other headings.
- To select the title of the table of contents,
Click in the title
- To open the Style pane, on the Home tab,
In Microsoft Word for Windows, Click

In Microsoft Word for macOS, Click
The Styles pane opens and we can see that the TOC Heading style is applied. Let's modify this style to match our other headings. We'll change the font color and apply the italics style.
- To open the Modify Style dialog box, in the Styles pane,
Right-click TOC Heading, Click Modify...
The Modify Style dialog box will open.
- To change the font color, in the Modify Style dialog box,
Click
 , Click Dark Red
 - To italicize the font,
Click

- To accept these changes,
Click

- To close the Styles pane,
Click

- To save the document, on the keyboard, press:
Control key + S
The title of the table of contents now matches our other headings.

